95 Sea Ray 230 Sundancer stringer repair

gmach

Seaman Apprentice
Thread starter
Joined
Nov 15, 2025
Messages
34
It's about a 2 1/2" rise towards the transom.
 

gmach

Seaman Apprentice
Thread starter
Joined
Nov 15, 2025
Messages
34
It's not too late to make this project an outboard conversion. :unsure: :LOL:
I thought about that too but, I bought a big ol swim platform to hang off the back though thats been sitting in the shipping crate this whole time. Plus this boat has a bad tendency to wander at low speed; do you think putting an outboard further out might make it worse?
 

gmach

Seaman Apprentice
Thread starter
Joined
Nov 15, 2025
Messages
34
Well it's been consistently in the 90's temperature wise here in California and so I have to work early in the morning or late in the evening...... until now.
 

Attachments

  • 20260718_204706.jpg
    20260718_204706.jpg
    1.4 MB · Views: 8

gmach

Seaman Apprentice
Thread starter
Joined
Nov 15, 2025
Messages
34
Since the cabin is now air conditioned, I figured I would takle the rotten balsa core in the fore deck while enjoying the cool a/c.
 

Attachments

  • 20260716_003952.jpg
    20260716_003952.jpg
    2.7 MB · Views: 12
  • 20260717_224542.jpg
    20260717_224542.jpg
    1.9 MB · Views: 12
  • 20260718_201854.jpg
    20260718_201854.jpg
    2.7 MB · Views: 12

gmach

Seaman Apprentice
Thread starter
Joined
Nov 15, 2025
Messages
34
I finally got around to glassing the transom. I really misjudged the radius I made for the steps on the transom. I figured a quater 1/4 inch round over would have worked but the 1708 did not agree and I spent a way to much time trying to get it stuck down and then watch it pop back up 15 minutes later. So instead of fighting it I just let it cure.
 

Attachments

  • 20260801_003418.jpg
    20260801_003418.jpg
    2.6 MB · Views: 8

gmach

Seaman Apprentice
Thread starter
Joined
Nov 15, 2025
Messages
34
I ended up grinding out the delaminated corners and this time applying a generous fillet and laying down some new glass. The transom is 4 layers of 1708 and 5 layers of tabbing for a finished thickness of 2-1/4 inches and when I bang on the transom it has that beautiful solid high pitch ring!🙂
 

Attachments

  • 20260817_141115.jpg
    20260817_141115.jpg
    2.1 MB · Views: 9

gmach

Seaman Apprentice
Thread starter
Joined
Nov 15, 2025
Messages
34
Here I am fitting the stringers in place. The Coosa is really easy to work with maybe even easier than wood. Because it is a dense type of foam, it can be sanded and cut very fast. One big drawback I found with it though is the dust it generates. I find that it irritates the skin way worse than normal fiberglass and it can work its way through thin clothing like a t shirt easily. I'm assuming this is due to the fact that it's less dense than normal fiberglass and the dust it creates is more coarse (bigger glass slivers).
 

Attachments

  • 20260818_215720.jpg
    20260818_215720.jpg
    3 MB · Views: 14

tpenfield

Moderator
Staff member
Joined
Jul 18, 2011
Messages
19,641
Looks good. Keep in mind that Coosa is not as strong as plywood, so you will want to double up on the glassing of those stringers.
 

tpenfield

Moderator
Staff member
Joined
Jul 18, 2011
Messages
19,641
BTW - 1708 cloth yields about 0.045” thickness. So, the 4 layers on the transom are getting you 0.190” thickness (y)
 

gmach

Seaman Apprentice
Thread starter
Joined
Nov 15, 2025
Messages
34
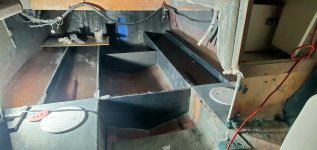
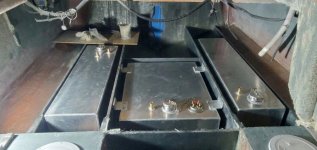
Got my stringers glassed in with 3 layers of 1708. The glass tabbing for the stringers runs about 10 inches onto the hull just as wide as the stringers are tall. I have been using vinyl ester to laminate glass and epoxy to bond the structure to the boat. Right now i'm installing the bulkheads and trying to figure out how i am going to plumb these fuel tanks. When the boat is sitting level relatively. The hull bottom slopes down 2 1/2 inches from the stern toward the bow and the side tanks sit higher in the vee of the hull bottom. I figure the best place to make the tank connections are at the front of the tank because that would where the fuel would naturally collect. I would run about 1 inch piping from the front of the side tanks through the stringers and back into the front of the main tank. I will also install shut off valves for both sitde tanks in the areas where the round inspection hatches are installed. That is the plan; am I missing anything? Let me know what you guys think. I also included an AI generated image to give you an idea of the tank layout.
 

Attachments

  • 20261109_070229.jpg
    20261109_070229.jpg
    2.2 MB · Views: 1
  • image_84f4d897.jpg
    image_84f4d897.jpg
    660.1 KB · Views: 1
Top