Alpha 1 gen 2 Top bearing pack rough? Grease?

ilove2fixx

Chief Petty Officer
Joined
Feb 13, 2016
Messages
501
OK, lots of confusing information and requests...

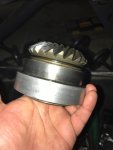
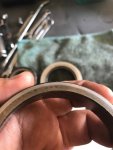
The very first thing we need is the serial number of the drive. Around 1998 Merc changed some of the bearings...

Upper drive shaft upper bearing (earlier Gen IIs) Merc # 31-61100A1. Use Timken 09067 and 09196 (outer race and roller assmebly)
Upper drive shaft upper bearing (later Gen IIs) Merc # 31-32575A1. Timken number unknown (at this stage)
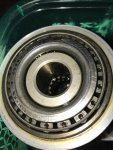
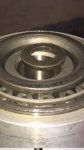
Upper drive shaft lower bearing Merc # 31-35990A1 Use Timken HM89449 and HM89410
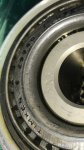
Input shaft bearings (both the same on earlier Gen IIs) Merc # 31-35988A12. Use Timken 382A and 386A (2 of each)
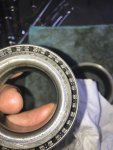
Input shaft bearings (both different on later Gen IIs) Merc # 31-30894A5 (set). I don't have the Tinken numbers for these. If you have a later Gen II, please forward me the numbers on the bearings. There will be one number on the outer race and one number on the roller set. Same with the upper bearing.

Chris..........

Ok will do after I take them apart

Can I use a jaw puller instead of that bearing separator ? No autoplace has one for rent but have those 3 jaw puller ?
 

ilove2fixx

Chief Petty Officer
Joined
Feb 13, 2016
Messages
501
And I'm sorry for the confusion I'm talking about the horizontal bigger bearings that is with the yoke..

It's a 2003 bayliner and the top bearing is smaller than the bottom one ,at least the outer metal/aluminum carriers that is.

I will upload pics now ..
 

ilove2fixx

Chief Petty Officer
Joined
Feb 13, 2016
Messages
501
No Title

Here's some pics of the bearings

I believe it's a 25580 bearing ?
Are both the same bearing ?
 

Attachments

  • photo269216.JPG
    photo269216.JPG
    57.1 KB · Views: 6
  • photo269217.JPG
    photo269217.JPG
    83.8 KB · Views: 6
  • photo269218.JPG
    photo269218.JPG
    112.6 KB · Views: 6

achris

More fish than mountain goat
Joined
May 19, 2004
Messages
27,468
And I'm sorry for the confusion I'm talking about the horizontal bigger bearings that is with the yoke..

It's a 2003 bayliner and the top bearing is smaller than the bottom one ,at least the outer metal/aluminum carriers that is.

I will upload pics now ..

That's the year of the boat, and all that tells us is the year of the boat. What is the serial number on the drive?

Here's some pics of the bearings

I believe it's a 25580 bearing ?
Are both the same bearing ?


You'll need the number from each of the outer races and each of the inner races. 4 numbers in total.

Chris......
 

ilove2fixx

Chief Petty Officer
Joined
Feb 13, 2016
Messages
501
No Title

Ok I was able to pull the top one off but not the bottom one I can't grip it with my 7 ton 3 jaw puller The top bearing is 25580 Outer race 25520 Inner bearing looks the same as the 25580 ? And race for that 25520 As well And when press them in do I press them until they seat out ? I compared my old bearings My to a new one and they look and function identical .. mine actually spins more , maybe because there oiled compared to the dry new ones.. but mine still look good and there original compared to the new China ones I got .. lol u think I should swap them out while I'm here ? That bottom one close to the gear feels and looks good do I really have to get it out ? I would need to buy a $100 tool to do that .. Also is it ok to use any nut for the yoke? I went to ace hardware and they matched one up ? Top 1/3 It has white nylon I'll add some thread locker blue is that fine ?
 

Attachments

  • photo269216.JPG
    photo269216.JPG
    57.1 KB · Views: 5
  • photo269233.JPG
    photo269233.JPG
    66.1 KB · Views: 4
  • photo269234.JPG
    photo269234.JPG
    86.4 KB · Views: 5
  • photo269235.JPG
    photo269235.JPG
    75.7 KB · Views: 4
Last edited:

Bt Doctur

Supreme Mariner
Joined
Aug 29, 2004
Messages
19,346
You press the bearing on far enough to start the nut, the races will be slightly loose at this point
Using an inch - pound torque wrench, rotate the drive shaft clockwise at least two
full turns. Check the preload by rotating the drive shaft very slowly in the same
direction a third time and while rotating, take a reading of the preload. The preload
reading should be within specification as follows:
New Bearings 6-10 in. lb. (0.7-1.7 Nm)
Used Bearings 3-7.5 in. lb. (0.3-0.8 Nm)
NOTE: The bearings are considered used if spun under load once.
70703
a
b
a - Torque Wrench
b - Drive Shaft
If the preload did not check to specification follow the appropriate instructions:
If The Preload Is Higher Than Specified: remove shims from beneath the top cover
bearing cup. Reinstall the top cover and recheck the preload as outlined above.
If The Preload Is Lower Than Specified: add shims beneath the top cover bearing cup.
Reinstall the top cover and recheck the preload as outlined above.
c. Continue this process until the preload check is within specification.
 

ilove2fixx

Chief Petty Officer
Joined
Feb 13, 2016
Messages
501
So press the bearings in until they stop? Or until there's no gap between them? I don't have shims in between the bearings just those 2 shims that go ahead of the gear when I slide the whole unit in..

I just don't want to press them in to much then take th apart again ..

My gear / bearIng set is way different than the video.. I have 2 bearings different size housings and my bearings are pressed not loose like in the videos ..
 

achris

More fish than mountain goat
Joined
May 19, 2004
Messages
27,468
Press the bearings on until they almost bottom out. You want the tightening of the nut to do the final 'press' so the preload is right. If you're replacing the bearings, it matters little how you get then off. However, if you overtighten the nut and need to release the bearings, you need to do it in a nondestructive way.

Also those bearings are not 'top' and 'bottom', they are rear and forward. Bearing next to the gear is rear, bearing nearest the Uni joints is forward. Quite confusing when there is already a top and bottom bearing in the housing.

Cheers.

Chris. ...
 

ilove2fixx

Chief Petty Officer
Joined
Feb 13, 2016
Messages
501
That's the thing I don't how much is almost bottom out.. until the inner race of the forward gear is almost flush like 1/16 inch gap ? Or until the outer race is down 1/16 inch with the rear race ? Can I use a big c clamp to press the forward bearing down ?


There should be no slop or play in all the bearings before I torque down the nut right ? You They should spin freely and smoothly before and after torquing down correct ?
 
Last edited:

Bt Doctur

Supreme Mariner
Joined
Aug 29, 2004
Messages
19,346
There should be no slop or play in all the bearings before I torque down the nut right

There might be a little untill you torque the nut

They should spin freely and smoothly before and after torquing down correct ?

Define freely, they will have a slight preload on them from torquing the nut. There is no torque value for the nut. You tighten the nut untill you get the 5.5 inch pounds of torque "turning " the input assembly with the wrench
 

ilove2fixx

Chief Petty Officer
Joined
Feb 13, 2016
Messages
501
Ok will press down forward bearing until almost flush ..

I could press down with c clamp or need an actual press ?
 

achris

More fish than mountain goat
Joined
May 19, 2004
Messages
27,468
OK... step by step.

In your hand, one drive gear, with NO bearings on it.
On your bench, a rear bearing and its outer race and a forward bearing with its outer race. And a spacer cup.
Take the REAR bearing and press it onto the gear until it bottoms out against the back of the gear face. Press ONLY on the inner race of the bearing.
Take the rear bearing outer race and put that on the rear bearing.
Take the spacer cup and put the forward bearing outer race in it, and put that on top of the rear bearing outer race.
Press forward bearing onto the gear until there is a slight rattle between the outer races... Again, only press on the inner race of the bearing.
Now move the assembly to the bench to do the rolling torque set up.

You can use a press or a vice or a C clamp to get the bearings onto the gear. Just don't **** them as you press them on....

Chris.......

BTW, I know from the photos that the forward bearing is a 25580(inner) and 25520(outer). Are the rear bearing numbers the same?
 

ilove2fixx

Chief Petty Officer
Joined
Feb 13, 2016
Messages
501
Ok sounds easy but u said till a rattle ? So leave like 1/16 of an inch or till no gap but just a little loose ?

But I don't have a spacer just what you see

And the outer races are the same the inner races I was only able to see the forward gear one the rear one is pressed in can't see the numbers
 

achris

More fish than mountain goat
Joined
May 19, 2004
Messages
27,468
Press the forward bearing until is close. It's got to be close enough so that when you put the assembly on the yoke, you can get the nut on.

So you're not replacing the bearings?
 

ilove2fixx

Chief Petty Officer
Joined
Feb 13, 2016
Messages
501
No they seem fine and because I can't get the rear one out lol so I just left them I did press the forward bearing in even if I press it just half way I can still get the nut in??? Am I missing maybe a spacer like u said ? But there was non just the bearings and outer races ?


Here's a pic of the nut in the center to see how far I pressed it in.. it would take 2 nuts to sit flush with surface of inner race ? Is that deep enough or how much further do I have to press it in ?
 
Last edited:

ilove2fixx

Chief Petty Officer
Joined
Feb 13, 2016
Messages
501


I didn't have any spacers ??

And my drive has 2 different size outer bearing Outer race Housings ? Rear one is way smaller than forward one. ( The out most aluminum housing/carriers )


Maybe I don't have a alpha one gen 2 ? Lol that would explain so much lol
But I'm pretty sure I do from the pics of the shaft?
 

achris

More fish than mountain goat
Joined
May 19, 2004
Messages
27,468
That aluminum housing on the forward bearing outer race is called a spacer in the parts breakdown. Have a look at the manual BT Doctur posted the link to. All the part names and the order of assembly are in there.
 

ilove2fixx

Chief Petty Officer
Joined
Feb 13, 2016
Messages
501
That aluminum housing on the forward bearing outer race is called a spacer in the parts breakdown. Have a look at the manual BT Doctur posted the link to. All the part names and the order of assembly are in there.

Oohhh makes sense now lol
The outer rings that go over the outer races ARE the spacers.. ok
BUT now did I drive that forward bearing far enough? You see the previous pic I placed a washer for reference .. it's about half of the height left from top of gear to top of forward bearing ? I got the nut on and maybe 3 -4 full turns until There's no more slop in the assembley.. now just torque a little at a time till I achieve the 5inch/lbs and I'm done ?
I'm just worried if I didn't press that last ( forward )bearing deep enough? Because that determines how close the teeth get to the other ( vertical ) gear set .. kinda scary

Also is it best to install ujoint bellows and retaining ring to bell housing first or transom ?
I know exhaust bellows to transom first correct ? And then oil and water hoses to bell housing after and lastly the shift cable and it's bellow?
Also can I spray or pour anything in the shift cable outer hose casing so I can push the actual cable
Through smoothly ? In my last boat I had a hard time pushing that thin metal cable through
 
Last edited:
Top