At the gelcoat stage - help needed!!!

Status
Not open for further replies.

Yacht Dr.

Vice Admiral
Joined
Feb 26, 2005
Messages
5,581
Re: At the gelcoat stage - help needed!!!

Great to hear from you again YD, I would have probably gave up a long time ago if it wasnt for you giving out some great advise & tips thats made my project so much easier ( still hard work but much easier if you have the knowledge )

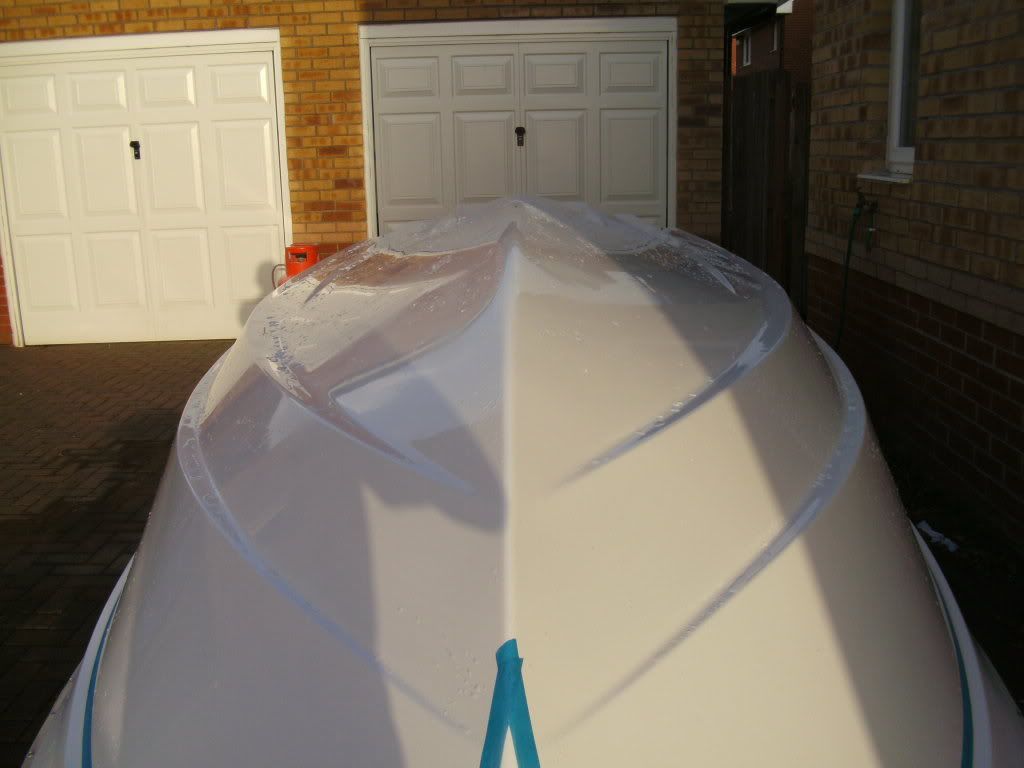
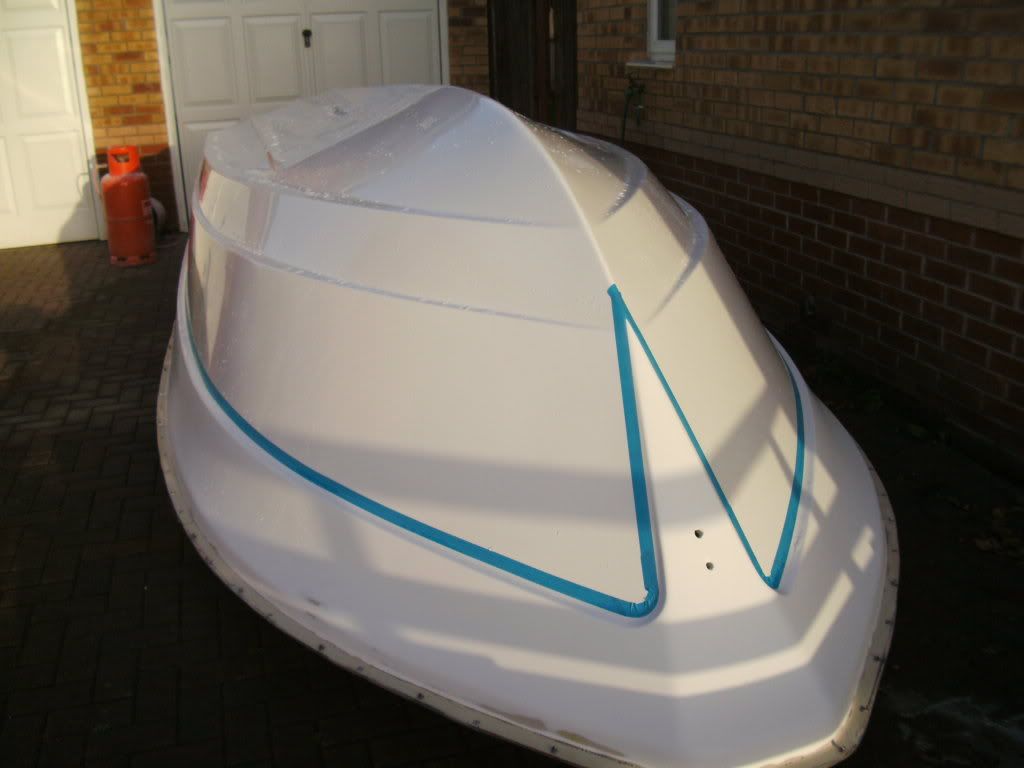
I really didn't want to spend too much time on the lower grits but I honestly felt I had to because of the heavy orange peel I got , I am now at 400g though with all the orange peel now gone.

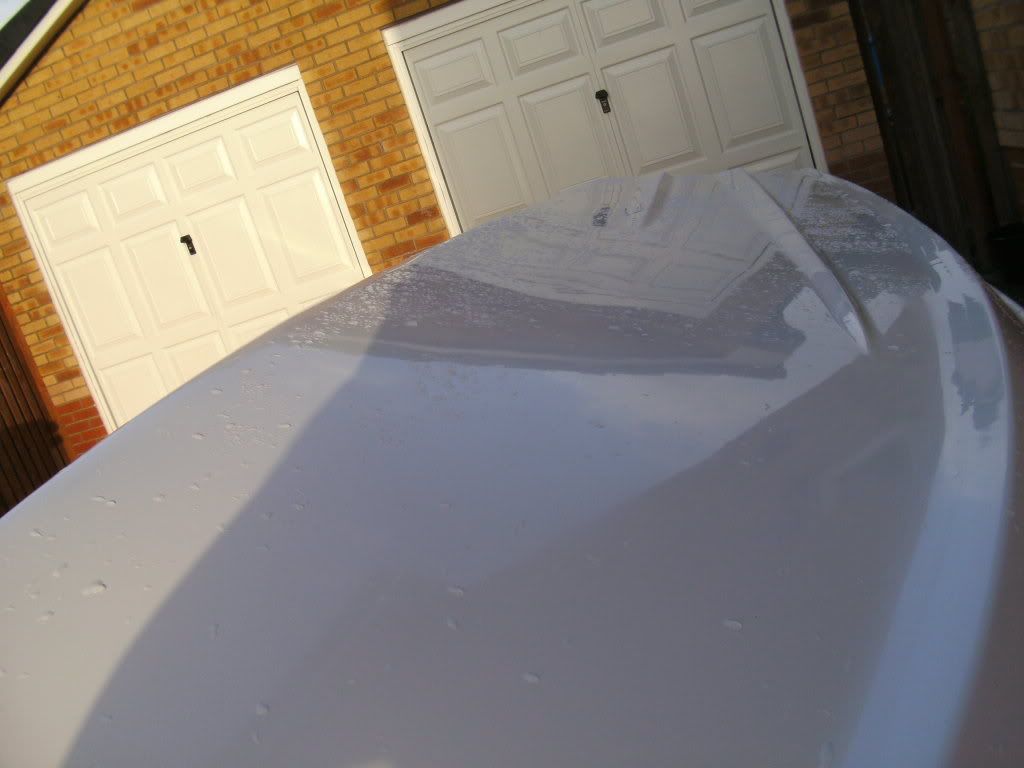
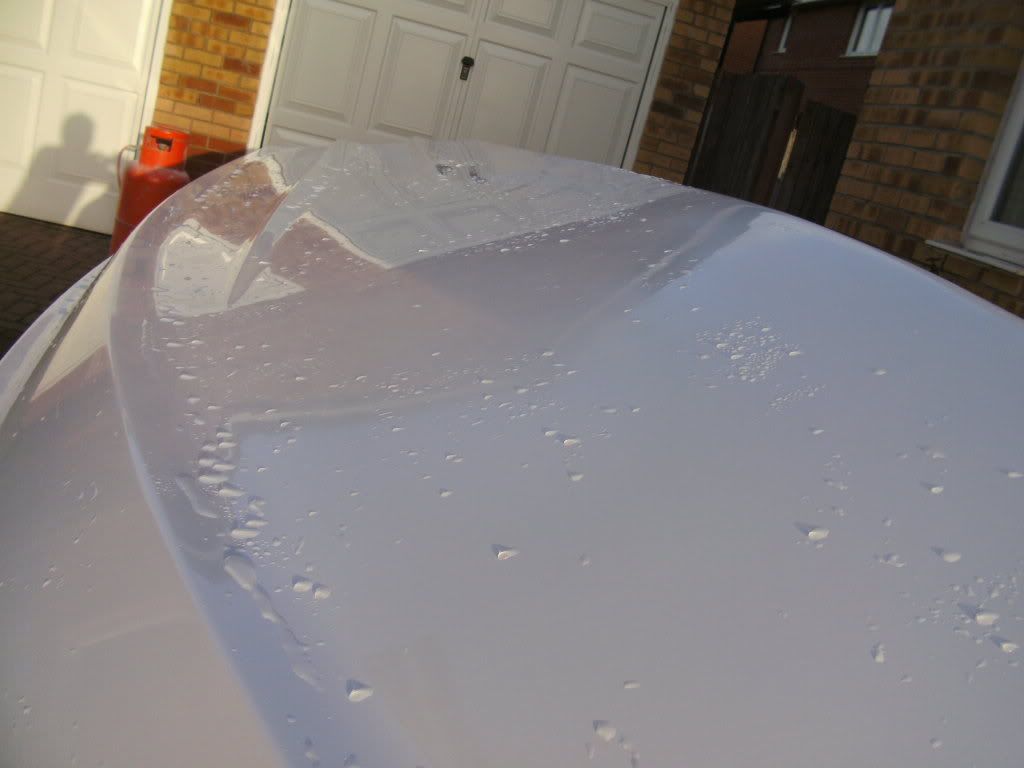
I tested a 1M square area sanding through the grits to 1000g (180, 240, 320, 400, 600, 800, 1000)
I then buffed this area out with the 3M imperial rubbing compound you recomended ( Thanks for that advise cause this stuff is fantastic) and after a short while I got an acceptable finish ( to my standards at least) here is a couple of pics of what the finish should be like for the rest of it.

The 3M compound states that it can remove 600g> dry scratches, does this mean I could stop at say 800g, or should I carry on to 1000g - 1200g just to be sure?

Thanks again YD for some great tips.

Think of it this way MB .. Application/sanding/finishing of gelcoat is a lot like putting in a new lawn on a dirt surface in your yard.

The Dirt surface lets call it " substrate " ( you never want to get down to the dirt/substrate when doing a full gel ).

Now lets get the ol' Mower out and start cuttin.. ( 320 grit ) .. Your settings on your mower is NOT low to the ground..just taking off the surface 6" grass sprouting up right ? .. Your not going to get out the rototiller after you applied your base will ya ( 120 grit ) ?

Then you set your mower a little more down and change the blade ( 400 grit real clean cut .. but still not to the base of the lawn you want in the end ).

Then lets say you have a high end Razor cutter blade ( 600g-1000g ). .. your just cruzin' over your lawn to give that Fine cut. ..

Then the Blower to get off all the grass cuts in your yard/sidewalks .. that does not take anything off your lawn .. just makes it look "cleaner" .. ( polish ) .

You Dont have to follow the Grits .. 320-360-380-400-500-600-800-1000-1200-1500-2000-Micro 4k-5k etc then buff.

This is gelcoat. 320 to almost 400 ..then 600 .. ( sometimes for smaller touchups I will forgo the 600 and go right to 1k ).

When you sand with the finer grits ( 600 + ) its almost fun actually .. its like washing your boat 2-3 times. The finer the grit then the less you have to press on the buffer ( good Idea for most here ).

Hmm.. mebbe I should have associated this with growing and trimming a beard ;) .. same thing :D .

YD.
 

morebass 17

Petty Officer 1st Class
Joined
Mar 25, 2011
Messages
223
Re: At the gelcoat stage - help needed!!!

Think of it this way MB .. Application/sanding/finishing of gelcoat is a lot like putting in a new lawn on a dirt surface in your yard.

The Dirt surface lets call it " substrate " ( you never want to get down to the dirt/substrate when doing a full gel ).

Now lets get the ol' Mower out and start cuttin.. ( 320 grit ) .. Your settings on your mower is NOT low to the ground..just taking off the surface 6" grass sprouting up right ? .. Your not going to get out the rototiller after you applied your base will ya ( 120 grit ) ?

Then you set your mower a little more down and change the blade ( 400 grit real clean cut .. but still not to the base of the lawn you want in the end ).

Then lets say you have a high end Razor cutter blade ( 600g-1000g ). .. your just cruzin' over your lawn to give that Fine cut. ..

Then the Blower to get off all the grass cuts in your yard/sidewalks .. that does not take anything off your lawn .. just makes it look "cleaner" .. ( polish ) .

You Dont have to follow the Grits .. 320-360-380-400-500-600-800-1000-1200-1500-2000-Micro 4k-5k etc then buff.

This is gelcoat. 320 to almost 400 ..then 600 .. ( sometimes for smaller touchups I will forgo the 600 and go right to 1k ).

When you sand with the finer grits ( 600 + ) its almost fun actually .. its like washing your boat 2-3 times. The finer the grit then the less you have to press on the buffer ( good Idea for most here ).

Hmm.. mebbe I should have associated this with growing and trimming a beard ;) .. same thing :D .

YD.

Your a funny guy YD. The amazing thing is i just laid a new lawn in my garden 3 weeks ago and its due its first cut at the weekend. Whats the chances of that eh:D I just hope after you comparing the two I dont hit my lawn with 800g. :)

Your also right about the sanding steps getting more enjoyable the higher the grit. First time of my life I actually wake up in the morning looking forward to do more sanding.

The finish I showed in the previous pics was just a quick attempt to see what kind of finish I could expect, Although I used the 3m compound I used a cheapo polishing pad, I am saving the 3m pad for the main polish, This pad is supeior compared to the one I tried it with, so with a little bit more attention to detail on my final buff I think 1000g - 1200g will work out just fine, I may have to do a couple of passes with the polisher but I dont mind this cause I really enjoy the polishing apart from when I get a fright when I see my reflection :eek:
 

proshadetree

Lieutenant Commander
Joined
Jul 19, 2008
Messages
1,887
Re: At the gelcoat stage - help needed!!!

God I used a polisher on my Baylinner and I hurt for a week. You and YD must have Popeye arms from all that sanding and polishing.
 

morebass 17

Petty Officer 1st Class
Joined
Mar 25, 2011
Messages
223
Re: At the gelcoat stage - help needed!!!

God I used a polisher on my Baylinner and I hurt for a week. You and YD must have Popeye arms from all that sanding and polishing.

Your so right proshadetree. It hurts for the first hour or so each day but you just have have to work through the pain barrier then its not so bad. When I was on the lower grits I could only sand for 10 minute intervals with a small break inbetween, anymore than that I would lose all feeling in my arms (not funny)

People like Yd and Oop's though dont feel the pain anymore, its just natural for those two now, Oop's has a sander & polisher surgically attached to his arms lol ( see his hull extension thread) and I'm pretty sure YD just laughs at the pain and carrys on regardless. But no matter who you are it certainly keeps you fit.
 
Joined
Sep 13, 2010
Messages
16
Re: At the gelcoat stage - help needed!!!

YD,

This subject may be worthy of a new thread. But I am a rookie in the forum, and can't start one.

I have learned much from this forum, and I thank you for sharing your knowledge.

I posted in another tread last spring, but I am picking up on my project to re-gel my 93 SeaSwirl SE190.

My question is about masking and gel-coat. Is it practical to mask and stencil onto gelcoat?

For example, I am looking to spray the body color, then the candy stripe, and as a last step I want to stencil over the body color with a different color. The name of the boat will be "Faded Glory" So you can imagine an antique white body, an antique red candy stripe with stenciled stripes on the body, and then stars stenciled on the body in an antique blue.

does the masking have to come off before the cure, or can it be pulled off after the cure. Or is it just an impractical expectation to do this detail of work with gel coat?

Thanks for your time.
 

oops!

Supreme Mariner
Joined
Oct 18, 2007
Messages
12,932
Re: At the gelcoat stage - help needed!!!

YD,

This subject may be worthy of a new thread. But I am a rookie in the forum, and can't start one.

.

yes you can my friend,,,,,,

at the top left of the page......right before the forum starts..... right under where it says the name of the forum in big blue letters......it says post new thread.

click that and you are in.......

that question on multiple gellcoat colors is worthy of a new thread
 

morebass 17

Petty Officer 1st Class
Joined
Mar 25, 2011
Messages
223
Re: At the gelcoat stage - help needed!!!

Finally making some progress !!

I finished all the sanding steps and gave the hull a quick polish with the cheap polishing head. ( I'm saving the good one for the final polish once i finish painting )

Ive also blew out all the dust from my garage and washed the boat to get rid of all dust/polishing residue in preperation for paint. Ive laid masking tape to the area that will be painted, and ive prepped this area to 180g for the undercoat.

Although the finish I got is not perfect, i'm still quite happy with it. my target at the start of this build was to produce a finish that looked good from 2 feet away, anything less than this would be a bonus, Well I made my target but I did'nt get my damn bonus :( so i will just keep everyone at least two feet away from my hull, lol

Here is a few pics of where I left off today, hopefully get the first coat of paint on tomorrow.

PICT0882.jpg


PICT0883.jpg


PICT0879.jpg


PICT0878.jpg
 

oops!

Supreme Mariner
Joined
Oct 18, 2007
Messages
12,932
Re: At the gelcoat stage - help needed!!!

im looking at what looks like a good gellcoat job.....

whats with the 2 feet?. is there some problematic areas?.....let see.
 

alligatorgars

Seaman Apprentice
Joined
Aug 18, 2011
Messages
42
Re: At the gelcoat stage - help needed!!!

(From the nose bleed seats)
From the pictures you provided that gel coat job came out great!!!!!
From the earlier pictures I was worried for you but your persistance pulled it off wonderfully. You deserve a atta boy!!!

When you are finished would you care to give a step by step of materials used including totaled amounts, techniques, do's and donts?
 

morebass 17

Petty Officer 1st Class
Joined
Mar 25, 2011
Messages
223
Re: At the gelcoat stage - help needed!!!

im looking at what looks like a good gellcoat job.....

whats with the 2 feet?. is there some problematic areas?.....let see.

Thanks Oop's, its nothing that cant be fixed, there is one or two isolated patches of orange peel which is hardly noticable but I know they are there, I didnt want to sand these areas cause i would have likely sanded through so i will repair these areas at a later stage, there is also a couple of pinhole size fish eyes where I must have contaminated the surface by touching it without knowing or something, but its no big deal as these can easily be filled i suppose, and finnaly the fairing is not perfect, but i am looking at the hull upside down so im sure once its flipped it will look fine cause im sure the rest of the fairing work is sound. I always knew I wouldn't get below the waterline perfect cause i basically had to reshape the keel and strakes cause there was not a straight line in sight when I got the boat.

Anyway im gonna stop moaning and appreciate the fact it was my first time using gelcoat and I managed to get an acceptable finish, thanks to all you guys here that talked me through it step by step.
 

morebass 17

Petty Officer 1st Class
Joined
Mar 25, 2011
Messages
223
Re: At the gelcoat stage - help needed!!!

(From the nose bleed seats)
From the pictures you provided that gel coat job came out great!!!!!
From the earlier pictures I was worried for you but your persistance pulled it off wonderfully. You deserve a atta boy!!!

When you are finished would you care to give a step by step of materials used including totaled amounts, techniques, do's and donts?

Great to have you on the front row seats now:), thanks for your comments, I was worried for a little while myself through a big part of this but with everyone here that helped me through it - it turned out to be a success.

The worst that could have happened is that i had to reshoot the gel, as gutted as i would have been if this happened it would have given me a chance to implement what i learned from the first time. But all is good cause I only have a couple of small areas that need touched up.

I will provide a step by step and hopefully people will learn from my silly mistakes ( Biggest mistake - air pressure at the tip of the gun , if I had this adjusted properly it would have saved a LOAD of sanding ) But seriously if you want a step by step re-read YD's 'how to' as my step by step would'nt even come close to his one.

Hope the premier front seats are comfortable enough for u :D
 

Yacht Dr.

Vice Admiral
Joined
Feb 26, 2005
Messages
5,581
Re: At the gelcoat stage - help needed!!!

Although the finish I got is not perfect, i'm still quite happy with it. my target at the start of this build was to produce a finish that looked good from 2 feet away, anything less than this would be a bonus, Well I made my target but I did'nt get my damn bonus so i will just keep everyone at least two feet away from my hull, lol

PICT0882.jpg


PICT0883.jpg


PICT0879.jpg


PICT0878.jpg

I dont think I could have done better Morebass .. friggin sweet.

I know that some think gel is alot harder to deal with .. but the Satisfaction is Guaranteed ! ;)

Felt good when you started buffing and see the outcome and say " Oly ****e !! " .. tell me it didnt feel good lol :D .

Very nicely done m8 .. now you Know.

Too bad I didnt catch on to your other color..or I would have had you Inlay the other color with Gel : ) .

Not many can say " Yea.. I re-gelled my boat " heheeh...

YD.

PS. You didnt think I forgot about ya did ya wink wink ..
 

morebass 17

Petty Officer 1st Class
Joined
Mar 25, 2011
Messages
223
Re: At the gelcoat stage - help needed!!!

I dont think I could have done better Morebass .. friggin sweet.

I know that some think gel is alot harder to deal with .. but the Satisfaction is Guaranteed ! ;)

Felt good when you started buffing and see the outcome and say " Oly ****e !! " .. tell me it didnt feel good lol :D .

Very nicely done m8 .. now you Know.

Too bad I didnt catch on to your other color..or I would have had you Inlay the other color with Gel : ) .

Not many can say " Yea.. I re-gelled my boat " heheeh...

YD.

PS. You didnt think I forgot about ya did ya wink wink ..

YD thanks for the compliments mate,

I dont think I could have done better Morebass .. friggin sweet
Well I just followed your instructions, so i'm pretty sure the master could do better than the student.

Felt fantastic when I started buffing, I was still a little doubtful before the pad hut the surface, but as soon as the compound started to dry out and then I wiped the area to get rid of residue - i was amazed. What a transformation :D

Too bad I didnt catch on to your other color..or I would have had you Inlay the other color with Gel : )
I was thinking of gelling the topsides but I decided on paint, thinking it would be really tricky to do a 2 tone with gel. But knowing now what you and everyone else has taught me - I may just do it. But for the time being it will just be painted maybe the first winter after the launch I will attempt it, No doubt you'll get a load more questions from me he he!!

I know that some think gel is alot harder to deal with .. but the Satisfaction is Guaranteed ! ;)
My fairing was far from perfect, fly's got stuck in the wet gel, I got LOADS of orange peel, it looked a mess when first sprayed. Air line dragged along the wet gel, BUT it still managed to be saved. Gelcoat is so forgiving that even when you make as many mistakes as i did you can still get a good finish, As you say YD "Satisfaction Guaranteed"

I actually thought everyone had left me for a while :( my fault though for not working my *** off to supply you all with update pics. Hopefully now that the sanding marathon has finished I should be posting more regular updates. ( oh wait - did i say the sanding was finished - maybe after I sand the whole of the inside and the cap and the outboard then I can stop buying shares in that sandpaper company )

Thanks for sticking with me all through this gel application YD, hope everyone sticks around for a while longer, still loads more to do.
 

Decker83

Commander
Joined
Apr 5, 2011
Messages
2,593
Re: At the gelcoat stage - help needed!!!

I think you did a awesome job on the gel coat. I hope that I can do half as good as you.
Give yourself a really big pat on the back. :D

Kent
 

morebass 17

Petty Officer 1st Class
Joined
Mar 25, 2011
Messages
223
Re: At the gelcoat stage - help needed!!!

I think you did a awesome job on the gel coat. I hope that I can do half as good as you.
Give yourself a really big pat on the back. :D

Kent

Thanks mate, hopefully yours goes smoother than mine, and if you have any questions - fire away.
 

Outback Jack

Petty Officer 1st Class
Joined
Apr 23, 2010
Messages
267
Re: At the gelcoat stage - help needed!!!

I am impressed and a mighty fine job done there morebass. I am so impressed you have me sitting on the fence on whether to gelcoat or paint now. In reality how many hrs do you think you have in sanding the gelcoat to get it looking like that.

Yacht DR and Ooops how maney hrs would you estimate you would have sanding out a gelcoat job ?

I am thinking now I only have to run the furnace for 2 days for the gelcoat to cure then I can sand in any temps. Just throwing around options now cause you did such a fine job . Going to have a nice looking boat when you are all done .

Cheers
Jack
 

morebass 17

Petty Officer 1st Class
Joined
Mar 25, 2011
Messages
223
Re: At the gelcoat stage - help needed!!!

I am impressed and a mighty fine job done there morebass. I am so impressed you have me sitting on the fence on whether to gelcoat or paint now. In reality how many hrs do you think you have in sanding the gelcoat to get it looking like that.

Yacht DR and Ooops how maney hrs would you estimate you would have sanding out a gelcoat job ?

I am thinking now I only have to run the furnace for 2 days for the gelcoat to cure then I can sand in any temps. Just throwing around options now cause you did such a fine job . Going to have a nice looking boat when you are all done .

Cheers
Jack

Thanks Outback Jack, its all thanks to the people here on iboats.

Total hours sanding = not got a clue!!:D

but if you mean just the sanding steps after the initial gel application, then I would probably be the wrong person to ask because I screwed up the spray job, But if I didn't screw up then probably not long at all, I would have started with 320g depending on the amount of orange peel. In all honesty, all the sanding steps could be done in a few days. Just dont let my sanding marathon put you off gelling yours.

Im pretty sure Oop's & YD would do it in half the time cause they know when enough is enough, Unlike us, as we would more than likely oversand.

IMHO gelcoat is the way to go, the stuff is so forgiving and you are almost gauranteed an excellent finish.

If you are a professional sprayer and had the right equipment ( air fed respo ) then and only then I would consider spraying a two part paint, but in reality this is'nt an option so Gelcoat is the winner by a mile for me anyway.
 

Yacht Dr.

Vice Admiral
Joined
Feb 26, 2005
Messages
5,581
Re: At the gelcoat stage - help needed!!!

Im sure we could sand and buff that boat out in 2 days ( flipped over the way it is pictured ). But we are going to use power tools instead of wetsanding. I at least do not recommend powersanding for beginners.

If .. per say I did this hull .. it would have taken me to prep/mask/spray ONE day. Sanding and buffing would take me about 2 days ( and thats not full days ).

But .. per say I did this hull in Paint. It would have taken the same time to prep for primer/mask/apply the primer. Then a day to prep the primer with 400g/fill micro scratches or whatever filling was needed. A few hours to blow off/water down the booth/change the filters etc. A few hours to topcoat/paint. Then wetsand down to 2k grit and buff the boat would take another day + .

Its almost the same time ( as long as you dont burn through the paint while buffing ;) ).

Gel is the way to go on small FG boats IMO. ..

YD.
 

Outback Jack

Petty Officer 1st Class
Joined
Apr 23, 2010
Messages
267
Re: At the gelcoat stage - help needed!!!

Well that is not bad for time at all...I have experience with using the tools as we usually prep someones old car in the family for a painting every other year . We always sand a little to much at first but doesn't take long to catch on .Actually we are doing my bros 66 chevy 1/2 ton right now . Just imagine he wants some fiberglass work done :) I really appreciate the replies . Looks like my plans might take another path. I thought I had a plan from the start but with all the projects and knowledge here it doesn't take long to change the plan ..would like to try and keep it looking original if I can with a little personal touch . Thanks again YD and morebass.

YD Do you use a refinishing da something less aggressive then the regular da ?
 

fishfeatures

Senior Chief Petty Officer
Joined
Mar 29, 2011
Messages
743
Re: At the gelcoat stage - help needed!!!

my hat is off to you morebass.. looks terrific, you'd surely pass a 2 inch inspection never mind 2 feet.
 
Status
Not open for further replies.
Top