can of worms?

jrttoday

Lieutenant Junior Grade
Joined
Feb 8, 2010
Messages
1,081
not shabby for a no-glassing blankety blank guy like me :lol: Couple of air pockets I'll drill out/fill before adding a little more build up. Said something about a tornado; last night we had several to the west, a few to the north, and several to the east with one bad one. Only had high winds with rain; glad she was inside... Kinda cool today but will get back at it
http://

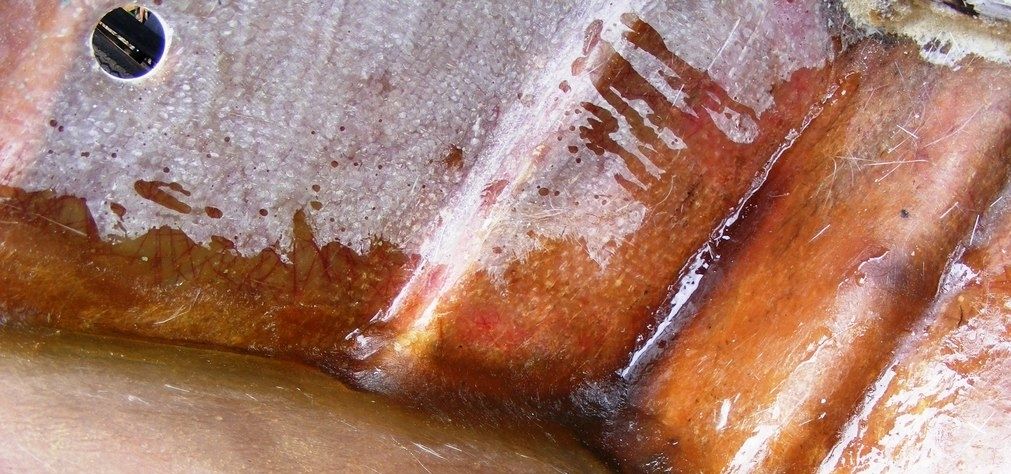
that isn't air, but dust in the corner underneath runoff (where bottom of hull meets gunwale)
It's starting to look like pour this weekend??? lol Bought a new 1" drain, not that an 1/8th will make any difference, was cheaper!! and transom tie downs. If I drill all of that, 5200 will do; but if put in the pour, no need? Permanent anyway, right? Is there really any difference? I know we already covered that..... just little nagging questions :rolleyes:

edit____ just looked again under different light, no dust - maybe glare camera picked up?
 
Last edited:

sphelps

Supreme Mariner
Joined
Nov 16, 2011
Messages
11,475
When I did the MFG transom I pre installed the bottom drain tube and poured around it .. The deck tube I drilled after the pour with 5200 .. No leaks from either one after 3 years so far ...
The more ya glass the better you will get with it .. Looks like your getting the hang of it to me ..
 

jrttoday

Lieutenant Junior Grade
Joined
Feb 8, 2010
Messages
1,081
1st thing learned welding is how to stick a rod :lol: 2nd thing is how to stick another!! :facepalm: 1st thing with fiberglass is how to make a mess; 2nd is that there is a critical moment when you need leave well enough alone. 3rd is doing it again :facepalm:
Seriously, am enjoying the process and glad I'm doing this now.
http://

Have some touch up to do, but was to late in the evening for more. Still needing more buildup imho. Light spots are strings of glass, some hanging off of board and cup - others didn't lay down and missed. An R bubble or two - the mess on stringers was just me wiping the brush off.

There's a slight buckle. plan to cut a foot? down and re-glass before 24oz. After the skin's in, will snap a line outside, set the pitch and take my circular saw across the top for transom height.
Posting here is a real ego buster!!! Always looks better here at home than on iboats!!!!!!!!!!!!!! Who cares? I don't...
 

jrttoday

Lieutenant Junior Grade
Joined
Feb 8, 2010
Messages
1,081
never had a problem w/5200. Just wondering if there was any advantage to one vs the other. Thinking I like not drilling and having to hit the other side with precision. Pipe fitting can do, and know the math. Welding errors in judgement are easier than glassing the same :lol: at least, for me
 

jrttoday

Lieutenant Junior Grade
Joined
Feb 8, 2010
Messages
1,081
I'm not 100% certain as to "who safe" this practice is, but have done it twice so far. I set that radiator type heater to wide open for an hour placing a 2x4 on top, then cover with a moving matt. There's been enough of a breeze to keep some air moving? At wide open, the thermostat does not trip - no spark, if it even does spark? Not certain of the inner workings of this heater??

Goal is to help resin kick off; once it does, no additional heat required. Just saying, if anyone else does this and blows the tail end of their boat off, don't blame me :lol:
yeah yeah, add more hardener for cold temps. It's a balance between working time and setting up......

edit_____ that's another thing; what I laid in #141, took my time on and was focused only on those few inches. In #143, was all over the back end and used 40 to 48 ounces of resin - three batches for sure, usually 16oz at a time.
Oh well, another cup o joe and a BC, back at it :D
Tic Toc Tic Toc :lol:
 
Last edited:

jrttoday

Lieutenant Junior Grade
Joined
Feb 8, 2010
Messages
1,081
first look this morning from the top, ain't so bad... have another layer of csm at the very least for 24oz, but may still add more build up? Have to check it

http://


small leaf for added strength!
camera keeps picking up a reflection or something in that corner? Must be going blind cos I don't see it with the naked eye???
 
Last edited:

jrttoday

Lieutenant Junior Grade
Joined
Feb 8, 2010
Messages
1,081
nothing to show for today, at least picture wise. Added six more layers of csm to corners - they needed it and look better lol. Made a cut 10" down in the center and took that buckle (more like a pucker) out - must have been thinking steel when I fit it, it's not the same. First layer of csm on and had to quit for the day....
Am beginning to wonder if five gallons is enough? :lol:
 

studioq

Petty Officer 1st Class
Joined
Apr 11, 2014
Messages
201
Just going over your thread.. Makes me glad I'm done with mine! You'll find if you switch to less CSM and do layers of CSM and 1708 - You'll gain a lot more strength and go through a lot less resin. CSM is fun - because it goes on easy and is hard to mess up - but pound for pound - I'd rather use 1 to 2 layers of CSM (8oz or 1.5 oz) and then top it with 2 layers of 1708 and move on... Far stronger and a lot less work and product. Just my opinion... Keep going. Looks like you're off to a good start.
 

jrttoday

Lieutenant Junior Grade
Joined
Feb 8, 2010
Messages
1,081
thanks studioq, believe it or not I am very conscious of uniformity throughout. This isn't my first time glassing, but my first time REALLY glassing :lol::lol: CSM isn't that hard to mess up, at least not for me :facepalm::lol:
Untouched after finishing last nigh
thttp://


not making excuses, just explaining because I have to know what's what. Lighter spots are where I sanded sloppy runs from spacers. Line in the center is where I cut to take out pucker. Was after dark when I started and still have a couple air bubbles to drill and refill, because that's how I am.
In #146, I was rushing to get that much done at one time

Heater's in there now to break the chill - should be warm enough weather to do more today.
Haven't been able to find 1708 locally and the csm measures roughly .035 thickness. What weight is that? And "good start" HA!! Looking at everything that still has to be done, it does feel like I'm just getting started......:lol:

just now took the clamps off and it's laying flat and spacers touching outer skin. 24oz today.....
 

jrttoday

Lieutenant Junior Grade
Joined
Feb 8, 2010
Messages
1,081
these pictures bother me, lol. then I have to go outside and look!!! This resin comes out so shiny, it picks up and reflects like a mirror. I go look and there's nothing there.... just saying..
 

sphelps

Supreme Mariner
Joined
Nov 16, 2011
Messages
11,475
jr , remember the woven goes over wet csm .... Don.t put woven over already cured and hardened csm ..
 

jrttoday

Lieutenant Junior Grade
Joined
Feb 8, 2010
Messages
1,081
jr , remember the woven goes over wet csm .... Don.t put woven over already cured and hardened csm ..
extra glad I just read that!!!! Was making more beans etc :facepalm: :lol: while letting the Sun get higher... I needed to get that sitting well; am planning on fabricating the gusset - to tie in with the 24.
Thanks, you just saved me a big OOOPS!
 

sphelps

Supreme Mariner
Joined
Nov 16, 2011
Messages
11,475
Yep the woven needs the csm to break down and bind it all together ... Thats why the 1708 bi-axle is so popular .. It already has the csm sewed to the angled woven cloth ..
Go ahead and get both layers pre cut so you have time to do wet on wet layups ...
 
Last edited:

jrttoday

Lieutenant Junior Grade
Joined
Feb 8, 2010
Messages
1,081
yesterday was feeling like "another day's useless energy spent" :lol: Only one major accomplishment - gusset design and cut out templates for both sides of mold. And cut csm and woven for pad, which will be on both sides of keel with gusset straddling the keel and down to hull and pad. Not there yet, but looking like it will be a fiberglass nightmare for me :lol:
When in creative mode, I never lock in to a design - causes unnecessary frustration and headaches; BC no help!!
2 layers of 24 in the pad is the plan, may go with more? Yesterday was the first time I'd really handled 24woven and even "I' could understand the wet layup over csm.

In other news :lol: I figured out my seating problem; all I had to do was to look up at the shelf :facepalm: Yet, another blinding flash of the obvious lol. I have two minimally used Wise seats.
I made my leaning post and my buddy is always complaining he doesn't have one back aft. Simple, replace the seats that came with the deck with those and make another lp.
 

jrttoday

Lieutenant Junior Grade
Joined
Feb 8, 2010
Messages
1,081
STRINGER QUESTION!!! not sure of the exact term, but in structural welding, anytime you have a longitudinal rib etc meeting a transverse bulkhead and you wrap the end of the rib, weld should not touch weld on bulkhead or the bulkhead. Think it's called "weld separation"? Creates hard spot if not.
The same should be with stringers and inner skin or transom? If so, need to trim 'em back an inch or so
 

sphelps

Supreme Mariner
Joined
Nov 16, 2011
Messages
11,475
Were they tied to the transom originally ?
Drains holes ? The gussets will tie the transom and stringers together right ?
 

jrttoday

Lieutenant Junior Grade
Joined
Feb 8, 2010
Messages
1,081
originally?? when was that?:rolleyes: and how?:lol: Best I can remember, no.... not directly, there was a 1/2x2 floor foundation across the back and it was all in such a mess when I got it that I cannot be certain (been awhile too). This go round, my floor/deck was butted to the additional 1/2" piece I covered the transom with - all PB'd and tabbed - have removed all of that nonsense. We are creating new nonsense now!! :facepalm::lol:

That you bring up the drain hole is a good point; the sump box was attached (practically welded) to the transom, two stringers, and hull. I've been adding PB in the void between stringers and inner skin - and the inner skin is not yet complete. This is what I'm working with

http://

Had some surface air in the csm from doing it in not enough light, no big deal, another layer of csm before 24 anyway. I've done the math but don't have it in front of me right now, will check and re-check for sure. Re-design on pad, will be on top of keel and glassed to death!!! lol Can't explain, pictures in a month :lol: Used 3" PVC on the bottom; ID when finished 2". I "might" make fg gussets for other stringers? not today... That I need what I'm doing, probably not... Just because I think it makes it so :facepalm::facepalm: :lol::lol::lol:

But my original question, the stringers should be tied to the transom? There will be a rat hole in the corner of any gusset here. Piece pictured will be glassed on table first, then glassed in later. The angles are correct, wood in form holding it off. Has to be cut back after pad and skin anyway
 
Last edited:

jrttoday

Lieutenant Junior Grade
Joined
Feb 8, 2010
Messages
1,081
already have 2gals AF, but thinking will not flood below deck with it and drain back out. Am thinking no drain below deck either, it's all solid and dry; a gallon of Herculiner will give me a few coats, seal and forget about it. No plans to sail the miracle mile anyway
 
Top