Cobia 24' rebuild project.

zool

Captain
Joined
Aug 19, 2012
Messages
3,432
Thanks Zool for the info. I think I should stay with the paint method as it would appeR that there is just to many things that can go wrong and for repair or touch ups pInt would serve me better

That's what I would do ;)
 

zuluwarrior

Petty Officer 2nd Class
Joined
Sep 11, 2010
Messages
109
No Title

Took the braces off the bulkhead and mixed up a batch of epoxy and using a disposable piping bag applied the batch to the gaps at the bottom of the bulkhead. Rain came and had to cover boat back up and try and feather the pb out and because some areas had a lot of the mixture it got fat on me and I will have a little grinding to do but no big deal. One thing for sure it is solid as a rock! That makes me happy! Decided not to try and hot coat today. Small but important progress though
 

Attachments

  • photo218555.jpg
    photo218555.jpg
    67.3 KB · Views: 0

zuluwarrior

Petty Officer 2nd Class
Joined
Sep 11, 2010
Messages
109
No Title

Here is a pic of the disposable piping bags I used. They are 21" long and you can cut the tip as narrow or thick as you want it. Work great, really heavy plastic
 

Attachments

  • photo218556.jpg
    photo218556.jpg
    73.5 KB · Views: 0

zuluwarrior

Petty Officer 2nd Class
Joined
Sep 11, 2010
Messages
109
No Title

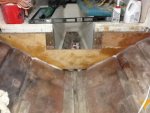
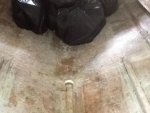
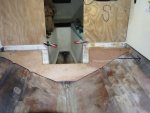
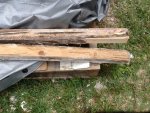
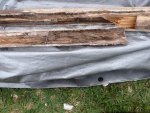
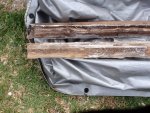
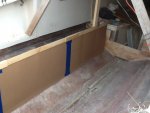
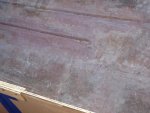
Hey Guys, couple of questions. I have these boxed fiberglass sections that run along the path of the chines on the inside of the hull. They are about 3 to 4 foot long but the ends are open which has rotted out the core. I can't see how they add any real strength to the hull and want to cut them out. I see in Ahmincha's post that he filled in the chine areas. Do I need to do the same and what benefit will I get if I do it? My thought right now is to cut them out, grind down flat and add another stringer. Will doing it with the second stringer be a better option, opinions please.
 

Attachments

  • photo219173.jpg
    photo219173.jpg
    41.4 KB · Views: 0

kcassells

Fleet Admiral
Joined
Oct 16, 2012
Messages
8,738
As of late the reasoning to fill the chines is to afford easier lay of glass with the curved chine. That's all it's about. Said to be easier to glass without that contour. In regards to ques. #1 ...probably just fillin in the chines and removing that little glassed area with most like be as strong or better. Ends up taking alot of pb.
You got to dig em out and clean up anyway.
On another note if it was there before then it was something the mfg determined to be required.
DSorry about a not so straight up answer. Seems like your call...either should work fine.
 

zuluwarrior

Petty Officer 2nd Class
Joined
Sep 11, 2010
Messages
109
Yeah they have to come out. I will add another stringer which will be as long as the main stringers in their place and fill the chines. Should be stronger than what is/was there. Thanks. One other question, how are you supporting the deck in relation to the hull sides, just tabbing or do you need to add a cleat of sorts and than tab the deck afterwards? Curious.
 

kcassells

Fleet Admiral
Joined
Oct 16, 2012
Messages
8,738
Well I added some big kick azz cleats that I wetted out and glassed. Then cut to fit the angles. I wanted the new floor to sit on something solid.
Go back to some of my posts, you will see the way I did it. Some of my areas are not easy to just glass up against the hull. So I compensated with a ledger system that I pb'ed to the structure and clamped. There are just some areas that are not accessible so I got this bright idea to go this way. Where I can I will run up the hull sides with tabbing. Couple of the bulkheads may get complicated as a result but there ya go. Height variations in regards to the floor and cleat.
Good to yap with you. :)
 

kcassells

Fleet Admiral
Joined
Oct 16, 2012
Messages
8,738
earyago;
4-13-15 016.jpg 4-13-15 009.jpgthats a storage space up on the lfet and no way can I get under
there to make a clean joint. So as it went I built out the stringers to compensate for the new floor to sit on but that was coincidence. Cause of the hard to get to areas in the first place.
 

zuluwarrior

Petty Officer 2nd Class
Joined
Sep 11, 2010
Messages
109
Hmm, I need to think on this a bit. I see what you have done and hence my wanting the second stringer for support. I think I will need to get the stringers in place to get a better visual of the next step(s). Not always clear looking at 2 dimensions lol. Good to yap with you as well my friend.
 

kcassells

Fleet Admiral
Joined
Oct 16, 2012
Messages
8,738
Yup I understand, But I just found too many places I cannot do the "perfect" hull transition with the structure I have, Especially up by the port/starboard where the angle turn in under the other deck wells.
 

zuluwarrior

Petty Officer 2nd Class
Joined
Sep 11, 2010
Messages
109
I can see what you mean by that lip/ledge. I would have to attach to the hull sides as I have no ledge to attach to. I had a thin fiberglass ledge but felt that it would not offer sufficient support. Thanks KC
 

zuluwarrior

Petty Officer 2nd Class
Joined
Sep 11, 2010
Messages
109
No Title

I cut the original lip off as the core was all rotten and one I ground that off it just left a thin fiberglass lip.
 

Attachments

  • photo219340.jpg
    photo219340.jpg
    61.1 KB · Views: 0

kcassells

Fleet Admiral
Joined
Oct 16, 2012
Messages
8,738
Well then what I see is the "traditional" method that most is used. Once the floor is placed you will pb the gap like a fillet and roll tabbing up 2x. I think the tabs are 4" up then 8" up over the first. Then fair it out. Looks like 3/4" ply will fit in there nicely unless I'm missing anything.
Let me know.
 

zuluwarrior

Petty Officer 2nd Class
Joined
Sep 11, 2010
Messages
109
Thanks KC that's what I was thinking, finish the plywood just off the sides, pb a nice filet and at least 2 tabs of glass. Not sure about filling cavities with foam as I saw first hand from the original foamed areas. But as has been told on this forum if the deck is sealed against water intrusion then the foam should be fine plus I believe the foam today is different in it's properties then in the past. Maybe wrong but that's what I think.
 

johnnybgood

Seaman
Joined
Jun 12, 2012
Messages
72
Doing a similar rebuild of a Steiger Craft and can't decide on re-foam or not, was thinking put 8" round inspection hatches in the compartments that had foam and fill with foam board strips that can be removed and replaced also a way to check for any water. Still undecided ready to put the floor back in so I have to make a decision soon. So are you going to foam ?
 

kcassells

Fleet Admiral
Joined
Oct 16, 2012
Messages
8,738
Thanks KC that's what I was thinking, finish the plywood just off the sides, pb a nice filet and at least 2 tabs of glass. Not sure about filling cavities with foam as I saw first hand from the original foamed areas. But as has been told on this forum if the deck is sealed against water intrusion then the foam should be fine plus I believe the foam today is different in it's properties then in the past. Maybe wrong but that's what I think.


Working on something in regards to the foam discussions. Personally I believe there should be a way for water, air and drainage to exist together at the same time with foam. I do not believe boats were made to not have some sort of water passage to exit towards the bilge. But thats just me. I'll fill you in as I move this concept to a test model.
Foam is such a beatin subject that someone or another has to make a resolution that both can exist at the same time. In other words it's not just black and white. He says, they says....blah, blah, blah
 

zuluwarrior

Petty Officer 2nd Class
Joined
Sep 11, 2010
Messages
109
No Title

Something to ponder. Well I was back at the grinding and cutting those raised supports out and man it took so much longer than I expected. Man grinding sucks. And to top it off I found a thin area and ground right thru the strake. Damn I was pissed but chuckled afterwards as now I officially had my first grind thru lol. Should be an easy fix, just one more thing to fix. Damn did I mention I hate grinding. But that part is done and I had a little time left to start on the template but called it a day when wifey called supper time.
 

Attachments

  • photo219553.jpg
    photo219553.jpg
    180.4 KB · Views: 0
  • photo219554.jpg
    photo219554.jpg
    173.3 KB · Views: 0
  • photo219555.jpg
    photo219555.jpg
    65.6 KB · Views: 0
  • photo219556.jpg
    photo219556.jpg
    64.6 KB · Views: 0
  • photo219557.jpg
    photo219557.jpg
    66.1 KB · Views: 0
  • photo219558.jpg
    photo219558.jpg
    151.3 KB · Views: 0
  • photo219559.jpg
    photo219559.jpg
    80 KB · Views: 0
Top