Cobia 24' rebuild project.

kcassells

Fleet Admiral
Joined
Oct 16, 2012
Messages
8,738
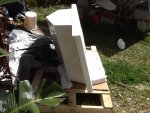
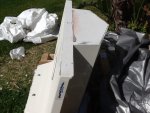
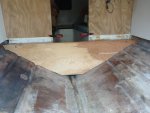
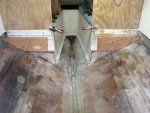
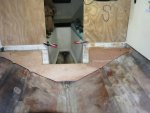
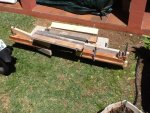
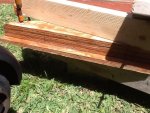
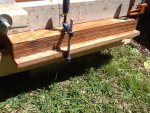
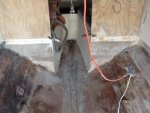
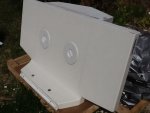
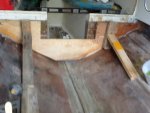
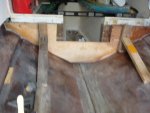
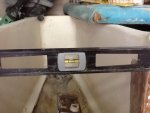
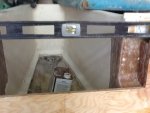
Hello All, still alive and just started back with some work on the boat. The weather has been horrendous over at least the past 3 weeks then I came down with of all things, shingles. Man that is some painful stuff, out of work for 3 weeks, just getting back to myself again. But some good news is that the laminations for the stringers are complete and I will be moving to making the templates. They are approximately 12.75' long. The scarf joints came out very nice and I held a panel before it was cut down(16') up by one end and gave it a shake to flex it and these things are solid. Very happy with the results. And Wood is correct that it did take a bit of fine tuning and fiddling to get them right but very pleased. Also, my transom bracket is complete and id due to be shipped sometime next week. With daylight saving time fast approaching I'm looking to make some good progress.


That engine bracket looks real real sweet! I'm thinking about one but that will end up down the line for me.
 

zuluwarrior

Petty Officer 2nd Class
Joined
Sep 11, 2010
Messages
109
Picked up my transom bracket today, pics to follow this weekend, didn't have time this evening. Plywood for stringers have been completed but not cut to shape yet. I decided to get anymore grinding and cutting out of the way first so that it is clear sailing for bulkheads and stringers. Will be removing the toilet so that I can see if I can fit a new drain in the rope locker. Fun, fun, fun. Weather is starting to get more settled and the daylight is longer. Want to get the bulk of grinding done before it gets hot.
 

kcassells

Fleet Admiral
Joined
Oct 16, 2012
Messages
8,738
Picked up my transom bracket today, pics to follow this weekend, didn't have time this evening. Plywood for stringers have been completed but not cut to shape yet. I decided to get anymore grinding and cutting out of the way first so that it is clear sailing for bulkheads and stringers. Will be removing the toilet so that I can see if I can fit a new drain in the rope locker. Fun, fun, fun. Weather is starting to get more settled and the daylight is longer. Want to get the bulk of grinding done before it gets hot.


Cool! Well keep us posted and add some pics.
 

zuluwarrior

Petty Officer 2nd Class
Joined
Sep 11, 2010
Messages
109
No Title

Hello Guys, managed to get some grinding done and removed the toilet. Man that was all sorts of nasty! Toss up between grinding and plumbing, not loving either right now. The block that the toilet was mounted on appears solid but I will take a closer look and replace if need be. Here are a few pics.Oh yes my bracket is home and looks to be in good shape, no visible signs of nicks or chips.
 

Attachments

  • photo217377.jpg
    photo217377.jpg
    54 KB · Views: 0
  • photo217378.jpg
    photo217378.jpg
    60.3 KB · Views: 0
  • photo217379.JPG
    photo217379.JPG
    170.9 KB · Views: 0
  • photo217380.JPG
    photo217380.JPG
    186.4 KB · Views: 0
  • photo217381.jpg
    photo217381.jpg
    62.6 KB · Views: 0
  • photo217382.jpg
    photo217382.jpg
    62.9 KB · Views: 0

zuluwarrior

Petty Officer 2nd Class
Joined
Sep 11, 2010
Messages
109
One thing I did notice after removing the toilet was that it appears that an excessive amount of caulking was used on both thru hulls which does not look right to me but I plan on replacing them anyway so all should be good. Not sure if I can rebuild toilet or just replace with a like model. We'll see
 

kcassells

Fleet Admiral
Joined
Oct 16, 2012
Messages
8,738
Well good to see some progress Z! if the hopper/water closet/crapper/ .itter has models #'s then you may find parts.
Good to hear from you.
Really like that transom bracket.
 

zuluwarrior

Petty Officer 2nd Class
Joined
Sep 11, 2010
Messages
109
No Title

Hello Guys, got a little done over this weekend. Weather still isn't settle yet. Good Friday was sunny but wifey would not have any of my time spent on the boat. Kites, hot cross buns and fish cakes, no boat stuff. So I managed to get some more grinding done and worked on the main bulkhead template and the build ups for the main bulkhead. Lots of cutting,trimming, test fitting, repeat, repeat and the showers of rain but got everything cut and fitting pretty good. This evening I will try and glue everything together and then glue into place. Need to get this step done first and correct as my stringers will come off the bulkhead face and tie into the transom. Man I must have climbed in and out of my boat a hundred times fitting and refitting these parts. I left the buildups 1 inch lower than the front face of the main bulkhead so that I can glue in a piece of hardwood for a cleat to screw into when I get to the deck install. Here are a couple of pictures.
 

Attachments

  • photo218235.jpg
    photo218235.jpg
    61.8 KB · Views: 0
  • photo218236.jpg
    photo218236.jpg
    56.6 KB · Views: 0
  • photo218237.jpg
    photo218237.jpg
    58.1 KB · Views: 0

zuluwarrior

Petty Officer 2nd Class
Joined
Sep 11, 2010
Messages
109
The build ups will consist of 3 pieces of 3/4" ply which will be glued to the back of the bulkhead before the whole thing is glued into place. I will also coat the backside with resin before install.
 

zuluwarrior

Petty Officer 2nd Class
Joined
Sep 11, 2010
Messages
109
Trying, it's been a little busy at work of late and the elements are not on my side right now but I'm going to keep on chugging along.
 

kcassells

Fleet Admiral
Joined
Oct 16, 2012
Messages
8,738
hey Z.... Do just like you're doing. The world still spins and it gets done when it gets done. Ocean is always there.
 

zuluwarrior

Petty Officer 2nd Class
Joined
Sep 11, 2010
Messages
109
No Title

Managed to get the build ups glued to the bulkhead and some grinding done, argh. Grinding sucks but a necessary evil I guess. Hopefully the weather stays good so that I can glue this bad boy in and then on to the stringers.
 

Attachments

  • photo218300.jpg
    photo218300.jpg
    51.5 KB · Views: 0
  • photo218301.jpg
    photo218301.jpg
    53.3 KB · Views: 0
  • photo218302.jpg
    photo218302.jpg
    50 KB · Views: 0
  • photo218303.jpg
    photo218303.jpg
    64.1 KB · Views: 0

zuluwarrior

Petty Officer 2nd Class
Joined
Sep 11, 2010
Messages
109
No Title

Thanks Mark. Going to hot coat it Friday when I get home from work and install over the weekend. Then I can work on the stringers and get them installed. My plan once they are installed is to get the bracket install mocked up.
 

Attachments

  • photo218369.jpg
    photo218369.jpg
    151.8 KB · Views: 0

zuluwarrior

Petty Officer 2nd Class
Joined
Sep 11, 2010
Messages
109
No Title

Had a late start today and then murfy showed up! I was refitting the bulkhead and using my grinder to make adjustments which was going smoothly until near the end my grinder just quit. Wtf I say! Tried the obvious and no joy so had to use my belt sander and finished up with the random orbit 5" but lost a lot of time. But got the bulkhead glued in but didn't finish the filets as I wanted to make sure that I got good cure time and bonding first. I'll finish the filets tomorrow and coat the bulkhead face the same time.
 

Attachments

  • photo218528.jpg
    photo218528.jpg
    172 KB · Views: 0
  • photo218529.jpg
    photo218529.jpg
    171.9 KB · Views: 0
  • photo218530.jpg
    photo218530.jpg
    194.3 KB · Views: 0
  • photo218531.jpg
    photo218531.jpg
    188.4 KB · Views: 0

zuluwarrior

Petty Officer 2nd Class
Joined
Sep 11, 2010
Messages
109
I've been trying to find info on gel coating over epoxy and think that I might do a couple of tests to see first hand if this is feasible or if I should just use a good paint finish. I have been using Interlux Epiglass epoxy resin so will give it a shot.
 

kcassells

Fleet Admiral
Joined
Oct 16, 2012
Messages
8,738
Z,
it's not a tried and proven thing to put gelcoat over EEEEpoxy. Lots of issues and related discussions. You are best of finding a epoxy paint to complete the task.
Been done before and not new. You can google your butt off. But I don't have any confidence in gelcoat over eeeepoxy.
 

zool

Captain
Joined
Aug 19, 2012
Messages
3,432
I've been trying to find info on gel coating over epoxy and think that I might do a couple of tests to see first hand if this is feasible or if I should just use a good paint finish. I have been using Interlux Epiglass epoxy resin so will give it a shot.

If youre gonna gel over epoxy, theres a few things you need to watch in the prep. If the gelcoat comes in contact with any unreacted amines from the hardener, it will stop the epoxy cure, and that's where the failures can come from. The mixture for the epoxy needs to be spot on, excess hardener will leave unreacted amines. Once the epoxy is fully cured, you need to remove any amine blush on the surface, warm water alone works best...clean it multiple times, then sand with 80 grit.

West Systems 207 hardener is low blush, and they offer the gel coat cover method in their manual.

Basically, remove ALL blush, and you should be fine.
 

zuluwarrior

Petty Officer 2nd Class
Joined
Sep 11, 2010
Messages
109
Thanks Zool for the info. I think I should stay with the paint method as it would appeR that there is just to many things that can go wrong and for repair or touch ups pInt would serve me better
 
Top