Cobia 24' rebuild project.

zuluwarrior

Petty Officer 2nd Class
Joined
Sep 11, 2010
Messages
109
e9b70ccf-5ada-4733-9ef8-b9e414ea4cb9.jpg


Not sure this is going to work. Still a little unsure of the newer format.
 

kcassells

Fleet Admiral
Joined
Oct 16, 2012
Messages
8,738
This is still whacked. I Can't enlarge your/the pic.
Nor have I completed "phot bucket' or something like that. But as usual da werk lookzzz great!
LOL tried to up load pics but the pics file was too huge.
I guess I better figure out PB since it appears to be the only way to load pics that won't blow this forum up.
Was gonna send some pics on the prep and glassing I did as well as some pics on the teak wood. I'll send later. Got to spen 2 hrs loading up phot bucket now. lol.
Keep kickin it!
 

zuluwarrior

Petty Officer 2nd Class
Joined
Sep 11, 2010
Messages
109
Man, thought I had it licked. New format has me stomped for now, I'll have to keep trying
 

kcassells

Fleet Admiral
Joined
Oct 16, 2012
Messages
8,738
Hey Zulu, Hope your still working at it. Me too I am! Can't wait to exchange progress!!
 

kcassells

Fleet Admiral
Joined
Oct 16, 2012
Messages
8,738
Hey Zulu, Hope your still working at it. Me too I am! Can't wait to exchange progress!! Ha ha have to wait 30 secs between posts lol.....
 

kcassells

Fleet Admiral
Joined
Oct 16, 2012
Messages
8,738
Hey Zulu, Hope your still working at it. Me too I am! Can't wait to exchange progress!! Ha ha have to wait 30 secs between posts lol.....now 18 secs 1 2 3 4 5 6 7 8 9 10 11 12 13 14 15 16 17 18 19 20 21 22 23 24 25 26 27 28 29 30 yea
 

kcassells

Fleet Admiral
Joined
Oct 16, 2012
Messages
8,738
Hey Zulu, Hope your still working at it. Me too I am! Can't wait to exchange progress!! Ha ha have to wait 30 secs between posts lol.....now 18 secs 1 2 3 4 5 6 7 8 9 10 11 12 13 14 15 16 17 18 19 20 21 22 23 24 25 26 27 28 29 30 yea...
 

zuluwarrior

Petty Officer 2nd Class
Joined
Sep 11, 2010
Messages
109
I had a couple of hours of good weather this morning and was able to get some trimming done to the main stringers and bulkhead. Used a finish router to round over the outer top edges on the stringers. Then moved on to putting stringers and bulkhead in hull and used a straight edge to pick up the high spots on the stringers and trimmed them. Put everything back in place and realized that I will need the cut 2 more short bulkheads so that the span is shorter for the way I will lay the ply decking. Mixed a batch of putty and glued stringers to transom, bulkheads to stringers. Oh yes I had to level the hull a bit but this was done before I glued anything. I will let the glue setup overnight and try and cut the last 2 bulkheads tomorrow. Once all is glued up I will try and post some pictures.
 

kcassells

Fleet Admiral
Joined
Oct 16, 2012
Messages
8,738
Nice....been working here my self.Got the first two stringers in under cutty, glassed and pb. Needs tabbing. Going to grap some more ply now and start to cut rest of stringers
and bulkeads. I'll get some pics later also.
 

zuluwarrior

Petty Officer 2nd Class
Joined
Sep 11, 2010
Messages
109
Great, glad to hear you are making progress. I think I will post pictures later like after I get some glass tabbing on as the site is still buggy and I'm still getting a lot of error messages. Just going to go for one post with pics and see how I make out.
 

kcassells

Fleet Admiral
Joined
Oct 16, 2012
Messages
8,738
Can't get a pic in plus all the error messages. Gonna just yap for now. Hey how do you link or get pics from photbucket to this site. I've had no luck yet. !!??
Going out to work on the boat. Glad your kickin some butt!
 

zuluwarrior

Petty Officer 2nd Class
Joined
Sep 11, 2010
Messages
109
What I do is have the forum open and in a new tab open my photobucket account. Then I highlight and right click the img in photobucket and click copy. I then click on the forum and go to the new post window and right click again and click on paste. This should give you a 2 line string. At the end of the string usually looks like this
 

kcassells

Fleet Admiral
Joined
Oct 16, 2012
Messages
8,738
I'll give it a try. Tx! Going out to sweat in das boot for awhile. Just feel a little beat today, maybe I'll get relit in the boat mind set.
 

zuluwarrior

Petty Officer 2nd Class
Joined
Sep 11, 2010
Messages
109
Hello All, been a long while since last posts. Had a really busy summer at my job and had to put the boat on hold. Then in the middle of October 2014 we where hit by 2 hurricanes in a week that did substantial property damage through the island and my home received serious roof and interior ceiling damage. Just staring to get back to some form of normalcy with the house, thanks to insurance. The boat suffered damage to the work I had completed but this can be fixed. I have purchased a 52 gallon fuel tank and just ordered my transom bracket which should be ready near month's end. Work has slowed a bit and with the weather cooler I will be looking to get cracking on her soon.
 

kcassells

Fleet Admiral
Joined
Oct 16, 2012
Messages
8,738
Great to hear from you Zulu! Glad all is getting back to norm and no-one was hurt. What kind of bracket did you order?
 

zuluwarrior

Petty Officer 2nd Class
Joined
Sep 11, 2010
Messages
109
Went with the Hermco fiberglass bracket. Single motor mount with 30" setback. Just had him shorten the swim platform so I don't have to worry about fitment around the notch in the transom.
 

zuluwarrior

Petty Officer 2nd Class
Joined
Sep 11, 2010
Messages
109
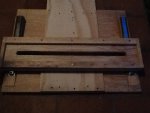
IMG_0475.JPG Decided to have my stringers go all the way to the cabin entrance which means having stringers that will be longer than the 96" plywood length. The stringers will be approximately 155" long. So in doing some research on here I see that the best joint to use is a scarf joint to increase joint strength. So I found a easy to build scarf jig for a router and made one up. Have to say after the testing that this thing works pretty good. IMG_0480.JPG IMG_0476.JPG
 

kcassells

Fleet Admiral
Joined
Oct 16, 2012
Messages
8,738
Decided to have my stringers go all the way to the cabin entrance which means having stringers that will be longer than the 96" plywood length. The stringers will be approximately 155" long. So in doing some research on here I see that the best joint to use is a scarf joint to increase joint strength. So I found a easy to build scarf jig for a router and made one up. Have to say after the testing that this thing works pretty good.
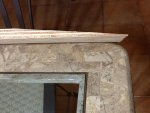

I'd say thats a pretty dam good scarf joint! I ended up going with the butt joint/lap joint. butted both sides butt was extra glass, glue and wood...
That looks really nice! Shoot some pics to the tricks!
 
Top