Cobia 24' rebuild project.

zuluwarrior

Petty Officer 2nd Class
Joined
Sep 11, 2010
Messages
109
No Title

I will say that although the strake reinforcement was 50% rotten the remaining good wood was really solid and what was stuck to the hull took a really long time to remove. It was really stuck down good. Glad I decided to remove them though, would have been a problem down the road.
 

Attachments

  • photo219555.jpg
    photo219555.jpg
    65.6 KB · Views: 0
  • photo219557.jpg
    photo219557.jpg
    66.1 KB · Views: 0

kcassells

Fleet Admiral
Joined
Oct 16, 2012
Messages
8,738
Hey Now....looking real good! Welcome to the "grind a hole thru the Hull Club"! :lol:
 

zuluwarrior

Petty Officer 2nd Class
Joined
Sep 11, 2010
Messages
109
No Title

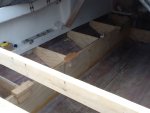
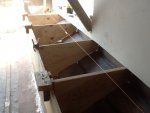
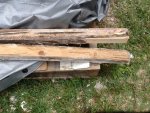
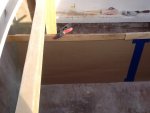
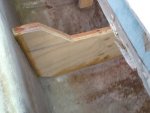
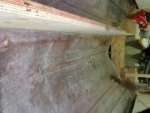
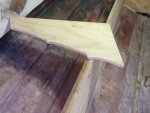
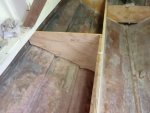
Hello Guy, I would like to call this post O DE PAIN!!! Weather was good on Saturday and my stepson was lending me a hand. We got a template setup and marked, cut it out and tested fit. So far so good. Laid it on the first stringer and cut it out. Now we put this thing in and out of the boat at least half a dozen times till satisfied with the fit. Did I mention heavy and awkward, yeah. Now braced it in place and marked a line for deck height, cut and braced in place for pb. Both of us were pretty tired by now but stringer number 2 still needed cutting and fitting so I went to tidy up a few things and son has marked and cut the second stringer but his body language is saying something is not right. So I go to look at what he has done and worse case scenario, he has cut the stringer wrong because he did not reverse the template. Now normally this would be a WTF moment but what was done was done, so how can I move past this and not make him feel any worse than what he was feeling. First thing out of my mouth what just cut it in half and I will use the ply for bulkheads. Needless to say this took the wind right out of my sails and I consoled myself with 6 cold Coronas. Packed everything away, covered boat up and called it a day. Got up Sunday and mixed up some pb and glued the port stinger in place but ran short on epoxy so will need to finish that off and start on building another stringer. Gotta love this rebuilding stuff!! I was really pleased with the glue lamination on the stringers so I did something right lol
 

Attachments

  • photo220217.JPG
    photo220217.JPG
    178.8 KB · Views: 0
  • photo220218.jpg
    photo220218.jpg
    50 KB · Views: 0
  • photo220219.jpg
    photo220219.jpg
    58.9 KB · Views: 0
  • photo220220.jpg
    photo220220.jpg
    52.5 KB · Views: 0

kcassells

Fleet Admiral
Joined
Oct 16, 2012
Messages
8,738
Mama said there would be days like this! :mad-new: So Oh Well...back to the grinding wheel, I mean stringer. :joyous:
 

zuluwarrior

Petty Officer 2nd Class
Joined
Sep 11, 2010
Messages
109
No Title

Not a lot done this weekend, chores and son came home from uni for his summer break. Materials and epoxy are just about done. Need to buy some more epoxy and 2 sheets of ply hopefully need week if I have the spare cash. Did get a bulkhead cut and fitted to the one stringer that is in place. Didn't glue it in place because I think I need to wait until I have the starboard stringer installed first and then go from there. I can cut a few more bulkheads which I plan on as I have enough ply to do that so that's the plan for now.
 

Attachments

  • photo220560.jpg
    photo220560.jpg
    56.4 KB · Views: 0
  • photo220561.jpg
    photo220561.jpg
    56.1 KB · Views: 0

kcassells

Fleet Admiral
Joined
Oct 16, 2012
Messages
8,738
Thats cool! Worked all weekend on my stringers, bulkheads and re-fitting the old splashwell component and fish wells. Sore body aches!:)
 

zuluwarrior

Petty Officer 2nd Class
Joined
Sep 11, 2010
Messages
109
I feel you on that note literally. Cut, fit, trim. Up the ladder, down the ladder. Man what a workout. The template I used for the first bulkhead I'm hoping I can use with slight trimming for the rest of the bulkheads on the port side so my plan is to cut all the port side bulkheads out this weekend. Hopefully I will have a little spare cash to buy some more supplies
 

zuluwarrior

Petty Officer 2nd Class
Joined
Sep 11, 2010
Messages
109
No Title

Hello Guys, managed to get a little done to the bulkheads and will go with 4 per side with the front and rear being 1.5" thick. the rear three are going to be spaced about 31.5" apart and the front is 27.675" apart. I'm pleased with the dry fit and will make any final adjustments before pbing to the hull. I put a line level on them in their rough form and it's not to bad.
 

Attachments

  • photo220881.JPG
    photo220881.JPG
    170.2 KB · Views: 0
  • photo220882.JPG
    photo220882.JPG
    176.1 KB · Views: 0
  • photo220883.jpg
    photo220883.jpg
    47.3 KB · Views: 0

kcassells

Fleet Admiral
Joined
Oct 16, 2012
Messages
8,738
Look at all those perfect bulkheads....get out of here to cool!
:D
Were they there like that in the original build?
 

zuluwarrior

Petty Officer 2nd Class
Joined
Sep 11, 2010
Messages
109
Nope, hull had foam sandwich construction like a whaler. I'm really using my best guess as to how many bulkheads to use but I tried to space them so that the span between them would not create flexing in the cockpit sole and not exceed the width of a sheet of ply. Hopefully I'm ok.:D

Everything is created twice, first in the mind and then in reality. So pay close attention to the thoughts you choose. They have a way of becoming real.
 
Top