Finally began my summer project and I am already confused...

fishKILLER1987

Petty Officer 3rd Class
Joined
Mar 22, 2010
Messages
86
Re: Finally began my summer project and I am already confused...

Oh ok. Sounds like Marine plywood is the only way to go for transom building.

I have done alot of research throughout the day and it seems like the two most common choices of wood for replacing stringers is white oak and douglas fir. Doug fir seems to be much cheaper than white oak so I think this is the wood I will go with to build the stringers. Now I just have to track down a lumber yard with fir boards that match the demensions I need.

Do fir boards usually come treated or maybe treated and then kiln dried??
 

tdrudd87

Petty Officer 1st Class
Joined
May 28, 2009
Messages
288
Re: Finally began my summer project and I am already confused...

Actually, most of use seem to use exterior for the transom, but if you want to spring for marine, I can't say it would be bad. Just pricey.

Any reason you don't want to use ext ply for the stringers, scarfed as needed? Although, I used select grade pine and am relying on my glass for strength.

Terry
 

d_saum

Petty Officer 3rd Class
Joined
Jul 3, 2007
Messages
80
Re: Finally began my summer project and I am already confused...

Hey Fishkiller.. Just wanted to say hey and thanks for all the questions/info/updates/pictures you're providing. I'm about to start my own Center Console rebuild and your thread has already answered a lot of questions for me.

I'm very curious to see how you end up placing your livewells and the general layout once you're done.


If I may... can I ask one question to the experts? (Sorry.. not trying to hijack the thread, but it may be applicable to fishkiller also) If you were going to use PT outdoor plywood instead of marine grade ply to save money, how do you dry it? and how do you know when it's actually dry enough to go in without issue? (again... sorry Fishkiller for my question in your thread.) :redface:
 

jonesg

Admiral
Joined
Feb 22, 2008
Messages
7,198
Re: Finally began my summer project and I am already confused...

My construction buddy told me to nail the sheet of PT ply to the side of the house, ok but its not my house. :p
A few hours in the sunlight baked that sheet dry, flipped it over and did the other side.

I noticed when I glassed one side it warped, but glassing the other side within 2 hours pulled it back into shape again.
My stringers are 5/8th ply.
20 inches tall x 8 foot long.
Glassed them in the shade then moved into the sunlight, the resin goes off in minutes when the sun hits it.
 

fishKILLER1987

Petty Officer 3rd Class
Joined
Mar 22, 2010
Messages
86
Re: Finally began my summer project and I am already confused...

D saum,

Not a problem. I was actually wondering the same thing. With the high price of marine grade ply, you cant help but wonder what other options are out there.

Here's an update:

Right after work today I went down to a fiberglass supply house on the south side of town. While talking to the owner of the shop, I learned alot more about fiberglass work. I had originally wanted to use epoxy resin and woven roving to glass the stringers into place. Boy was I wrong. The owner explained to me that not only is epoxy resin extremely expensive, but it is nearly impossible to completely wet down the thick fiberglass cloth used to incase the stringers. His suggestion to me was to use polyester resin instead. He explained that the majority of boat builders that buy supplies from his shop use polyester resin for all fiberglass work except for applications that require more of a putty like bedding compound to bed the stringers to the hull. I also learned that it is nearly impossible to use woven roving to glass over the stringers. Woven is so thick that it is difficult to bend it around the sharp corners of a board like at the top of the stringers. It tends to lift off the stringer and cure with gigantic voids and air pockets. Instead, the owner told me that most builders use two layers of 1.5oz CSM to cover the stringers. He said it is alot easier to work with and holds up just as strong as woven roving.

So I ended up purchasing two gallons of polyester resin, two small bottles of medium MEKP, 4 yards of 1708, a couple mixing containers, a couple syringes, and a really neat aluminum roller used to remove any unwanted air bubbles.

I ground down the majority of the old fiberglass that incased the stringers which has left me with just the hull bottom which I will lay the new stringers down on. In the midst of all the grinding I made a couple deep gouges into the hull bottom so I have decided to lay down a strip of 1708 which will cover the portion of the hull where the new stringers will be bedded down. I figure this will give me an opportunity to practice working with fiberglass and stregnthen up the hull quite a bit. After glassing in the strip of 1708 I will have an even and strong surface in which I can bed the new stringers down on.

Just a little more grinding to do tomorrow then I hope to start the fiberglass work by friday. Then begin installing the new stringers on saturday after I track down some fir boards that match the demensions I need.

Any ideas, opinions, or suggestions??

Thanks.
 

83mulligan

Senior Chief Petty Officer
Joined
Feb 7, 2009
Messages
687
Re: Finally began my summer project and I am already confused...

Fish, you may already know this, if not, here goes. You don't want to lay your stringers directly on the hull. If you do it will create a hard point of contact which stresses the hull. You'll want to bed them in a layer of peanut butter you make up yourself or a bed of PL Premium (lots of guys on here seem to like this method). This will create a firm bond, but somewhat flexible contact point with the hull.

This is the way it was explained to me, perhaps some experts can chime in with a more technical explanation.
 

jonesg

Admiral
Joined
Feb 22, 2008
Messages
7,198
Re: Finally began my summer project and I am already confused...

Make sure they sold you unwaxed resin, and you will need at least 4 more gallons.:)

The resin roller must go into acetone, you'll need a couple of gallons of that and silicone gloves are a must. Put the acetone in a small bucket with a lid, just enough to cover the roller and cut a slot in the lid or the acetone will depart pronto. Soon as you sense the resin curing and starting to gel get the roller in the acetone.

On stringers that are less than 2 inches thick you glass each side seperate and seal the edges/ends with straight resin, its a whole lot easier doing it outside the boat and glassing it in place after it cures. You'll soon find out.
 

fishKILLER1987

Petty Officer 3rd Class
Joined
Mar 22, 2010
Messages
86
Re: Finally began my summer project and I am already confused...

Ok, so you're saying to put the roller in the acetone as soon as Im done usings it to apply the resin right?? In order to keep it from ruining.

The guy did explain to me yesterday that it is easier to glass in the stringers one side at a time. He said it is much easier then trying to wrap glass around the entire stringer at one time.
 

jonesg

Admiral
Joined
Feb 22, 2008
Messages
7,198
Re: Finally began my summer project and I am already confused...

Ok, so you're saying to put the roller in the acetone as soon as Im done usings it to apply the resin right?? In order to keep it from ruining.

The guy did explain to me yesterday that it is easier to glass in the stringers one side at a time. He said it is much easier then trying to wrap glass around the entire stringer at one time.

Resin goes off in a matter of minutes, anywhere from 5 to 10 minutes,
the bigger the batch the faster it starts to gel, a quart of resin might go off in 4 minutes if you don't get it out of the mixing pot.
On a larger batch as a QUART I pour it out and spread it with the brush at the same time then go back over it again with the brush to even it out, by the time I've done that its gellin up. I'd say less than 10 minutes from adding the mekp to getting the brush into acetone.

theres no way you could get it done in one shot,
I prefer to use a big 4 inch brush as rollers don't do corners.

I pre-glass stringers because its easier to just tab them in place than having to be concerned about getting glass up the sides and free of voids,
I accomplish all that on top of a garbage barrel.
Once the stringer is glassed I bed it and let it cure, then tab with cloth and resin, about 6 feet at a time. Its a lot easier to mix up a few smaller batches of resin than one big batch. You'll see.:D
 

fishKILLER1987

Petty Officer 3rd Class
Joined
Mar 22, 2010
Messages
86
Re: Finally began my summer project and I am already confused...

Oh ok. I think I understand what you're saying. Im sure I will soon realize once the fiberglass work begins. Im hoping that glassing over the area where I ground down the old fiberglass that incased the old strigers will give me enough practice to get familiar with fiberglass before moving on to more important jobs like glassing in the new stringers.

It took me 3 days of calling multiple lumber mills to find doug fir lumber that matched the demensions I needed for my new stringers. However, today I found a small lumber yard 200 miles away that had exaxctly what I needed. So I took off work around noon today and set out to pick up my new stringers. 6 hours later I had the wood in my garage. I got 6 doug fir boards, 2x12x18. This should be more than enough to make the new stringers and then some. I got an extra board just incase I happen to butcher one on accident.

The original stringers were made out of plywood. Because it is impossible to find a a piece of plywood that is 16ft long, 2 of the 3 stringers were actually two seperate pieces of plywood fiberglassed together to make the full legnth needed. However, since Im replacing the plywood stringers with demensional lumber I now have board long enough to make each stringer out of one solid piece of wood. So instead of having two pieces of wood attacted together on the ends, the stringers will be one solid piece of wood running from the stern to the bow. I would imagine that this could only improve on the stability of the boat. Any thoughts???

Thanks.
 

jonesg

Admiral
Joined
Feb 22, 2008
Messages
7,198
Re: Finally began my summer project and I am already confused...

Too bad they couldn't deliver the wood or freight it to you.
But you got it now.
All in all whatever you do will be superior to the factory build, they just can't devote the time and labor we do.
Try throwing some glass and resin on scrap wood just to get the feel of how it handles before commiting resin to hull. I love the smell of resin.:p

Make sure that wood is dry or the resin will not take at all.
Been there, done dat.
 

fishKILLER1987

Petty Officer 3rd Class
Joined
Mar 22, 2010
Messages
86
Re: Finally began my summer project and I am already confused...

Excellent idea. A little practice never hurt anyone.

The wood is kiln dried so I should have no problem getting the fiberglass to stick to it. That was one of the first things I made sure of before driving all that way to pick it up. So I should be good to go.

Over the course of the weekend I was doing some thinking. I will be adding alot of weight to this boat when I install the larger stringers and multiple crossmembers. The stringers were originally made of plywood and and could be lifted with one hand. The new stringers are made of demensional lumber that will take two men to lift and set down into the boat. The crossmembers will be made of marine ply so they shouldnt add too much extra weight but I know the stringers are significantly heavier then what was originally in the boat.

Is all this extra weight going to be a problem??
 

jonesg

Admiral
Joined
Feb 22, 2008
Messages
7,198
Re: Finally began my summer project and I am already confused...

Older boats had heavier glasswork and a solid ride.
Don't forget all the wet foam you tossed.

Good wood is better than wet foam.:D
 

fishKILLER1987

Petty Officer 3rd Class
Joined
Mar 22, 2010
Messages
86
Re: Finally began my summer project and I am already confused...

Alright guys, long time no talk I know...but I wont get much done sitting here on the computer. Just have to get out there and get it done. So for the past week or so I have been relentless on this thing. However, for the amount of work done I still feel like I did not get much accomplished.

I did run into a few snags which slowed the process down quite a bit. But never the less I got what needed to be done accomplished.

Progress Report:

Picking up where I left off, I had ground down the remainder of the old fiber glass that held the old stringers to the hull and began the start of the new fiberglass work. By the way, fiberglass work is no fun. What a mess!! I had cut out pieces of 1708 and laid them down on the hull where I had ground down the old fiberglass. This added alot of strength to the hull and helped prevent it from bowing when laying down the first stringer. However, I dont think I will do this to the other side because it was very time consuming and used up a large portion of materials. I try to keep in mind that this is a learning process and I am learning as I go.

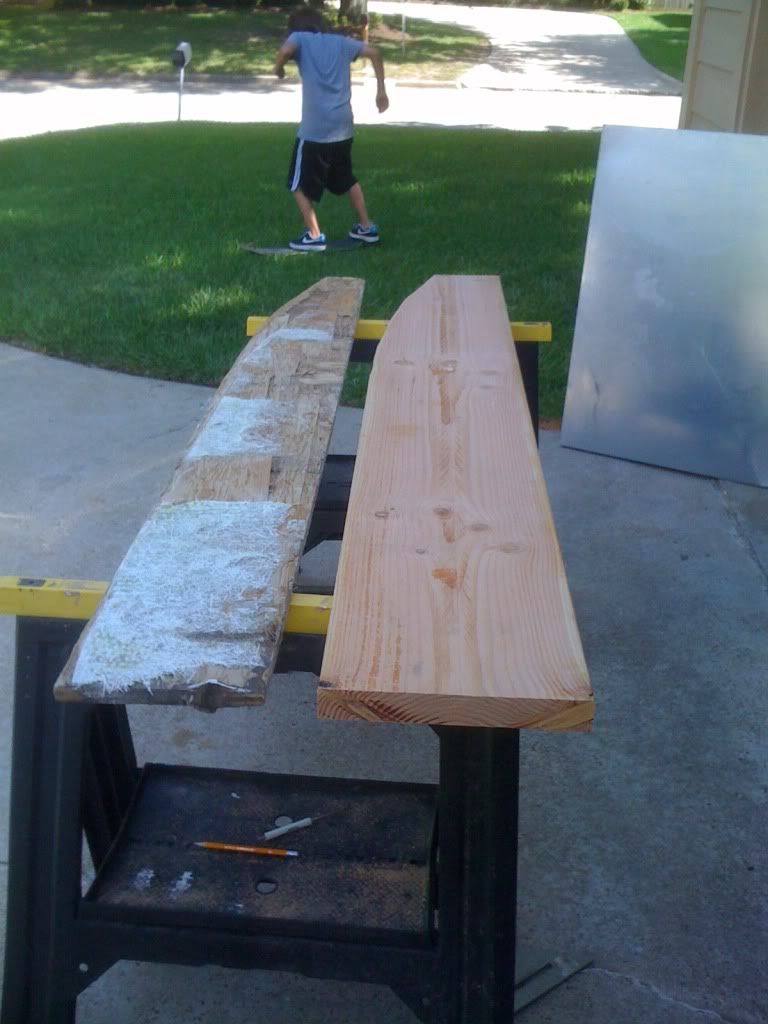
I then began the process of cutting out the new stringer. I used the old stringer to trace a pattern onto the wood to cut out the new stringer. This is where I ran into a few problems. Because the original stringer was two pieces of thin plywood fiberglassed together, I had to significantly modify the new stringer to fit to the shape of the hull. I went with one solid piece of wood to make the new stringer, which I feel can only improve on the structural integrity of the boat. After the stringer was cut to the correct deminsions, I used a grinder with a coarse sanding disk to grind the wood down to match the shape of the hull. This was a very handy tool because I could almost mold the wood into any shape.

After a long period of taking the stringer in and out of the boat for frequent test-fits, I finally found a good fit and went with it. I mixed up a batch of epoxy resin and cabosil to bed the stringer down to the hull. I made a very thick mixture like peanut butter which made it very easy to work with. I was very concerned with the weight of the stringer pushing through the epoxy and eventually resting on the hull bottom, so with the help of my father, we constructed a few jigs that insured the stringer would stay at least 1/4" off the hull bottom to prevent any hard spots.

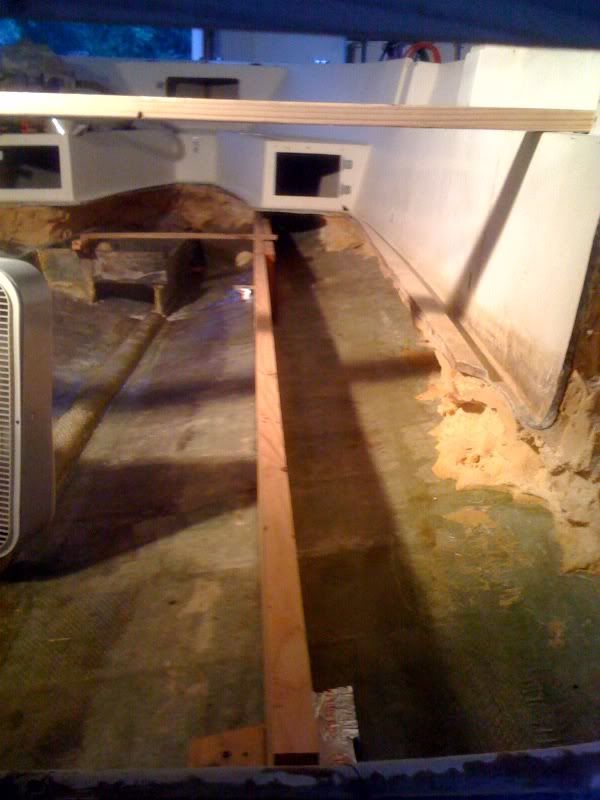
We then laid down a very thick strip of epoxy onto the hull bottom then placed the stringer down into the epoxy. We then gathered up what epoxy had oozed out from underneath the stringer and forced it back under the stringer to prevent to possibility of voids forming within the epoxy. After the epoxy was packed in we then cleaned up the edge where the epoxy met the hull bottom let it cure. We also used a level to insure the board was relatively straight and secured it with a "quick-fix" piece of 1X4 board that was attached to the adjacent old stringer to keep the new stringer from moving during the cureing process. After the epoxy cured I then removed the jigs that kept the stringer off the hull bottom and packed more epoxy into the open area where the jigs had been. Overall I would say the first stringer came out good.

So thats as far as I have gotten. My next step is to begin glassing the stinger to the hull. This process is taking a little bit longer than I had originally anticipated, but I think the next two stringers will go much faster because I now know what to expect.

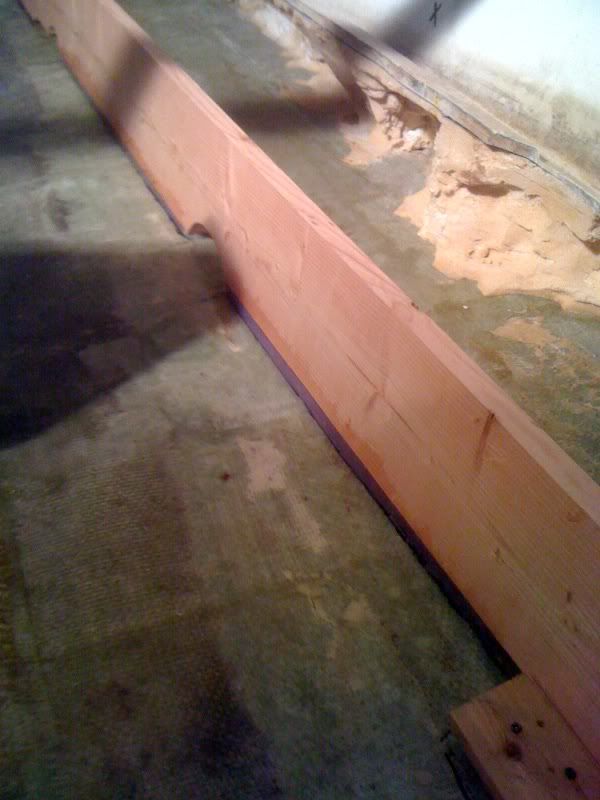
Unfortuneately, I have no pics of the stringer cutting process...just the finished product:

newboatstringer2.jpg


You can see here the epoxy between the stringer and the hull bottom. In some places it is up to an inch thick. I hope this isnt a problem. Any thoughts???

newboatstringer3.jpg


newboatstringer1.jpg


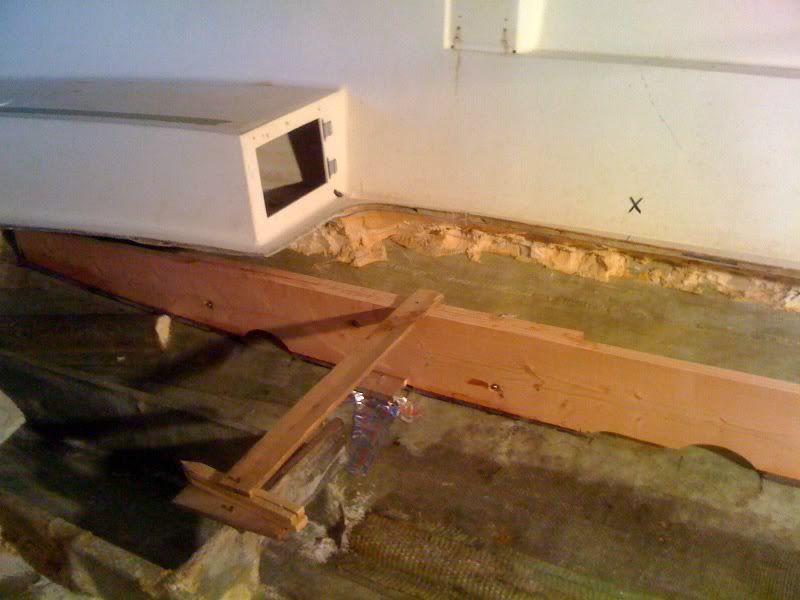
Here you can see the "quick fix" board we used to secure the stringer while the epoxy cured. It looks terrible but it did the job. You can also see one of the jigs that was used to keep the stringer off the hull bottom.

Tell me what you think.

Thanks.
 

83mulligan

Senior Chief Petty Officer
Joined
Feb 7, 2009
Messages
687
Re: Finally began my summer project and I am already confused...

Fish, looks good. You may want to consider taking a router and putting a roundover (i used a 3/8" bit) on the top to make wrapping the stringer with fiberglass easier.
 

jonesg

Admiral
Joined
Feb 22, 2008
Messages
7,198
Re: Finally began my summer project and I am already confused...

Little bits of pink foam work as spacers between stringer and hull., leave em in there. Looks good, you're onto the rebuilding process.
 

fishKILLER1987

Petty Officer 3rd Class
Joined
Mar 22, 2010
Messages
86
Re: Finally began my summer project and I am already confused...

Good to hear!

I agree. I think everything is shaping up good so far. Just need to keep working at it.

I think I will either router or grind the edges of the stringer down so it will make it a little easier to wrap the glass around it. I had actually thought about this while the board was out of the boat but in the midst of rushing to get the stringer in I neglected to get it done.
 

fishKILLER1987

Petty Officer 3rd Class
Joined
Mar 22, 2010
Messages
86
Re: Finally began my summer project and I am already confused...

Finally an update!

All the new stringers are finally in and it is now time to install the crossmembers to support the boat from side to side.

I was originally going to use 3/4" marine ply to make the crossmembers but after discovering that the cheapest price for marine ply in my area is $83 a sheet, I am looking for a cheaper alternative. I have alot of leftover doug fir wood that I used to make the stringers and I was considering using that to make the crossmembers. The boards are 2" thick by 12" wide...would this wood be good to make the crossmembers out of??

Or is there a better alternative out there??

As always, here are a couple pics of how she sits now:

photo.jpg


This is a pic of all three stringers bedded down to the hull of the boat. No glass yet.

photo2.jpg


Here you can see the difference in size from the old stringer made from 3/4" Ply (on left), and the new stringer made from 2x12 doug fir (on right). Quite a difference.
 
Top