First rebuild - '89 Campion Allante 185 - Stringers, Deck, Transom

Chris51280

Ensign
Joined
Jan 24, 2018
Messages
932
I will leave my bilge area as is without gelcoat. Since gelcoat is just poly, there is no need for it since nobody will see it. I won't even bother with a waxed surface since this it wont hurt or help doing it either way. Just glue down my neoprene strips with PL and call it a day.
 

steve_h7

Chief Petty Officer
Joined
Sep 16, 2018
Messages
401
Perfect, thank you both! I'll do the two jobs just like you suggested. :thumb:
 

kcassells

Fleet Admiral
Joined
Oct 16, 2012
Messages
8,738
Most guys do paint or gelcoat the bilge area. The other under deck compartments...not so much. :]
Makes cleaning easier.
 

kcassells

Fleet Admiral
Joined
Oct 16, 2012
Messages
8,738
Oh re-read. tank area and bilge area are 2 different spaces. Tank area to paint is a total option.
 

Chris51280

Ensign
Joined
Jan 24, 2018
Messages
932
ups, I meant tank area will be left untouched and without paint.. Bilge will be gelcoated along with the ski locker.
 

steve_h7

Chief Petty Officer
Joined
Sep 16, 2018
Messages
401
I don't have a ski locker, and the bilge is an open area with the gas tank. There's no bulkhead closing off the tank from the bilge, it's all one compartment. Just fwiw...
 

chevymaher

Commander
Joined
Mar 29, 2017
Messages
2,932
I don't have a ski locker, and the bilge is an open area with the gas tank. There's no bulkhead closing off the tank from the bilge, it's all one compartment. Just fwiw...

The earth axis is changed and the poles just reversed. Watch out.
 

steve_h7

Chief Petty Officer
Joined
Sep 16, 2018
Messages
401
:D
If the bilge is easier to clean with a coating I might just go ahead and use gel coat under the tank and into the bilge area now. I was debating whether to use it on the deck and sides and it'd be a good chance to see what it looks like and if it's something I'd want to walk on and have to look at all the time.
 

steve_h7

Chief Petty Officer
Joined
Sep 16, 2018
Messages
401
Waiting for gel coat and more supplies so I thought it'd be good to move on and get the hull damage I caused during the demo, fixed. I enlarged the cut in the hull and put 1 layer of csm, 1 layer of 1708, then another 2 layers of csm on from both the interior and exterior. Besides being a little nerve racking grinding to make the damage larger, it seemed to go pretty well. Grinding and sanding upside down on the exterior of the hull is a new treat in itself. :) I have the exterior pretty well sanded and now am waiting on fairing compound.
The gelcoat when sanded is a total different color of white than the aged stuff... am I looking at color sanding they entire hull that will be below the waterline to bring it back to one color and to get the color to match? I know the upper colors are old and very oxidized and will need the whole treatment but I wonder about the value of sanding all the white gelcoat below the waterline that no one will see? Or is there an easier way?
 

Attachments

  • photo311666.jpg
    photo311666.jpg
    483.6 KB · Views: 1
  • photo311667.jpg
    photo311667.jpg
    234.4 KB · Views: 1
  • photo311668.jpg
    photo311668.jpg
    198.6 KB · Views: 1

Chris51280

Ensign
Joined
Jan 24, 2018
Messages
932
what do you get for fairing? I will make my own with glass spheres.
No easy way in sanding. If you sand with 220 grit it goes very fast. I did it sanding my anti fouling off the transom. still got to do the keel upside down. not looking forward to it.
 

steve_h7

Chief Petty Officer
Joined
Sep 16, 2018
Messages
401
Waiting for fairing compound so I tabbed in my tank support board that I covered in csm to waterproof. I'm a little confused about how to put in the neoprene strips when I install the tank. I've got a 1" gap between the tank and hull as well as about the same between the tank and stringers. Is the goal of these strips to hold the tank securely from the unsupported part of the tank bottom and sides? I found some 1" x 1" strips if this is what their purpose is:

https://www.amazon.com/Rubber-Stuff...+1"+thick&qid=1556897498&s=industrial&sr=1-14

The tank itself has tabs on each end, fore and aft, that allow it to be screwed into the board supporting the tank too.
 

Attachments

  • photo311775.jpg
    photo311775.jpg
    253.9 KB · Views: 3
  • photo311776.jpg
    photo311776.jpg
    230.1 KB · Views: 3

Chris51280

Ensign
Joined
Jan 24, 2018
Messages
932
It looks like your tank is screw on the bottom to the floor.Is this correct? Very unusual. The neoprene is to give the tank some cushion and air around the tank. It also lifts up the tank so no standing water will touch it. If your tabs are solid to the board, then they strips would be of no purpose. When in doubt. put it back as it was but better. Make sure no water gets in your screw holes
 

kcassells

Fleet Admiral
Joined
Oct 16, 2012
Messages
8,738
Mr.Chris is completely right. Good catch and Steve good question. The tank rests on the neoprene strip that are alternatively staggered so air and water can do there jos and evaporate.
The water trapped under the tank will rot it.
On another note hopefully the fittings won't be too high above the height you were shooting for. Usually the tabs are on top. But what do I know?
Can you get the fabricator to add tabs to top? Or a local shop.
Let's see if we can get other opinions.
:D
 
Last edited:

steve_h7

Chief Petty Officer
Joined
Sep 16, 2018
Messages
401
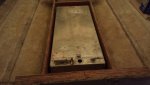
Yes, it screws to a support board tabbed onto the hull.
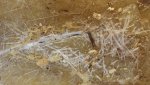
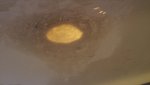
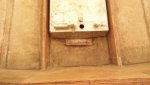
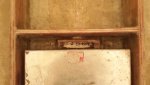
I asked about the neoprene strips before but I probably did a terrible job of describing how the tank sat originally... so being that it's an unusual design, let me add some more pictures to help. When I demo'd it originally there was a lot of debris under the tank support board (probably not the right term but I don't know what else to call it :)
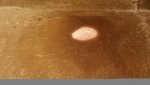
) so I made the board another 4" wider so it sits higher across the keel part of the hull and gives a little more room under it than the stock board did.
I didn't find any neoprene (or any type) of support strips along the sides and under the tank other the board under the tank when I took it apart.
Thanks so much for the info and help and let me know if these pictures change anyone's mind because for now I think I'll just skip the neoprene strips.
 

Attachments

  • photo311784.jpg
    photo311784.jpg
    284 KB · Views: 1
  • photo311785.jpg
    photo311785.jpg
    269.5 KB · Views: 1
  • photo311786.jpg
    photo311786.jpg
    230.1 KB · Views: 1

kcassells

Fleet Admiral
Joined
Oct 16, 2012
Messages
8,738
Last time....
Don't lay the tank on the deck directly even if you see a gap like you pic shows. Re-think it. You tank will last days not years. Once you add fuel that tank will belly out, will rub and rupture.
Swear to God I think you are fing with me. Just do it simple stupid. :faint2: Can I buy life a life insurance policy on you and your unknowing boat riders? I'll need some info.
Done, your boat do what you want.
 

steve_h7

Chief Petty Officer
Joined
Sep 16, 2018
Messages
401
I value your opinion but maybe you're missing that the belly of the tank is resting on a 3/4" board with csm and 1708 covering it. I'm not sure how it would belly out. I'm just putting it back the way I found it and it lasted 30 years before I tore it apart so I'm kind of lost.
 
Top