It all started with a leaking livewell. boat restore project. 1993 Mirrocraft

fishrdan

Admiral
Joined
Jan 25, 2008
Messages
6,989
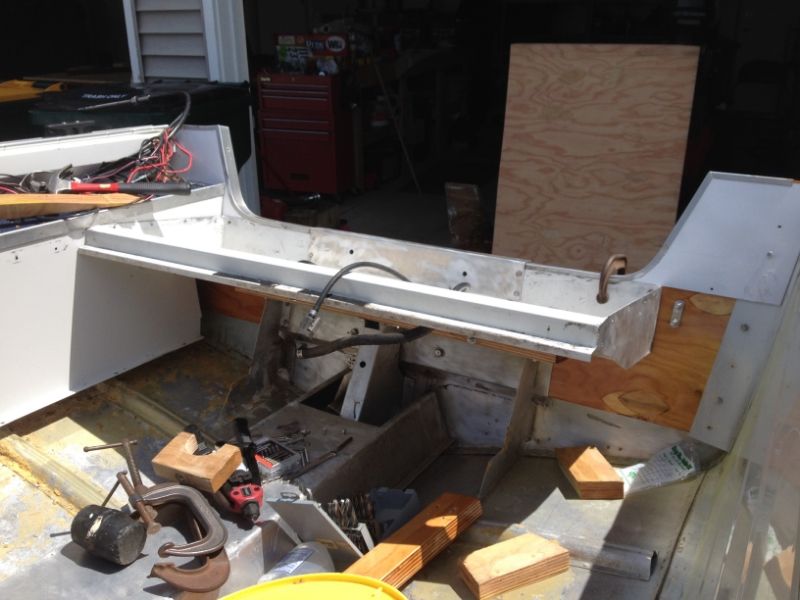
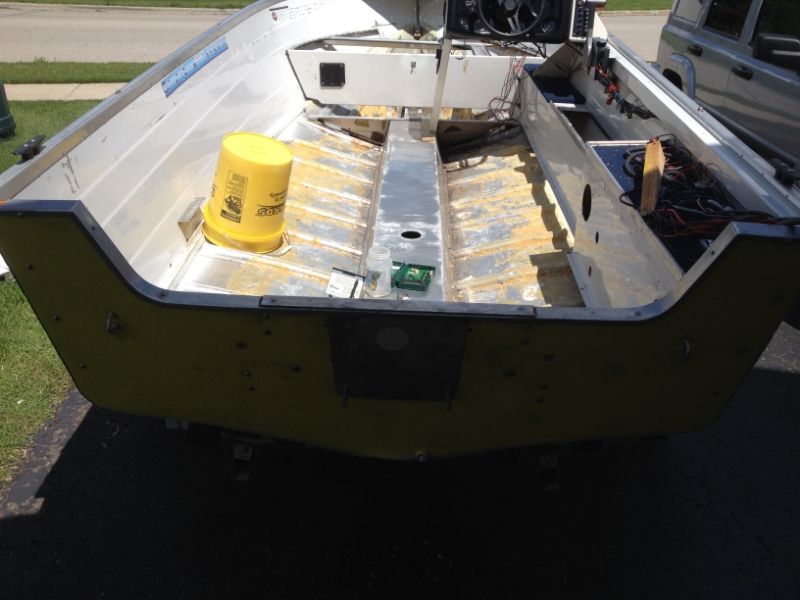
Dry fitting was rough it was pretty tight on the thickness on the corners. Is it supposed to be that tight? Is the epoxy going to make it tighter?

Saw your other thread, replying to this one...

Tight is a problem as it's going to get thicker with epoxy. Can you post up a pic of where it's tight in the boat, there maybe alternatives to sanding, or maybe not. You don't need to sand the entire transom, just the tight places. While fitting the transom. I'd put a couple layers of tape on the tight areas, (to simulate the epoxy layer) so it's not too thick after epoxying,
 
Last edited:

Browndog10

Petty Officer 3rd Class
Joined
May 13, 2014
Messages
89
Thanks just wanted to make sure before I started sanding the C*** out of it only to find out that its supposed to be tight like that. Last resort may be trimming it but the size is accurate. I see much sanding in my future today. :) Hopefully start with the sealing.
 

Browndog10

Petty Officer 3rd Class
Joined
May 13, 2014
Messages
89
Quick update had to sand a ton.almost a full ply. Area on the top was wider 1 1/2 than the bottom at 1 3/8. Went and checked the old piece and it was thinner at the bottom. oy Hindsight I should have used 3/4" and 1/2" marine ply instead of 2 3/4" and would have saved myself a bunch of sanding. I have gotten it to go pretty easily now and drilled the holes. Need to go to a family function so I will probably epoxy it tomorrow.
 

Browndog10

Petty Officer 3rd Class
Joined
May 13, 2014
Messages
89
Last coat of epoxy on transom, jb weld the transom panel or whatever its called. Sanded, primed both sides. Installed new livewell pump. I also got the tubes and hardware for the home made tool, should be interesting. :eek: Took the week off so hopefully I will get the started on the reassembly, I plan on taking to a launch and leaving on the trailer to see if any rivets leak before I put the foam and floors in. I would hate to get her all back together only to find a leak that the old foam was hiding.
 

Browndog10

Petty Officer 3rd Class
Joined
May 13, 2014
Messages
89
IMG_3900.jpg

IMG_3897.jpg


Spent most of the week sanding, painting and JB welding. Weather didn't cooperate also so delayed a few days. Installed the new bilge and livewell pump. Got the dry fitting done on the transom. I wanted to make sure that it would all go back together correctly. A few more things to paint and prime and I will start the assembly. I also started cutting the floor as I ordered the nautolex and will get the foam this week.
 

Browndog10

Petty Officer 3rd Class
Joined
May 13, 2014
Messages
89
Thanks JNG definitely not as far as I wanted to get. Darn weather! I am debating if I should clean the bottom of the hull (with acetone?) and gluvit the bottom just for sh*ts and g*ggles I have basically done everything else so why not? On a side note I forgot to mention that the bilge hose had a hole in it. How does that happen? Its a pretty sturdy hose and I know that it was never moved because it was embedded in the foam. Just makes you wonder. I also have a conundrum when coming to the bow floor. It was molded and curved. Looks like I will be trying my hat in wood shaping. I wont be able to do this with 3/4" though going to try it with 1/2" plywood. I am sure a few f bombs will be dropped before all is said and done.
 
Last edited:

Browndog10

Petty Officer 3rd Class
Joined
May 13, 2014
Messages
89
Priced out the rigid foam from depot and Menards. It looks like the 2 part foam may be more economical or at least very close these days. As the 4x8 rigid sheets are 26 bucks a piece where I reside. US comps has 2 pt for 8 cu ft for 67 bucks. I need about 14 cu ft. by my rough calculations my boat weighs 650 empty and motor is about 185 rounded up to 200lbs. At the similar costs is the pour in the way to go?
 
Last edited:

jbcurt00

Moderator
Staff member
Joined
Oct 25, 2011
Messages
25,122
IMO pour in foam gets a bad reputation. If you can get the 2part delivered at or about the price of rigid sheets, I'd go pour in foam EVERY time:
  • Better flotation via every nook & cranny gets foamed or at least mostly foamed
  • Resistant to fuel (HUGE plus)
  • Adds deck rigidity (or at least it should)
  • Reduces hull noise because it is adhered to the hull, not laying against it.
To reduce the primary con (complete PITA to remove if it gets water logged) take care of the boat once you're done rebuilding it: Bow high, plug out, well covered......
 

Browndog10

Petty Officer 3rd Class
Joined
May 13, 2014
Messages
89
It looks like it will cost me 10 bucks more for the pour in with shipping, and thats not counting tax on the rigid foam. Only problem is that now I have to sell the hot knife that I ordered last night as I wont need it. LOL! Judging by the post for the foam calculations, a 4x8 sheet of 2” rigid foam was 14 bucks a piece in 2009. Its now 26 bucks a piece, price has just about doubled in 5yrs. Wow!
 
Last edited:

Woodonglass

Supreme Mariner
Joined
Dec 29, 2009
Messages
25,929
One of the members, I don't remember who, laid plastic sheeting down first and then poured his foam so it would NOT stick to the hull, Just in case he wanted/needed to remove it at a later date. In some ways it defeats the purpose and in others not so much. Just food for thought. Not stating an opinion just an option.
 

Browndog10

Petty Officer 3rd Class
Joined
May 13, 2014
Messages
89
Hmmm ok. I guess it would defeat the purpose in the added stability of the hull?
 

83mulligan

Senior Chief Petty Officer
Joined
Feb 7, 2009
Messages
687
BD, I just finished my deck with that product. Love it! Also, on the foam thing, I laid plastic on the back compartment only so it would be easy to inspect and remove if necessary. you can see it in my thread in my sig. The pourable foam is nice because you can get it to conform to wherever you need it by blocking it. you can do small pours in the low areas to make sure it gets where you want it and stays out of drainage areas and then pour it up to the level of the bottom of your deck. Or, you can do like I did and use butcher or wax paper under the deck and lift it off to create a level platform for the deck, but not stuck to the deck. It's versatile stuff. Good luck with your project.
 

Browndog10

Petty Officer 3rd Class
Joined
May 13, 2014
Messages
89
Cool, just read the whole post. Nice work! I hope mine comes out that nice. Should I add a drain to the floor with the nautolex? Also, where can I find the blue foam for the livewell that was mentioned?
 

83mulligan

Senior Chief Petty Officer
Joined
Feb 7, 2009
Messages
687
BD, Thank you! Regarding the drain, I did it so water would not sit on my deck if it rained, I washed the deck down or whatever else might happen. The back edge sits on a rib and up against the back panel you see that isn't finished yet and I wanted a place for water to easily get to the bilge. The foam sheet is just closed cell insulation and you can find it at any home depot, lowes, etc.Stuff I used was 3/4" but its available all the way up to 2 inches thick or so.
 

Browndog10

Petty Officer 3rd Class
Joined
May 13, 2014
Messages
89
Oh gotcha on the foam. No wonder I couldnt find it. I thought that it was something completely different. Thats another obstacle that I have to tackle about sealing the top of my livewell so when I take off the water doesnt spill out from the top. That wont be addressed for awhile though. So for the drain did you make a channel or is it basically just a hole that goes right down to the hull to drain? I am wondering if I should do that. Drain is only a few bucks.
 

83mulligan

Senior Chief Petty Officer
Joined
Feb 7, 2009
Messages
687
I just made a channel out of that green foam board and taped it off before I poured so foam could not get in the channel. One thing that you have to remember when pouring that foam is that it builds a tremendous amount of pressure while it is expanding if it has nowhere to go. It will actually buckle your deck if there is no relief hole for it to escape through.

I also have to figure out how to seal my hatches. That will be down the road though.
 

jbcurt00

Moderator
Staff member
Joined
Oct 25, 2011
Messages
25,122
One thing that you have to remember when pouring that foam is that it builds a tremendous amount of pressure while it is expanding if it has nowhere to go. It will actually buckle your deck if there is no relief hole for it to escape through.
IMO, although buckling the deck is a possibility, the larger problem is that if there is no relief hole, the foam will also fail to fully expand. So you'll need to use more foam to fully foam the areas you want filled, it will be much more difficult to fully foam those areas & it will all be less effective as flotation then it should have been.

2lb foam only supports 60lbs +/- per SqFt if it expands at the rate it's intended to expand.

So for many reasons, care should be taken when prepping & pouring the foam.
 
Top