It has begun!

FBPirate95

Master Chief Petty Officer
Joined
Apr 15, 2009
Messages
840
Re: It has begun!

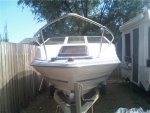
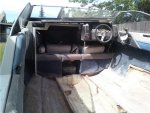
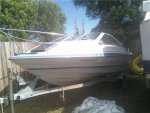
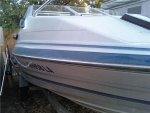
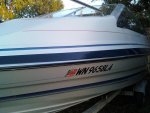
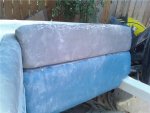
Sorry I havn't updated in a bit. I have not been working on her as I have been busy at work. It seems that in a sluggish economy my work as a security/accesss control technician is in high demand. As if that isn't enough I got a Kidney stone attack on Friday evening, so have been laying low this weekend. Depending on how I feel this afternoon I may get back in there and finish up the grinding. I will keep everyone who is interested in the progress updated. I know there are alot of us doing the same project right now but I find it interesting to follow the individual progress of others.

Kidney stones....YIKES!!!!

Keep updating as you can, even if its just to say hi. You see my thread, I update weather anyone responds or not. LOL It's kind of like my therapy diary. I'll keep following your thread if no one else does! :D
 

lowvlot

Petty Officer 1st Class
Joined
Jul 5, 2009
Messages
231
Re: It has begun!

Here is a question that many might find rediculous. I know I am the one that removed the deck but my question is does anyone know if the original is 1/2 or 3/4 inch thick? My deck was so wet in most of it that it sorta just broke apart and i'm not sure. My first inclination is that it is 1/2 inch with another section of 1/2 inch around the ski locker. Is this a reasonable assumption? Also so many people do this stuff a different way that it is hard to narrow it down. Would it be alright to resin the deck top bottom and sides then mat and resin it to the hull or do you have to resin the deck top bottom and sides and then mat the whole deck when it's down? :confused:
 

redfury

Commander
Joined
Jul 16, 2006
Messages
2,657
Re: It has begun!

Yup, best chance is that you had 1/2 layered around the ski locker. We want to keep our boats as light as possible, so 1/2" decking would be the way to go if you have the support under the wood to allow it. 3 stringers in my Glastron allows that in my case. 1/2" isn't going to be very stiff over a large expanse. However, 1/2" with a layer of glass is going to be much stiffer....which is why they call it composite construction! :D
 

lowvlot

Petty Officer 1st Class
Joined
Jul 5, 2009
Messages
231
Re: It has begun!

Thanks redfury. My boat only has two stringers but it isnt very wide there wouldn't be a very big span anywhere so i think 1/2 is the way i will go.

In reading multiple threads on here I keep coming across terms that I am not sure I know. Like what is CSM? What is PL? Lay up? I'm guessing that is the process of laying the resined fiberglass. I also asked this in an earlier post. I have som spots in the hull that i can see light through. There not all the way through just look thin. I am thinking just take some mat and resin and build that are up. Then do an outside repair with fiberglass putty ( Not sure of the exact term) Then gel coat those areas. I am assuming this would be best practice. I will try to get some pics up of the progress so far soon.
 

redfury

Commander
Joined
Jul 16, 2006
Messages
2,657
Re: It has begun!

Couple of answers to your questions...

PL is a brand of adhesive that is popular here ( myself included ). If you need to bond anything to the boat, PL Premium adhesive is the cats meow if you don't want to mix resin to make "peanut butter". I used it to adhere my transom and stringers to the hull and have been pleased with the results so far.


CSM stands for Chopped Strand Mat, 1708 Biax is 17 oz biaxial woven glass with a layer of 8oz csm stitched to it...very common for structural components like stringers, and transoms.

Lay up/Lay up schedule refers as you assumed correctly, putting the glass down. Expanding on that thought, it has more to do with the order in which you do things when applying glass to your project.

For example, if you are using poly resin to fix your "thin" spots from the inside, you would decide how strong you wanted the area. If it was just a thickness issue, then sanding the surface down to good glass, then glassing the inside with a couple of layers of mat ( depending on the oz rating you buy ) is pretty much your schedule. If you have an exterior part to the repair that requires glassing, then doing that after doing the interior section would be the next step in your lay up to take advantage of the bonding between the outer and inner glass if you are repairing a hole...for example.

As far as your thin spots go, snap a picture of what you are concerned with and you'll get plenty of suggestions on what to do with it. :cool:
 

lowvlot

Petty Officer 1st Class
Joined
Jul 5, 2009
Messages
231
Re: It has begun!

Redfury you are a wealth of knowledge. Thank you. I will take pics of the spots this weekend if the weather holds.
 

lowvlot

Petty Officer 1st Class
Joined
Jul 5, 2009
Messages
231
Re: It has begun!

Okay. Here she is in all her glory. Any help on the thin spots would be appreciated. Best practice on the missing and scuffed gelcoat? Also what do you think about removing the railing? I am leaning toward removing it.
 

Attachments

  • boat front.jpg
    boat front.jpg
    49 KB · Views: 0
  • boat gellcoat missing.jpg
    boat gellcoat missing.jpg
    16.6 KB · Views: 0
  • boat inside.jpg
    boat inside.jpg
    48.7 KB · Views: 0
  • boat outside.jpg
    boat outside.jpg
    48.1 KB · Views: 0
  • boat thin spot.jpg
    boat thin spot.jpg
    36.2 KB · Views: 0

redfury

Commander
Joined
Jul 16, 2006
Messages
2,657
Re: It has begun!

That looks like it's just normal keel wear...you don't have any gel coat. That's pretty easy if that's what I'm seeing. A few layers of 1708 Biax tape and a gel coat repair on the outside and probably a good keel guard and you are set.
 

lowvlot

Petty Officer 1st Class
Joined
Jul 5, 2009
Messages
231
Re: It has begun!

It is amazing in my opinion what a little 1000 grit wet sand some buffing compound and wax will do for your gel coat.
 

Attachments

  • Before Buff.jpg
    Before Buff.jpg
    43.3 KB · Views: 0
  • After Buff.jpg
    After Buff.jpg
    41.1 KB · Views: 0

lowvlot

Petty Officer 1st Class
Joined
Jul 5, 2009
Messages
231
Re: It has begun!

Tried my hand at upholstry this weekend. A crash course in sewing with my mother in law and I turned this out.
 

Attachments

  • before.jpg
    before.jpg
    41.8 KB · Views: 0
  • after.jpg
    after.jpg
    30.9 KB · Views: 0

lowvlot

Petty Officer 1st Class
Joined
Jul 5, 2009
Messages
231
Re: It has begun!

Quick question. I have read alot about letting your plywood dry before using it. Is that with any and all types? Even if it is stored inside at the store?
 

ezmobee

Supreme Mariner
Joined
Mar 26, 2007
Messages
23,767
Re: It has begun!

Mostly it's PT we're talking about drying out. I have found the exterior grade I've gotten to be pretty darn dry.
 

redfury

Commander
Joined
Jul 16, 2006
Messages
2,657
Re: It has begun!

Yup, I haven't found any of the plywood that I've used to have changed dimensionally from the store. It's all kiln dried wood and furnace cured when it is laminated, so the only thing that could need drying out would be the surface and anything that may have been drawn in by the end grains.
 

BrandonHa

Petty Officer 2nd Class
Joined
Jun 9, 2010
Messages
101
Re: It has begun!

Hey Lowvlat, you are in Spokane? Was just reading your thread here and noticed. I am just to the north of you a bit in Kettle Falls. I started my restore (or remodel?) a couple months ago and still going strong.

We also had water logged foam. Talk about a learning experience but tons of fun.

How goes your project?
 

lowvlot

Petty Officer 1st Class
Joined
Jul 5, 2009
Messages
231
Re: It has begun!

Brandonha. That is so weird. I was just reading your thread last night and noticed you are in Kettle Falls. Thought it was pretty close. I do alot of service work and get out your way sometimes. Matter of fact I will be in Addy on Monday. I am very interested in your restore and am watching your thread.
 

BrandonHa

Petty Officer 2nd Class
Joined
Jun 9, 2010
Messages
101
Re: It has begun!

Brandonha. That is so weird. I was just reading your thread last night and noticed you are in Kettle Falls. Thought it was pretty close. I do alot of service work and get out your way sometimes. Matter of fact I will be in Addy on Monday. I am very interested in your restore and am watching your thread.

You are more then welcome to stop by anytime if you get time. You can see my redneck boat repair tent :) I do manage to find my way down to Spokane now and then. I never used to go down there but trying to find things here in Kettle for my boat is sometimes impossible.

Today I am just reading and impatiently waiting for UPS to drop off the first of my parts for vacuum bagging.

I still have to read the 2nd page of your thread here. I read the first page and somehow did not notice there was a second page to it. duh. haha
 

lowvlot

Petty Officer 1st Class
Joined
Jul 5, 2009
Messages
231
Re: It has begun!

Today I did some more grinding and tried to remove the fuel tank. Does anyone know how these come out? Looks like it just sits in there and bayliner put some glass strips on the top to hold it in place. I cut the glass out and unhooked all the hoses and wires but it wont budge. There bulk heads in front and back of the tank but doesn't look as if there holding on to it. There may be half a tank of fuel in there. Do you think that would make it heavy enough to not be able to move it?
 
Top