Man vs. Boat (season 1).

oops!

Supreme Mariner
Joined
Oct 18, 2007
Messages
12,932
Re: Man vs. Boat (season 1).

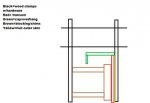
as far as the clamps.......use the thru holes that you allready have. the transom hooks......the key hole.....the garboard.....and knock a few more in for good measure.

really....dont worry about it.....you are going to have to do some glass work back there any how.

as far as fitting the transom.....you can cut down the top edge with out loosing the integrity you need. as much as 5 inches from the top of the key hole.
you can also shave an inch or two from the bottom v and use 2 pieces for that. fill the edges with peanut butter, and glass the whole sha bang.

the only thing is that you want good wood around the key hole. (i know you dont know where that is right now....but if you are really worried.....you can set the x dimension right now . just take your measurements from the outside of the transom)

if you knock the bottom off........this will help you know that your transom is sitting right.

the most common mistake in transom replacement is that the ply does not reach the bottom correctly, and there is a space between the outer hull and the bottom of the transom.

just remember.....after your new transom is built......before the install......practice putting it in......5 times....place.....bolt....

do this till its automatic.... leave nothing to chance.

the "act" of placement. is one of the single most important things in your boat......stringers can be glassed. but there can be no gap between the transom and the skin.
 

GT1000000

Rear Admiral
Joined
Jul 13, 2011
Messages
4,916
Re: Man vs. Boat (season 1).

OK, get the chainsaw, cut the back of the boat off and reattach usings oops! method of hull extension...:eek:

LOL...Just kidding PM.

As far as clamping, I would think the most important consideration is full and total contact, so whatever it takes is the order of the day.
One other possibility is to build some clamps like Woodonglass built involvoling some 2x4's and threaded rods, just make the clamps with a longer reach...see my 1st grade drawing below.

I am like Sgt Schultz in Hogans Heroes when it comes to boat knowledge...I know NATZING!!, but the transom of an I/O should not necessarily have a curve to it, and whether or not it does, the mating surfaces of the drive should be flat anyway, I 'spose.

And finally, like oops mentioned, you can remove a bit of the transom on the sides to clear the side pinch points, and if you want to keep the full height, just trim some of the overhang of the cap that is keeping it from sliding in. Also, keep in mind that trimming the sides, can be done a little at a time, since going in at a slight angle, may not require that you remove all of the material.

Hope this gives you some further ideas in your quest, young padawan...:redface:

Later,
GT1M
 

Attachments

  • transom clamp.jpg
    transom clamp.jpg
    8.8 KB · Views: 0

jbcurt00

Moderator
Staff member
Joined
Oct 25, 2011
Messages
25,109
Re: Man vs. Boat (season 1).

I found the web page for the scissor jack clamps. Function exactly like GT1M's wood clamp drawing, extensions could be added make clamps wide enough to bridge over the transom cap.
Scissor Jack Clamps

Post #50735 shows more detail
Post #50728 shows them in use

Since I don't have a welder, I'll be using wood clamps. Plan to remove my cap, but have to grind tabbing from entire interior seam:(. I have been scrounging parts to fab a welder from 2 microwave transformers........So we'll see........If you see a really bright bluish white light flash over mid west virginia, please send someone over w/ 1 &7/8 ball hitch to drag boat out of smoldering garage:redface:

Have a great week & good luck making progress, even small victories can be big!
 

scoutabout

Lieutenant Commander
Joined
Oct 14, 2006
Messages
1,568
Re: Man vs. Boat (season 1).

That's alot to ponder PM!

My advice garnered over exactly zero years of boatbuilding, would be to consider the following:

Rather than trim or cut your cap, go with a multi-section transom insert which is then reinforced with overlays of appropriate thickness across seams - much as what has been suggested before. Maybe make the first sections left/middle/right pieces and the next layer top/middle/bottom pieces, all appropriately set into whatever bonding agent is best.

Also, I have certainly seen some Mercruiser boats with gently convex transoms (specfic models escape me now, of course). There is probably a magical curvature whereby you can still make complete and sealed contact between the outdrive and the glass surface. It seems to be to be a shame to crush that flat as it may stress other parts of the structure. Not sure if I read it right but it seems someone above suggested making up the inner transom with many multiple individual (therefore flexible) plys of wood that would (chuck chuck...:D ) allow for a complete and strong mated surface between outer glass and wood.
 

chriscraft254

Commander
Joined
Jun 4, 2011
Messages
2,445
Re: Man vs. Boat (season 1).

Hey man, on the carpet glue you were battling with. I have found a sanding disk for my grinder that is really working great at removing the glue in my cabin. I will be posting it in my refurb thread along with the type grinder I'm using.

Also, I agree, there is no reason to have to put a transom in in one peice. As long as you layer the next layer and seams differently from the first layer, you should be good to go. Of coarse that being said, make sure everything is bonded well. Good luck.;)
 

Pmccraney

Lieutenant Commander
Joined
Jul 26, 2011
Messages
1,734
Re: Man vs. Boat (season 1).

Thanks Guys... I really appreciate you taking the time to read that novella and give me your input. That's why I love this forum... So, many folks willing to lend a hand.

I just got back from the shop.... The transom is definitely supposed to be curved... It's clear it came out of the factory mold that way. I put a flat level up next to it in the middle and there is a "mirror image" barrel-curve going to both sides. It also curves slightly top to bottom, but less pronounced than the horizontal curve.

The horizontal angle is more pronounced than I thought it was.... When I put the level inside the boat up against the transom I could easily slide my fingers behind the level at the "apex" (not sure if that is correct term) of the arch. So, I have definitely ruled out the "force flatten approach" - over time it is going to want to conform back to its original shape of 36 years and that can't lead to good outcomes.

I've seen multi-piece transoms on here (I think thread is "I'm really not looking forward to this"), but for some reason (maybe unfounded) that tends to give me a rash... Plus you still have to use a bunch of resin/materials to join everything and make sure the layers end up flush. However, that is still very much "Plan A-2" if the ideal outlined below doesn't work out.

I did go ahead and make a "relief cut" on the port side gunnel (I'm acting like one of my clients... I asked for advice, you guys gave it to me, and then went ahead and did what I wanted to do). Whether I go one-piece or multi-piece, this will be very easy to put back in and gives me more room to work with either way.

So, here is what I am thinking based on my "shop time" today and the thoughts from above.

(1) Go ahead and glass over the existing hole - a couple of layers of CSM and maybe some 17.08.
(2) Once the hole is covered, do a "build up" in the middle part of the transom with some structural PB and CSM. Test it periodically with a flat level to make sure I have a nice flat surface horizontally and vertically.
(3) Once this build-up is done, go ahead and measure the X-dimension. make the key-hole cut in the glass. Make sure this is uniform thickness and do further build up and/or sanding as necessary.
(4) Join two 3/4 in' ply pieces (single units) with PB or PL Premium.
(5) Lay that assembly in the boat and get it fitted and make sure it is flush.
(6) While the new transom pieces are laying (or is it lying) there, trace the key-hole cut out that is in the glass.
(7) Remove pieces from the boat and cut the key hole out (now I have a pass through for clampage).
(8) Do a CSM lay-up on the transom while it is outside of the boat.
(9) Then bond the transom pieces to my new flat transom. Use clamps for the key hold cut out and get it nice and snug. Tab it in, start on stringers.

Give me a sanity check on this.... If you guys think it would be easier to do the multi-piece transom, I am all ears. Don't want to waste my time, energy or pricey materials doing it the hard and/or wrong way.

I think you can use a new PB layer over cured PB, and that assumption is critical to this working out, especially if I have to do additional build-ups to even it out. If that is wrong, let me know.

Thanks again guys, and JB I'm glad to have you on board and freakin' love that old Glastron you picked up. Going to be a really sweet looking ride when you are done. Very classy (and classic) look/lines.

Thanks
 

GT1000000

Rear Admiral
Joined
Jul 13, 2011
Messages
4,916
Re: Man vs. Boat (season 1).

One last thought...

1/4" plywood strips, 6-8" wide, resined/csm'd, stacked, alternating vertical then horizontal, each "lamination" clamped till set, to take the curve, then built up. After 6-8 layers, you should end up with the 2-1/4+/_ " thickness you need???
Then you could add a couple of additional layers in the center where the cutout will be...sand flat both the inner and outer surfaces for the keyhole??

Yeah, I will shut up now, I know NATZING!
 

Pmccraney

Lieutenant Commander
Joined
Jul 26, 2011
Messages
1,734
Re: Man vs. Boat (season 1).

GT - you crack me up. Not to be be presumptuous, but think I have picked up on 4 things about you from reading your posts: (1) first and foremost, you are a man of faith, which I applaud; (2) you have a good sense of humor; (3) you have a great attitude and are always wanting to help; and (4) you are a huge fan of cross-hatched, basket weave type applications. One of these days you are going to get someone to bite on that.... (actually, it looks like arch, the "aquatect," did employ it a little on his toon mock up).

The problem here is that the I don't think the merc transom assembly will tolerate any form of "curve" (it needs to be dead-level flat at least around the key-hole) and your method would "preserve the curve" so to speak.

Thanks for stopping by... Keep visiting... I love having you around.
 

jbcurt00

Moderator
Staff member
Joined
Oct 25, 2011
Messages
25,109
Re: Man vs. Boat (season 1).

If you build up the transom w/ PB & CSM to give you a flat surface at the keyhole, then laminate 2 layers of 3/4 ply, you may make the transom too thick. I seem to remember 2 1/4 max thickness at the keyhole........GT1M's suggestion seems accurate. My only other comment would be to make wooden 'cribbing' that you use on the outside as a 'form' through which you pass the all thread to make GT1M's clamps from image above. The cribbing needs to extend the width of the hull to full spread load across entire transom & prevent additional flat spots.That way as you clamp the new transom wood in place it is drawn into arched curve shape of hull.

I don't have an I/O, but I think it was posted in a thread: the Transom doesn't need to be flat, just a small area directly around the keyhole, just a small % of the total transom area.

Use mold release gel on thru hull fasteners & inside fender washers & nuts to keep resin from sticking....
 

GT1000000

Rear Admiral
Joined
Jul 13, 2011
Messages
4,916
Re: Man vs. Boat (season 1).

GT - you crack me up. Not to be be presumptuous, but think I have picked up on 4 things about you from reading your posts: (1) first and foremost, you are a man of faith, which I applaud; (2) you have a good sense of humor; (3) you have a great attitude and are always wanting to help; and (4) you are a huge fan of cross-hatched, basket weave type applications. One of these days you are going to get someone to bite on that.... (actually, it looks like arch, the "aquatect," did employ it a little on his toon mock up).

The problem here is that the I don't think the merc transom assembly will tolerate any form of "curve" (it needs to be dead-level flat at least around the key-hole) and your method would "preserve the curve" so to speak.

Thanks for stopping by... Keep visiting... I love having you around.

What can I say, the first merit badge I earned in the Boy Scouts was Basket Weaving, guess I am still trying to revive it after all these years...
 

GT1000000

Rear Admiral
Joined
Jul 13, 2011
Messages
4,916
Re: Man vs. Boat (season 1).

Then you could add a couple of additional layers in the center where the cutout will be...sand flat both the inner and outer surfaces for the keyhole??

You missed that part didn't you, HAH!

You almost had me convinced I was not paying attention...:p:D
 

Teamster

Lieutenant Commander
Joined
Nov 8, 2010
Messages
1,923
Re: Man vs. Boat (season 1).

The problem here is that the I don't think the merc transom assembly will tolerate any form of "curve" (it needs to be dead-level flat at least around the key-hole) and your method would "preserve the curve" so to speak.

Blah, Goop on some Gluvit and go!!!!,..................lol..
 

Pmccraney

Lieutenant Commander
Joined
Jul 26, 2011
Messages
1,734
Re: Man vs. Boat (season 1).

Thanks Guys... Yes, GT, I did miss that... Sorry about that. JCB, I misspoke on the two 3/4 ply pieces. You are right... merc specs is 2" with a little wiggle room over to maybe 2.25. Would prolly have to dial at least one of those back to 1/2.

I finally found THE THREAD (see post 39) I remembered where a guy had a curved transom and he did it in three pieces. I remembered it had the phrase "not looking forward to this" in the title. So, after turning up nothing with the powerful iboats search engine, I scrolled through 14 pages until I found it... Sure enough, "not looking forward to this" was right there in the title. Best boat site in the world = yes; Google-like search technology = no.

Back to stringing Christmas lights and watching a little NFL....
 

BobsGlasstream

Commander
Joined
Sep 11, 2009
Messages
2,128
Re: Man vs. Boat (season 1).

I would use the same clamp method I used on mine. You don't need to have the entire Keyhole just a couple holes for the threaded rod to go through. One other option is the method used by several other builders that looked like giant chop sticks. Niether of these methods require additional holes. As for the transom, I would lift the top if I couldn't get it in.

Best of luck
Bob
 

U.S.S. Too Tall

Petty Officer 2nd Class
Joined
Jul 30, 2011
Messages
120
Re: Man vs. Boat (season 1).

PMC, I havent been on here in a long time. You have made a lot of progress since then! Looking good!
I also love the Rocky movie! Classic! I was laughing pretty hard!
As for the transom issue, I would use the 2 or 3 piece method. Put the first layer in with the 1/2 inch, with the 2 vertical cuts, then follow that with the 3/4 inch with 2 horizontal pieces. Not that I have any transom experience, but like JBCurt said "I'm not an expert by any means, but here's my $0.015: You'll get change back from my 2cents."

I need to try and get on here more often, but catching up on your build, and watching your videos, has taken a good 2 hour chunk out of my 14 hour work day!!
Good work! Keep it coming!!
 

oops!

Supreme Mariner
Joined
Oct 18, 2007
Messages
12,932
Re: Man vs. Boat (season 1).

lot to ponder there.

ill go over it all again when i get back.......

(im doing some plastic injection molding for a company here.....its cool....if it works....i might do some parts for my boat)

but i would not cover the hole before you install the transom.

flatness and parellelism on the hole area is CRUTIAL to the new transom. 2 x 3/4 inch ply is not thick enough.....even tho you will be adding matt and 1708....i would go 1 inch and 3/4 laminated together. this will only give you slightly over 1/4 inch to make up with a little slush. if you are too thin.....a washer between the nut and the transom plate will take up the non threaded area of the stud
 

Pmccraney

Lieutenant Commander
Joined
Jul 26, 2011
Messages
1,734
Re: Man vs. Boat (season 1).

Thanks Oops... Let me know your thoughts when you have time. FWIW, I think I am now leaning towards the multi-piece transom.... I did not understand some of the things you said in your first post about the bottom piece....
if you knock the bottom off........this will help you know that your transom is sitting right.
...


PMC, I havent been on here in a long time. You have made a lot of progress since then! Looking good!
I also love the Rocky movie! Classic! I was laughing pretty hard!
As for the transom issue, I would use the 2 or 3 piece method.

Thanks U.S.S. - Glad to have you back. Glad you liked the vid, and I do think I am now leaning heavily towards the 3 piece method.

I would use the same clamp method I used on mine. You don't need to have the entire Keyhole just a couple holes for the threaded rod to go through.

Thanks Bob, I think that is exactly what I am going to do, especially since Oops advices not cutting the key hole first.


Blah, Goop on some Gluvit and go!!!!,..................lol..

Teamster, I wish it was that easy... The thought of a metal boat has certainly entered my mind in this whole grinding process.

Guys, I took some video from this past weekend, and will try to post today or tomorrow. No special tricks this time, just some short footage so you can have a better idea of what I am dealing with on the transom.
 

jasoutside

Supreme Mariner
Joined
Dec 20, 2009
Messages
13,269
Re: Man vs. Boat (season 1).

The thought of a metal boat has certainly entered my mind in this whole grinding process.

Oh I dunno why man, looks like yur having a real blast!
mccraney-1.gif


:p:D
 

Pmccraney

Lieutenant Commander
Joined
Jul 26, 2011
Messages
1,734
Re: Man vs. Boat (season 1).

Man, I knew you wouldn't be able to hold that ace in your back pocket very long.... Of course, I did throw you a softball there...

there is really nothing clever or crafty I can come back with on that, except to say "well played" on that one.
 

jasoutside

Supreme Mariner
Joined
Dec 20, 2009
Messages
13,269
Re: Man vs. Boat (season 1).

Ah, I owed ya one.

Cheers buddy:D

Let's see if I can be of some help rather than a big punk.

___________________________________


I've been reading through your stuff here on the transom and haven't really commented as I'm not wearing the same color jersey ya know.

But, my gut tells me one piece transom (3/4" + 1/2" + 1/2") with the points of contact shaved away just enough to be able to slide it up into place. If ya know what I mean.

The 2 or 3 piece would surely do the job but I keep thinking it would be a bunch more work for ya and it may introduce more opportunity for issues/weak spots (bubbles, air pockets, n stuff) vs. a one piece.

____________________________________


But I am talking out of my league right now so I should just stick to talkin smack.:)
 
Top