Man vs. Boat (season 1).

jasoutside

Supreme Mariner
Joined
Dec 20, 2009
Messages
13,269
Re: Man vs. Boat (season 1).

I'm so glad I sold mine:)

The guy I sold it to was really happy to get it too:D
 

jbcurt00

Moderator
Staff member
Joined
Oct 25, 2011
Messages
25,109
Re: Man vs. Boat (season 1).

>>>>>>------ This space reserved for congrats on the successful transom install. -----<<<<<

:)
 

GT1000000

Rear Admiral
Joined
Jul 13, 2011
Messages
4,916
Re: Man vs. Boat (season 1).

Patrick,
I finally got a chance to see the vids, and all I can say is...
AWESOME!
GREAT JOB!

You continue to inspire and motivate with every step you take...

Thanks for the videos and the time you took to make them possible.

Now I gotta ask a couple of questions...
1- How "hot" did you make the PB? .5%? 1%? 1.5%?
1A- What was your ambient temp, approximately?
2- How long did the actual mix/install/clamping take? In other words, from the time you started mixing PB until you had everything clamped...
2A- Did you mix your PB first before adding MEKP, or did you mix the resin and hardener, then thicken?
3- How long after you got everything clamped down did the PB 'kick"?

Thanks again and I am looking forward to the reveal...
 

Pmccraney

Lieutenant Commander
Joined
Jul 26, 2011
Messages
1,734
Re: Man vs. Boat (season 1).

Hey Gus;

You caught me a good time - taking a quick "iboats" break - so I'll go ahead and fire off the replies.

1. The temperature was pretty good. It was in the low to mid 60s. That's really a little cool for glassing, but since I was working by myself and wanted a slower kick, I was okay with it. In the shop, it was probably a little higher than that - low 70s, because I had the heat on and small heater running.

2. I mixed it at slightly more than 1%. I had 750 mils of resin and I threw in about 8 mils of MEKP. I added a little to compensate for the lower temps, but still give me plenty of working time (because I was working by myself).

3. I didn't really put in a clock, but of course, you want to remove the transom from its "dry fit" position before starting to mix the PB and you certainly don't want to dilly-dally... Have everything set up and ready to go. Your transom piece in the boat (preferably), your clamping system (bolts, etc..) nearby and neatly organized and you will want to have already cleaned the area with acetone, etc...

I put in the MEKP first before adding the fillers (important for even kick). I would say I mixed it up over about 5-7 mins. Then I hopped into the boat. I spent about 5 minutes putting it on the backside of the transom and about another 5 minutes putting on the transom skin. Then another 5 minutes to bolt it on, make some final nudges/adjustments to get it straight (1 min) and then final crank-down on the bolts (1 to 2 minutes). All in all - about 25 minutes - "ISH" from the time I started mixing the PB to the time the last bolt was turned.

My resin was firming up a tad by the time I got everything installed, but it certainly wasn't kicking fast. I seems to get a little darker in color when it is starting to firm up. Mine looks like a honey color when its first mixed and then turns a little bit darker brown. It was still pretty wet (think of slightly runny jelly) when I had finished up. I was able to work some along the edges that had squeezed out by running a gloved finger down the sides (sort of like smoothing out a caulk line).

A little bit will squeeze out when you clamp down so allow for that. You don't want to apply too much and just have it all squeeze out like sandwich with too much jelly in it.

A couple of things to keep in mind.

You really want to do a couple of dry runs to practice installing it. Makes it a little more systematic/automatic and eliminates any surprises.

Also, keep in mind my clamping system was pretty easy because I just drilled holes in my boat. If you are clamping from above or using a different approach, it may take a little longer.

Also, I was using a smaller (middle section) only. This means it was easier to install, and did not take a lot of time to apply the resin.

If you have a larger complete transom piece, it will certainly take more time and certainly more peanut butter. Mix a little more than you think you will need because you don't want to get 2/3 of the way through the job and run out of PB. My PB was able to hold its position pretty well (even on vertical surface), even though it hadn't truly "kicked" yet, because I mixed it pretty thick. I was pleasantly surprised by that.

Others may have more info or tips and they are welcome to chime in... Again, this was only the second time I had ever mixed PB and I am learning on the job.
 

GT1000000

Rear Admiral
Joined
Jul 13, 2011
Messages
4,916
Re: Man vs. Boat (season 1).

Thanks Patrick, that helps clear up a few if's I had concerning my future attempt at transom installation...

Again, great job! and thanks for the quick response...these tips will help a lot when the time comes, because it is very hard to visualize just how long things take to actually do...
 

jbcurt00

Moderator
Staff member
Joined
Oct 25, 2011
Messages
25,109
Re: Man vs. Boat (season 1).

>>>>>>------ This space reserved for congrats on the successful transom install. -----<<<<<

:)

Pulled the clamps yet so we can officially call the center section installed? The 2 side wing sections should be a breeze! Drilling holes to use a similar clamp setup? W/ the big honking hole, a few extra <1/2" holes won't be a problem. Especially if you run a layer of CSM over most of the transom after you taper, fill & fair over the old outdrive opening.

Just a quick note to remind ya to change those filters often:D
 

Pmccraney

Lieutenant Commander
Joined
Jul 26, 2011
Messages
1,734
Re: Man vs. Boat (season 1).

Thanks JBC! - Hadn't had a chance to get out there yet... You raise a good question about how I am going to clamp those side pieces???

Hmmm.... I guess I could drill through the actual transom boards, or maybe wait until I cut the key hole on my center piece and use the hole to run some clamps with feet like frisco did... If it gets too complicated, I may just run a few layers of 1708 since its curved... Thoughts???

Also, sorry about your joke on Jason's Islander thread going right over my head... I'm an idiot...
 

jbcurt00

Moderator
Staff member
Joined
Oct 25, 2011
Messages
25,109
Re: Man vs. Boat (season 1).

No problem.... The wife doesn't call me obtuse for nothing.......

I think you just answered your own question: Through the keyhole! You've been reading friscoboater & oops threads! And paying more attention then a kindergartener... (its late so I don't want anyone to miss it, ^^ that was a snide comment aimed at our favorite early rising, hard working, video & pix posting madman of the north whose currently working on a SC i$l@nder ;) ) I'm sure they'll approve & green light that plan! Wings should be smaller, less CRITICAL so easier to install. Plus as almost mirror images, port side will be a trial run so starboard should go even better.

I'm not familiar w many things boat motors of any kind related, but I think I'd plywood the rest of the transom. Not just use 1708. Unless its multiple layers, not just 2. I think WOG posted it somewhere to ALWAYS CSM 1st, for good poly bond to the existing, and between 1708 layers for the same reason. So to apply 2 layers 1708, you'd also apply 2 CSM(1.5oz) layers for a total mat weight of 36-37oz,1 more of each may qualify you for the BOMBER certificate to be added to your profile, and then just glassing could be sufficient.?.?.?
 

bear_69cuda

Commander
Joined
Oct 10, 2008
Messages
2,109
Re: Man vs. Boat (season 1).

hmmm.... I guess i could drill through the actual transom boards, or maybe wait until i cut the key hole on my center piece and use the hole to run some clamps with feet like frisco did... If it gets too complicated, i may just run a few layers of 1708 since its curved... Thoughts???
...

yes! ^^^^^^^^^^^^^^^
 

Outback Jack

Petty Officer 1st Class
Joined
Apr 23, 2010
Messages
267
Re: Man vs. Boat (season 1).

T
Hmmm.... I guess I could drill through the actual transom boards, or maybe wait until I cut the key hole on my center piece and use the hole to run some clamps with feet like frisco did... If it gets too complicated, I may just run a few layers of 1708 since its curved... Thoughts???

That is a good plan. The thing is you do not need a lot of clamping force. As long as you get a good squeeze out of the pb from the backside and around your pieces you will be fine. You are going to be supporting it also with layers of 1708. When I put mine in I just braced a 2x4 from the console up against the plywood ...Worked good for me but clamping would have been better. The biggest concern is getting all the air out from the backside and filled in with a good pb mixture of chopstrand.

Jack
 

wisechoic

Cadet
Joined
Jan 14, 2012
Messages
6
Re: Man vs. Boat (season 1).

Nice "Chris". I have owned a 1978 19ft Lancer since 1980. She has a 305 "Marine Power" (GM) with a 280 Volvo Drive. It has been a rock solid boat and does pretty well even on the rough waters of Lake Erie. She is beginning to show some age though. This year I had to replace the distributor, and it looks like I have a weak port side stringer. Hopefully I can get some help with that from someone who has done one. Good luck with your Lancer.
 

glnbnz

Chief Petty Officer
Joined
Oct 4, 2011
Messages
458
Re: Man vs. Boat (season 1).

Since today was pretty crappie weather here in Illinois to work on my boat...I finally got the time to get through this thread (that I have been wanting to do for some time) and watch all the videos. Sometimes I look up at what I am doing and think 'Wow I am so overwhelmed by this project' but watching you and others on this forum really keeps me going. I like the part on one of your vids where you went over things that you had thought about for the boat and it reminds me of all the times that I think about my project. Sometimes I wake up in the middle of the night and I just know that going back to sleep is not an option as all of thoughts of the boat keep running through my mind.

This is a great thread Pmccraney and I am looking forward to seeing some more.
 

Pmccraney

Lieutenant Commander
Joined
Jul 26, 2011
Messages
1,734
Re: Man vs. Boat (season 1).

GT, JBC, OJ:

Thank you as always for stopping by. I really appreciate the interest and the kind words.

wisechoic - Sounds like you made one on your boat purchase... I would love to see some pictures of your lancer. Snap a few if you don't mind... Your boat is 3 years "newer" than mine, but I would love to see the similarities, etc..

glnbnz - thanks for taking the time to read through and watch... This has been an awesome experience learning something completely new and meeting a lot of wonderful people from all over in the process.

Okay guys: Didn't get a ton done of the boat this weekend, because I did this:

Duck Hole.jpg

That picture is from sunrise on my saturday morning duck hunt with several really good friends... We had a blast hanging out and had a good hunt, but that sort of eliminated any Saturday work. Notice the geese flying high... {not sure by the pic. insists on loading sideways... Turn your head to enjoy the view}


I did make it out to the shop briefly today, but I spent the first hour or so fixing this:


Lil Bat man got that for his 7th b-day and it proceeded to break 2 days after he got it. After figuring at the chain assembly, its as good as new. Nothing like seeing that smile, and a great little toy for him to cruise around the property while I work in the shop.


I snapped some short video and pics of the transom install, which I will post next (probably in the a.m. - I am being summoned to movie night).....
 

jbcurt00

Moderator
Staff member
Joined
Oct 25, 2011
Messages
25,109
Re: Man vs. Boat (season 1).

Yep, laughter is great! Now if I could just teach my crew to laugh, I'd be set! Still, I'll take the goofy 'smile' like looks of wonder & tail wags all day long! I checked the hunting photo before reading your description, & my 1st thought was you'd spent the day teaching ducks to fly in formation :facepalm:....... The mob is good w/ a Tur-Duck-En for Thanksgiving 2012.....

I have MLK day off, & it's threatening to be above 30 by noon Mon, I may push out her of the garage, tarp the cockpit & grind a bit!

Have a good week!
 

jasoutside

Supreme Mariner
Joined
Dec 20, 2009
Messages
13,269
Re: Man vs. Boat (season 1).

That thing is sweet! I wanna take a ride on that!

I'd be just as happy sittin on the lake at sunrise to man:)

Great excuses to not work on the CC buddy:D
 

glnbnz

Chief Petty Officer
Joined
Oct 4, 2011
Messages
458
Re: Man vs. Boat (season 1).

Sweet Scooter...why didn't they have fun stuff like this when I was a kid...
 

Mark_VTfisherman

Lieutenant
Joined
Nov 29, 2008
Messages
1,489
Re: Man vs. Boat (season 1).

....Need to follow your lead on the wiring diagram.....archbuilder has great advice on the color code too.....Thanks for the vids and keep up the great work.

Just a thought here- this is the most useful way to wire your boat. There are fairly standard-across-brand wiring colors for each use in a boat. If you use that chart, if you ever have a marine tech or someone after you work on/in the boat, using the correct colors can be a lifesaver. Never mind if you have a problem yourself and have to trace out a wire.

If you have to newly wire or rewire anything you will need to buy wire anyway, so you just figure out what you need and buy the correct colors. Here is a nice chart for marine wiring colors.They also apparently sell wire but I can't vouch for their prices or service; I just like the chart. Alternatively, you can get a very basic chart from GlenL here. But these colors only scratch the surface. On the other hand, color-coded wire can cost a fortune if you don't shop around. I have four colors of electrical tape (plus black) that I flag wiring with and write on it with a sharpie- both ends, and any junctions/splices.

You will also probably find very discernible and useful color-coded wiring in almost any outboard built since the 60s.
 

Pmccraney

Lieutenant Commander
Joined
Jul 26, 2011
Messages
1,734
Re: Man vs. Boat (season 1).

Yeah..that scooter is pretty fun...When we bought it at Toys'R'us, I pulled the tag from the display and brought it to the front to buy it. About 15 mins later, they bring out a pink barbie one... I was, like, ummm no... little MAN you see here with me wants the boy version... (he asked for a blue one but the display was red).... So, then about 30 mins later they bring out the red one, and I see on the box that there is also a blue one (300 series).... So, they go back and bring me the blue one... I get it home and realize the blue one is for 12 year olds and goes 15 m.p.h. (sneaky little guy).... Oh well, I wasn't going back at that point...he's big for 7 and will grow into it.

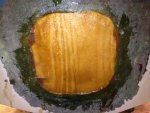
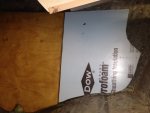
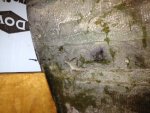
Here are few pics of the middle transom piece installed:

Transom Install Outside - 3.jpgtransom install.jpg

Also, on this one (again, it insists on loading sideways???), you can see a black line on the blue foam that marks where my engine mount stringer will tie in... Just out in front of that, you will see a ridge/hump which is a left over fiberglass build-up (about 1/4 inch), which was adjacent to my old engine mount stringer. Should I grind that away or just bed on top of it with a little room for PB/PL build-up??

Transom Install - 2.jpg

Also, here a couple of quick videos. I have learned that iphone actually takes better videos and can upload them from the phone to youtube, thereby saving me a couple of download and re-publish steps. So, I will take a page from Jason's book, and just start uploading some shorter, un-edited videos for quick topics here and there. However, for longer work sessions where I have a ton of footage, I will still edit them down, etc...


Thanks,
Patrick
 

boatnut74

Lieutenant Commander
Joined
Aug 29, 2010
Messages
1,835
Re: Man vs. Boat (season 1).

Transom looks good Patrick. That's one major milestone of your rebuild. Before you know it the new stringers and deck will be in and you will be trying to decide on interior colors :D Looking forward to more videos and updates.
 
Top