PlayDoh’s 16 SS resto underway

PlayD0h

Petty Officer 1st Class
Joined
Apr 23, 2009
Messages
326
What's the question?

We have a lot of boats and boaters, and most/many go from home to lake each use, meaning lots of launches.
Everybody want's easy launching and often the boat needs to be cranked up, tough to do that with bunks.
We do have bunks here but it "seems" they are on high powered speed boats and bass boats.
I "think"? most of the fishing/aluminum are on rollers.

Dan
ps: there are about 850k reg boats and 1.6 million fishing licences in MN, makes for a lot of boats on the roads and lakes

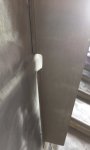
Ah, I gotcha. I was thinking you were referring to the roller ‘bracket’ by ‘support’. I would call those cross-members, but your right about them being easy to contact. I’ve hit the bracket and the support / crossmember at least once.
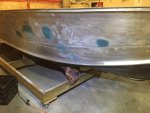
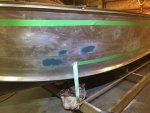
I launch and retrieve 2-3 times a day when I’m camping, and while it’s not ‘easy’ to crank it, it’s also not all that hard. The bogey wheels have made their own little dent in the hull where they sit, and I’d think if each bunk was replaced by 2-3 rollers, they might all dent the hull. Not a huge deal, but I do at times go one some bumpy rough roads.
Without a doubt the majority of fishing aluminum boat trailers around me have bunks. 4 strokes have good low end power and can power up on trailers, and most new boats have 4 strokes here.
I have a spare ATV winch I though of putting on the trailer so the wife can crank me up, or I can with the remote. The winch on my quad has a wireless remote that I never use and I could swap them and use the wireless for the boat.
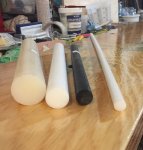
Im leery of modifying the main structure of the trailer by ‘V’ing’ the supports more, but that’s an option. At the very least I want new bunk boards and the composite ones are something I’d like to check out.

I think Ill leave the trailer design alone for now and just re-bunk it and lose the bogeys for a roller and longer bunks.
 

DLNorth

Chief Petty Officer
Joined
May 26, 2016
Messages
432
I wonder if the dents from the rollers are more a problem with the springs getting rusty and not defecting like they are supposed to? Or using a trailer with a larger load rating then what the boat is.* Both would greatly increase the "impact" load at each roller. And maybe the rollers themself's getting hard. Also some are "cogged" to increase the contact area,.

By support - yes I was referring to the "bracket" not the cross members, but neither on that trailer give much room between the boat the trailer. Most trailers here/now have more "drop" on the roller brackets in addition to a vee in the trailer cross members.

As for "motoring up", hard to do on a steep ramp and not popular with many boaters due to the holes that the practice makes at the end of the ramp, and it's less the hole and more the big pile of dirt after the hole that a boat can get hung up on.

* - I once bought a used trailer from a couple that spent a lot of time in Canada fishing. Because of the rough roads they bought a heavy trailer for their boat, a 16-17 ft Lund, maybe 1200 lbs. The trailer was rated at 2,200 lbs, in just 2 years shook apart the boat. I rebuilt the trailer and now have it under our SS16, BUT I removed 2 or 3 leafs from the spring packs to reduce the rating to about 1600 lbs. (measured on a MTS machine).

Dan
 

Watermann

Starmada Splash of the Year 2014
Joined
Jan 12, 2013
Messages
13,822
Even on concrete launches I shy away from power loading, especially if people fish from the docks. Sure fire way to wind up a bunch of mono around your prop shaft and ruin the seal.

With rollers positioned between ribs it'll dent the hull from normal use, the bottom AL is only .090.
 

PlayD0h

Petty Officer 1st Class
Joined
Apr 23, 2009
Messages
326
Question... are the gunnel button snaps on my SS factory? By the number of them I’m guessing they are yet I can’t recall reading about them on others builds.

Id love to have a Bimini as well, yet again I’ve only read a couple questions about them from others. Anyone ever get one? Anyone actually have the original? I guess it says a lot when the vast majority have them removed.

Im considering replacing the gunnel sheet, and going a size up, yet I’m not sure that would even work. If not I’ll add some say 1/8” plate under the cleats.

I got my drains and stern eyes in tbe mail. I overdrilled the transom holes and filled them with short strand fiberglass body filler. In hindsight I would have gone with the epoxy but this should do. I went 1/8”-1/4” over in hole size and about 75% had the redrill in the centre but the rest ended up off to the wood edge on a side. I’ve put a coat of epoxy sealer in the holes.

Im 95% done with the dent fixes and there looking good. Way more work than expected yet part of that is using Marine Tex as a filler. Stuff sands like concrete after a day or 2 cure.
Ill take some pics later
 

Watermann

Starmada Splash of the Year 2014
Joined
Jan 12, 2013
Messages
13,822
Original cover snaps should be riveted on the gunnels. I removed every single one from my islander, found mass white corrosion underneath them.
 

Watermann

Starmada Splash of the Year 2014
Joined
Jan 12, 2013
Messages
13,822
I've not dealt with them yet but I plan on filling them with JB water weld and sanding smooth.
 

PlayD0h

Petty Officer 1st Class
Joined
Apr 23, 2009
Messages
326
I just picked some up for pitting repairs. Any tips on sanding? Does it need to be sanded before it fully kicks?

You won’t need much sanding for that. Don’t put on more than enough to just level the pits. I used both JB Marine and Marine Tex to fill pitting and there either very much similar if not identical.
Marine Tex is way over priced IMO, and I don’t think there’s anything special about it vs marine epoxy. I have to disagree with it sanding like wood. Epoxy is glue essentially and sands like a poly glue. You don’t want to put it on like it’s a body filler where you put it on and sand it down to level. It’s not impossible but not fun.
Most of my gunnels are a single sheet and I’m not sure an epoxy plug would be the best option there. A direct, pointed impact could knock it out. I plan on adding some 1/8 sheet under my cleats and maybe more. If I was going to fill those holes with epoxy, I’d make sure to leave the underside with a mushroom / domed head. I’m sure you know what your doing, but I’d much sooner just replace the gunnels than epoxy a couple dozen holes. I’d like to replace mine with some 1/8” yet I’m not sure I can since the edge moulding might not allow it.
None of my gunnels are dented but I’d just prefer them more strong. I can’t believe the cleats never ripped out with 5/32” rivets in .08 sheet holding them on.
 

PlayD0h

Petty Officer 1st Class
Joined
Apr 23, 2009
Messages
326
Did my leak test and found my knee brace plate leaked. I replaced 6 rivets with bolts and it did the trick. I’m thinking of just injecting some extra 5200 with a large syringe between the hull and plate where it was leaking vs dropping the plate and starting over using another $30 of 5200. That and 5200 on the new bolts should be all it needs. I’m going to add a bead of 5200 around the perimeter of the plate once it’s painted, and if it ever gives me grief I might just weld the bugger.
I’ve filled most of the dent repairs, including the large crease, and one big dent. Word of advice is to take the common suggestion to just live with the dents, or at least consider it. I have decent body experience but working with aluminum to dolly out dents is no fun at all. Whatever you do, don’t hit anything ‘hammer on dolly’ as you’ll stretch the aluminum.
Anyways I can’t say I regret it as my hull will be pretty and it cost me $100 at most and a couple full days worth of work. I’m hoping to have it painted in a day or 2 here. I put Marine Tex on the large dent areas first thinking it would be better at holding on to the hull than the filler.

heres some pics. The tape is on there just because I was eyeballing the paint sections.
 

Attachments

  • photo313974.jpg
    photo313974.jpg
    226.8 KB · Views: 3
  • photo313975.jpg
    photo313975.jpg
    242.4 KB · Views: 3
  • photo313976.jpg
    photo313976.jpg
    240.1 KB · Views: 3
  • photo313977.jpg
    photo313977.jpg
    264 KB · Views: 3

Watermann

Starmada Splash of the Year 2014
Joined
Jan 12, 2013
Messages
13,822
Be careful using 5200 around that knee brace foot, if .... or actually when water gets underneath it will become corrosive trapped under there. Sealing the through bolts is good enough.

I agree, knocking on AL hulls is not easy. I rough the creases and dents up and use marine tex as filler to smooth them out. It's not east to sand MT but at least it won't absorb water if exposed.
 

PlayD0h

Petty Officer 1st Class
Joined
Apr 23, 2009
Messages
326
Be careful using 5200 around that knee brace foot, if .... or actually when water gets underneath it will become corrosive trapped under there. Sealing the through bolts is good enough.

I agree, knocking on AL hulls is not easy. I rough the creases and dents up and use marine tex as filler to smooth them out. It's not east to sand MT but at least it won't absorb water if exposed.

Interesting, and concerning. In that sense ‘buttering’ the plate isn’t a good idea? It was only dripping from the rear middle of the plate and fairly slowly. I went with hex head SS bolts for the 6 spots replaced from rivets. I snapped a couple pan head machine screws, and wanted to really marry the 2 halves.
Before I tightened the bolts, I used a dollar store ‘flavour injector’ syringe to get some 5200 in where the drips came from. Got some in there and after tighteningthe bolts there is no gap.
I was in the city and ‘BOATed’ (busted out another thousand). Got 4 seats, 2 AD 12” base/pedestal/mount packages and an extra base for the casting deck. Got the rest of the paint I’ll need, and I got my vinyl decking the other day from HD.
While at ‘Industrial Paint and Plastics’ I seen some nylon round bar and decided I’m going to use that as a bolt - through transom, liner. 1 1/2” for the 1” drains, 1” for the 1/2” motor bolts, 3/4 for the 3/8” stern eyes, and 1/2” for the 1/4 brace, and edge bracket holes.
Going to epoxy them in the overdrilled holes. Cost me around $40 for all those nylon round bars.

3/4 of the hull is primed and ready for paint, and I’m hoping I can resist the urge to fill in some new found small dents.

OH, I didn’t take a pic yet but I’m ready to put in the vertical bracket that is at the rear (maybe front) of the side shelf. When I hold it up to the hull the 2 bottom holes don’t touch the hull. I can’t remember if there was anything under the bottom half that would fill the space, or if I need to push in the hull as much as possible, or just leave the 1/16 or so gap.
Thats probably confusing so I’ll add a pic tomorrow.
 

Attachments

  • photo314147.jpg
    photo314147.jpg
    259.4 KB · Views: 2

Watermann

Starmada Splash of the Year 2014
Joined
Jan 12, 2013
Messages
13,822
I read you wanted to put a bead of 5200 around the perimeter, back buttering 2 properly prepped surfaces is a different story.
 

PlayD0h

Petty Officer 1st Class
Joined
Apr 23, 2009
Messages
326
Help!!!!
I'm trying to figure out what the reason these brackets are gapped on the bottom 2 holes. I haven’t pulled the consoles out and see if they have attachments that go beneath this bracket.
Anyone know what the issue is? There both equally spaced so it’s not like one got bent. This is the bracket that is at the front of the side shelf. I can’t paint until I get these riveted in, and it’s not possible to just bend the hull to close the gap.
Ive looked through my teardown pictures and at other people’s pics but I can’t see anything that attaches here. Most of my pics don’t show this spot of course.
 

Attachments

  • photo314264.jpg
    photo314264.jpg
    106.7 KB · Views: 2
  • photo314265.jpg
    photo314265.jpg
    107.7 KB · Views: 2
  • photo314266.jpg
    photo314266.jpg
    151.2 KB · Views: 9

PlayD0h

Petty Officer 1st Class
Joined
Apr 23, 2009
Messages
326
I’ve committed the biggest bone head move and don’t label these pieces. Can anyone identify them? Yes I feel like an idiot.
 

Attachments

  • photo314268.jpg
    photo314268.jpg
    238.2 KB · Views: 2
  • photo314269.jpg
    photo314269.jpg
    328.3 KB · Views: 2

Watermann

Starmada Splash of the Year 2014
Joined
Jan 12, 2013
Messages
13,822
The flat stock are those flimsy deck joiners. The ones with the small angle look like side panel to deck joiners. Can't tell what the small pieces are.
 

Watermann

Starmada Splash of the Year 2014
Joined
Jan 12, 2013
Messages
13,822
Looks like it's just the block off for the fore end of the side panel with a wire/cable pass through hole.

fetch
 

PlayD0h

Petty Officer 1st Class
Joined
Apr 23, 2009
Messages
326
Looks like it's just the block off for the fore end of the side panel with a wire/cable pass through hole.

[IMG2=JSON]{"data-align":"none","data-size":"full","height":"1200","width":"645","src":"https:\/\/forums.iboats.com\/filedata\/fetch?photoid=10751984"**[/IMG2]

Ya the picture doesn’t show what I’m concerned with. The bracket has 2 ‘tabs’ above and below that knock off. There staggered to match the hull profile. YET the bottom tab doesn’t lay on the hull, and is around 1/8” from touching, yet evenly gapped.

I still cant find anything that would go underneath the bottom tab which would fill that gap.
 
Top