Reel Peachy - 1993 Stratos 280 SF - Transom Rebuild

super_dork

Seaman
Joined
Apr 10, 2011
Messages
68
Big project. Nice patch job on the transom glass! Can't tell you how important it is to follow WOGs advice on PB - it takes a lot and it has to flow if it is gonna fill in everywhere. Dropping the transom plate in is one place not to short the goo.

RIck


Thanks! I'm really having a blast and learning a lot. I'm planning to load up the PB under the bottom and side edges as I drop it in as well then smooth it into a nice fillet as it oozes out. I feel like I'm making great progress and the end is in sight, but then I realize that I still have to do all of the exterior glass and gelcoat and flake work. I'm apprehensive, but very excited! If things go well, I'd really like to get the transom in by the weekend. Just have to see how things go since I only get a couple hours each night to work and I know that I have 2 nights this weekend that I can't work as much :-(

And WOG seems like he's got a vast amount of accumulated knowledge that he's willing to share. Plus, when compared to other's advice, his lines up and seems to be pretty on point with my plans for execution.
 

Rick Stephens

Admiral
Joined
Aug 13, 2013
Messages
6,118
And WOG seems like he's got a vast amount of accumulated knowledge that he's willing to share. Plus, when compared to other's advice, his lines up and seems to be pretty on point with my plans for execution.

Generally speaking - WOG will save your butt. :D
 

super_dork

Seaman
Joined
Apr 10, 2011
Messages
68
No Title

Well apparently Photobucket says I've maxed out my bandwidth on my account this month. Who knew that was a thing? I'll try to update them with embedded pics.

Well, here's the latest.

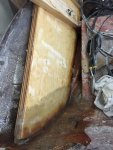
After waterproofing the boards, I added 2 large bolts to help be align once I started gluing since I didn't want to have to screw around with aligning things while on the clock. They worked great. I made up some thickened resin using cabosil but not nearly enough. I started with 24 oz and ended up making 24 oz more halfway through. I rolled it on one piece of the wood, then laid out my chopped strand mat that I cut to size using the AWESOME SHEAR TOOL on the ROCKWELL tool that RGRAUGER loaned me!! It was so cool, just zipped right through it. Then I rolled on the resin and wet the CSM really well. Then made a thick layer on the other board and sandwiched it together. I had also pre-drilled a grid of holes for adding stainless screws which worked well. I decided against trying to clamp it and just started in the middle and worked my way to the edges. The resin gooped out the sides and pilot holes well as I went along so I'm confident that I got a good tight bond. Now I may be wrong on this, but my assumption was that if I used the clamps, once I started putting my screws in, the clamps wouldn't serve a purpose since the screws would prevent any downforce from doing any good.

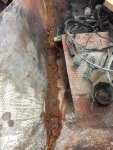
I checked it this morning and it is solid! I've got some cleanup to do. I tried to cut as much of the protruding CSM off as I went, but I'll use the Rockwell tool and sander to clean up the edges and surface. One unexpected thing that happened was some of my screws went through the back. Toward the end of screwing, the wood didn't resist as much and I was able to counter sink the screws more than just flush with the surface and this caused them to come through. Not a big deal, just unexpected. Depending on how easily the screws come out, I may remove them all and fill the holes, but I haven't decided yet. They are stainless screws, so it shouldn't be any issue long term anyway, especially if I seal this thing up right.

Next, I'll wrap the whole thing in a layer of CSM to give it a nice solid shell. Well, not exactly next. I have to take an inch or 2 off the top edge because I think I'm a little high for the splashwell clearance needed. So after I trim it, I'll wrap it.

Overall, using a foam roller on CSM sucked! The CSM just started turning into a blobby mess and making big goopy piles as the fibers moved around. I smoothed it all out, but it really was a bit more globby than I expected.

photo233546.jpg photo233547.jpg photo233549.jpg photo233550.jpg photo233551.jpg photo233545.jpg
 

Attachments

  • attach10071151.jpg
    attach10071151.jpg
    194 KB · Views: 0
Last edited:

Woodonglass

Supreme Mariner
Joined
Dec 29, 2009
Messages
25,930
Soooo, Are you using epoxy or Polyester resin? Cuz if you're using Epoxy, you don't use CSM with it.
 

super_dork

Seaman
Joined
Apr 10, 2011
Messages
68
No Title

So, here's the progress I've made on the transom grinding. I'm just taking it in chunks. Grinding just gets tiring. Anyway, I'm thinking that I may try to re-gelcoat the whole back end or at least the hull not the cap so that the color mis-match won't be as obvious.

attach10071341.jpg
 

Attachments

  • photo233570.jpg
    photo233570.jpg
    182 KB · Views: 0
Last edited:

Woodonglass

Supreme Mariner
Joined
Dec 29, 2009
Messages
25,930
NOTE: Color matching Gelcoat IS and ART FORM!!!!:eek: Much more difficult than Paint!!!! :nod:
 

super_dork

Seaman
Joined
Apr 10, 2011
Messages
68
NOTE: Color matching Gelcoat IS and ART FORM!!!!:eek: Much more difficult than Paint!!!! :nod:

Yeah, the boat looks white to me. White sounds good. No color matching needed!! After I get her in the lake that she swims in, she'll be off white again. :)

Who knows, after all this work, I'll at least try to get it close if I can. I may call around to the local glass shops to see if they can help - but I certainly don't feel like paying a lot for the "service".
 

super_dork

Seaman
Joined
Apr 10, 2011
Messages
68
No Title

I know this is out of order, but I wanted to go ahead and start thinking about this step as well. I'm going to have to repair the area where I cut the hull open. I know gelcoat and metal flake suck to work with, but I'm willing to give it a good try.

So first, I've added some pics of various parts of the flake as it stands now. In several places, the clearcoat has come off and the flake is exposed. In others, the clear is cracked. I'm looking for thoughts on how to go about making it all nice when I do the repairs to the cracks. I've already reached out to C&O Marine (recommended by Stratos) to get a color match on the flake.


photo233571.JPG
photo233572.JPG

photo233573.JPG

photo233574.JPG

photo233575.JPG photo233575.JPG

photo233576.JPG

photo233577.jpg
 

Attachments

  • attach10071363.jpg
    attach10071363.jpg
    206.5 KB · Views: 0
Last edited:

Woodonglass

Supreme Mariner
Joined
Dec 29, 2009
Messages
25,930
You grind and feather both bottom and top and then glass both bottom and top. The resin and glass are a lot stronger than you think. 3" on either side of the cut line and a 6" layer of 6oz fabric followed by 2 layers of 1.5oz CSM on top and bottom will yield a very stong patch. Just like the pics show.

Trying to do metalflake gelcoat is not in my Wheelhouse. Neither is metalflake Paint. Some other members may come along with some advice. I did post this a while back from my research...http://forums.iboats.com/forum/boat-...flake-painting
 
Last edited:

super_dork

Seaman
Joined
Apr 10, 2011
Messages
68
Kickin Glass and Takin Names!


My buddy came over last night and we got the transom fitted nicely. We trimmed up the edges to get a nice fit then laid down some peanut butter and and bedded it down. We smoothed it out and made some nice fillets then tabbed it in with some fiberglass tape and 1708. We added some clamps in, though for these we simple used the motor mounting holes instead of making the adjustable clamps. They worked really well. We had a blast! We worked for about 5 hours and it helped a ton having an extra hand. Fortunately, for whatever reason, my resin isn't setting up very fast like I expected. Maybe it doesn't set like Epoxy does - it never gets hot while I'm working with it, but by the next day, it's a nice solid bond. Anyway, that helped a lot since we had lots of time to work the PB and tab it in well. I'm going to let it sit for a few days then start adding more tabbing and structural glass. I think the biggest part is over now though - hopefully! Needless to say, get a buddy to help, it makes it a lot more fun and easier for sure.


0BABD42C-5C0A-47FA-9FC4-39A0CA9C8513_zpsmm6qct7t.JPG


015EC8A6-812B-4DEC-BF14-C06B98B946C4_zpsv95cprpv.JPG
B04E1F79-0013-4CBE-BA69-D314BF852E07_zpsd3dlvofc.JPG


7006F63A-22D6-492E-AEEE-6C465156A6DD_zpsw4hgddlh.JPG


C563F8C2-1529-48F0-BD46-3237DDA85D24_zpsfxtwle3b.JPG
2EE76654-C206-48F3-BBA7-EA2F4E3316E5_zpsyufkd73x.JPG
4870AADA-06A9-49EF-BB39-7E8FA2AA6C4A_zpseqiaq0ux.JPG
2EE76654-C206-48F3-BBA7-EA2F4E3316E5_zpsyufkd73x.JPG
27A32EAA-92BA-48C5-889A-A785B6BD3C58_zpsvlwomcd3.JPG
 

Attachments

  • 974CE278-8225-48CE-9687-D2562C6CC2B3_zpsrqzq5ooa.JPG
    974CE278-8225-48CE-9687-D2562C6CC2B3_zpsrqzq5ooa.JPG
    379.7 KB · Views: 3
  • B04E1F79-0013-4CBE-BA69-D314BF852E07_zpsd3dlvofc.JPG
    B04E1F79-0013-4CBE-BA69-D314BF852E07_zpsd3dlvofc.JPG
    214.2 KB · Views: 0
Last edited:

Woodonglass

Supreme Mariner
Joined
Dec 29, 2009
Messages
25,930
Uhmm, what % of MEKP did you use to harden the mix?? What made the PB so Brown??
 
Last edited:

super_dork

Seaman
Joined
Apr 10, 2011
Messages
68
I double checked. I'm mixing at 1%. 5cc in a syringe for every 16oz. It hardened overnight. It has been slow to harden - like it hasn't felt warm ever and hasn't hardened while working with it. However, it does eventually harden just fine. The temp in my garage has been high 70s to low 80s.

The PB - we just used Jif. :). Actually it's wood flower mixed in. My buddy had it left over from his last project. We used it over the Cabosil just because he was more familiar with it and it mixed in slightly easier.
 

Woodonglass

Supreme Mariner
Joined
Dec 29, 2009
Messages
25,930
Yeah, 1% is OK but it will take a bit longer for it to Kick! 1.5 would prolly be a better ratio. You might also consider using the metric system for your measuring. It's a LOT easier using CC's

Wood Flour is not really a good idea to use with Poly Resin. Poly is not quite as water resistant as Epoxy. Wood Flour is used a lot by the Epoxy boys and is perfectly acceptable as a thickening agent since epoxy once fully cured repels water very well. However Poly resin is a bit more hygroscopic, meaning it WILL, absorb water if it's exposed to it long term and therefore if the filler agent is also hygroscopic..i.e. wood flour, you're just adding to the problem. Cabosil is NOT hygroscopic and thats why it's recommended to be used when using Poly. Just something to consider as your move forward with your build.
 

super_dork

Seaman
Joined
Apr 10, 2011
Messages
68
Yeah, 1% is OK but it will take a bit longer for it to Kick! 1.5 would prolly be a better ratio. You might also consider using the metric system for your measuring. It's a LOT easier using CC's

Wood Flour is not really a good idea to use with Poly Resin. Poly is not quite as water resistant as Epoxy. Wood Flour is used a lot by the Epoxy boys and is perfectly acceptable as a thickening agent since epoxy once fully cured repels water very well. However Poly resin is a bit more hygroscopic, meaning it WILL, absorb water if it's exposed to it long term and therefore if the filler agent is also hygroscopic..i.e. wood flour, you're just adding to the problem. Cabosil is NOT hygroscopic and thats why it's recommended to be used when using Poly. Just something to consider as your move forward with your build.


Well that figures!

My buddy built his all with epoxy and I didn't think to check to be sure it we ok to use wood flour. I thought they were interchangeable. It's too late to change out the bedding at this stage - it's already set. Good to know moving forward.
 

super_dork

Seaman
Joined
Apr 10, 2011
Messages
68
Last night, I couldn't wait any longer and unclamped everything. I discovered that the bolts were stuck in the resin well so I had to thread them out instead of just tapping them out with a hammer as I had planned. No big deal. I put 2 nuts with a lock washer in between on the end of each length of allthread and was able to use my ratchet to get them out. It was a pain in the neck, but worked out fine. Everything else released easily. I also spent some time vacuuming up the dust out of the back so I can prep it for the later steps.

Then I started tabbing in some more. I added another layer of 1708 along the bottom edge then made up some peanut butter with cabosil (kinda seemed like Vasoline in consistency and look) and filled in the gap between the transom and the stringers (we had cut out the stringer a little bit to give us some working room. I covered the PB with some tape then 1708. I think it came out pretty well. The 1708 seemed to contour well.

I checked it all out this morning and everything is nice and solid. Gonna just continue to lay up more glass layers then tying in the little side decks and floating boxes to give it more structural support on the sides. Still debating adding in some knees tied in next to the stringers, though I kind that it will be redundant once I get the floatation boxes back in.

DA3213E0-90C1-438A-9819-59F50205C749_zpskucv8r4p.JPG

98F11117-F0E1-40BB-9DFD-938124D78D06_zpsvwarauxz.JPG

8605A68D-6011-4314-A6C3-F91E85F9885E_zpsejig8m76.JPG

A14B4AD8-2BE9-49B3-982C-DC2EC96ED967_zpst5uotq9m.JPG

3F47EC6C-A23D-4219-AE14-5A170D47EB5C_zps4zortmhc.JPG

15172E0A-50E1-418C-B656-5CA144ABCE9E_zpsdkvu5c3p.JPG

74E41E78-BC03-4F38-A18B-C51832B860A6_zpsseayjfas.JPG
 

super_dork

Seaman
Joined
Apr 10, 2011
Messages
68
No Title

Thanks Rick!

I know the pics are all starting to look the same, but I am actually making progress! I thought I had too much 1708 and too much (5 gallons) resin. Now I'm worried that I'll run out. I've probably got about 1.5 gallons of resin left and no more than 2 yards of 1708. I can likely finish the inside skin, but will need more for working on the outside. Looks like I'll be making a trip to the fiberglass shop Friday. I just don't want to run out mid job. So, last night, I added 2 full layers of 1708 across the whole back and wrapped around to the sides. I figured that I would use less resin if I layed up a second layer while it was all still wet. I almost did a third layer, but I felt like I needed to stop and plan these final layers a bit more. Due to the way the transom sits against the back, I haven't been able to really wrap over the top so I'm getting a bunch of sharp hard edges on the top. I'm going to sand/grind/cut the top edge stuff to make it easier to apply some top layer coverage. Anyway, it's coming along!


photo233934.JPG
 

Attachments

  • attach10074650.JPG
    attach10074650.JPG
    188.7 KB · Views: 0
Top