Reel Peachy - 1993 Stratos 280 SF - Transom Rebuild

Rick Stephens

Admiral
Joined
Aug 13, 2013
Messages
6,118
Amazing how fast you can use up a gallon of resin and a bunch of glass. Looking great. What is the black area on the middle? Old rotten stuff? Or just something too obvious for my dying brain cells?
 

super_dork

Seaman
Joined
Apr 10, 2011
Messages
68
Amazing how fast you can use up a gallon of resin and a bunch of glass. Looking great. What is the black area on the middle? Old rotten stuff? Or just something too obvious for my dying brain cells?

I know. I'm sure I'm heavy on the resin since I am inexperienced as well, though I have been applying resin to everything, then letting it sit then going back to work it after a minute or 2 to give it time to soak in so I don't have to work it in as hard. I just hate that the fiberglass shop is about 45 mins away and only open on weekdays. Makes me have to plan my trip(s) around my days off. I may go ahead and pick up some gelcoat while I'm there this time though.

The black area is one of the bolt holes for the motor mount.
 

super_dork

Seaman
Joined
Apr 10, 2011
Messages
68
Ok, so I think I have a problem. I can't stop working on this thing!!

Last night was pretty much "Attack of the Killer Plastic Sheeting". I feel like it was attacking me. When I was vacuuming, it would get sucked in, I would pull it out, then another piece would get sucked. When I was grinding, the airflow from the grinder kept pulling it toward the grinder, threatening to get wrapped up. When I was glassing, I would try to move it out of the way and my glove would stick to it, then I would use my other hand to free it and the other hand would get stuck to it (kinda like trying to get a sticky booger off your finger :laugh: ). Anyway, I fought plastic all night, but I won!!

Ok, so I made a plan and then just kept rolling. I started out by tenting up and grinding the 2 floatation boxes. and getting them prepped. Then I knocked down all the high spots, sharp parts and any other bad glass.

1.JPG

2.JPG

3.JPG

Then I vacuumed and prepped for glass. I did a dry fit on the boxes and everything still fit well. Then I cut wood strips to close the gap between the deck box platforms and the transom then used CSM (MAN I HATE CSM!!!!) and peanut butter to set it in. Then I used peanut butter and tape to set the boxes in. After that, I added CSM to the back side of the sides of the transom. Then I went ahead and added some 1708 to the side pillows to cover them up. The glass just drapes over the opening then it's supposed to be filled with urethane foam.

There are a few places that the glass didn't lay down well on that I will just come back and grind off plus I will trim up the pillows where the glass is hanging over the sides - just didn't want to cut it to fit so I'd have room to work with it.


4.JPG

5.JPG

6.JPG

7.JPG

8.JPG

9.JPG

10.JPG
 

super_dork

Seaman
Joined
Apr 10, 2011
Messages
68
Last night I did a bunch more grinding. I finished grinding down the gel on the outside so I can lay glass down the back as I tie in the splashwell. I did some prep work on the splashwell and repaired one of the bolt hole areas that was weak then laid up some CSM and 1708 to repair the damage from cutting it out. I also used some PB and CSM to fill in the gap between the outside skin and the new transom on the top edge. I'm going to have to cut it down some to cotour the top edge when the well goes in but I wanted the whole back side to be the same depth instead of having to build it up as I wrapped in the new well.

I also dry fitted the cap back on and it was a little snug. Not sure if I need to grind the splashwell down some more or if the new glass on the wings has pulled the tail up a little bit and flexed the hull a little. Not sure but I'm sure I can get it sorted out once I get everything prepped.


Oh and I built some knees. I really like how they came out. I positioned them inline with the Motor mount bolt holes.

E54CC583-4BF6-46E4-A18A-894DF0090CB5_zps37e4n1s2.jpg

0ED6F370-E6C8-4DD6-AF76-A4D84EFCC1A0_zpslyziaxna.jpg


1A0AA535-9997-4ADA-B696-CABF294AAEE1_zpsd5xbnvmq.jpg

92AEC3DD-CC3E-4AB4-A3D8-518A0D8A6E75_zpsk68hmjqd.jpg

E2CBD5F1-E979-4865-801B-73522593B3E6_zpsp5jo4sac.jpg EBC55469-1570-4A28-90A2-9FAC91EACEF6_zpsof1xlhss.jpg

26CFA25C-BC4F-4E28-8D4A-8056F037D896_zpsbieonj1n.jpg


2A93C3CB-A1A5-498A-901B-31F6C335472E_zpsfqyaatub.jpg

91F16E8B-7B66-47B3-8E66-4F837BC7CEDC_zpskyucxtu9.jpg

FE0E91B0-AA8A-4063-8DBC-B810FE4B8DEE_zpsvzngr1vl.jpg

47021C57-BDCC-4314-BF47-58B9EFF7550E_zpsr75z4bye.jpg
 

super_dork

Seaman
Joined
Apr 10, 2011
Messages
68
After looking at the knees, some of the tape bubbled up on the upper edge so I'm going to have to grind it off and rework it. Also, I had read that blue foam from Lowes would work OK with poly resin, so I used it to back up my repair on the splashwell. It ended up melting some and causing the repair to have a bulge on the inside of the spashwell. I'll grind it down/out as well and rework it.

I've had such good luck to up this point, it figures that I'm going to have issues now!

Also, I picked up about $200 more in fiberglass supplies, including gel coat, clear coat and some preval sprayers (never used these before but seem like they should work well since I don't own a compressor or sprayer at the moment). Just need to start grinding the underside and top sides of the cap before reinstallation. I've been under the weather all weekend, so I've been taking a break.
 

super_dork

Seaman
Joined
Apr 10, 2011
Messages
68
Man, do you ever just run out of steam? I somehow lost my momentum and need to just get out there and finish things up before it's spring again! I haven't touched anything for the past 2 weeks. I have all the supplies ready, just can't seem to make myself go out and grind the hull for hours. Someday!
 

kcassells

Fleet Admiral
Joined
Oct 16, 2012
Messages
8,739
Dork,
What the heck is going on? What is that black stuff? Can't get a grip on the thread. Went back and don't see what that stuff is. Glassing over something that looks like it won't stick.
 

super_dork

Seaman
Joined
Apr 10, 2011
Messages
68
I'm assuming you are talking about the black on the floatation boxes. That's just paint. I only tabbed them in with 4" tape so I didn't need to grind down the whole boxes, just enough for the taped area. If that's not it point me to the pic you are looking at.
 

Woodonglass

Supreme Mariner
Joined
Dec 29, 2009
Messages
25,930
Yeah Poly will EAT foam unless you wrap the foam with Clear Packing tape first. Epoxy will work with foam but not Poly. Also, any painted surfaces will cause the Poly adhesion to fail. In the future I'd recommend you grind any/all surfaces that will be glassed at least double the width you'll be glassing to ensure a good bond. Better SAFE than SORRY!!!!:eek::D;)
 

super_dork

Seaman
Joined
Apr 10, 2011
Messages
68
I finally got back to the garage on Sunday night and last night!!!!

Sunday I went through and did some cleanup and hung new 6 mil plastic so that I could sand and grind without covering everything in dust. The plastic I was using was this really thin painters plastic and it was too lightweight and would blow around when grinding near it. Anyway I will still have a TON of cleanup to do when I'm done, but overall I think this will help keep any more dust off of my workbench and storage shelves (though they already have a nice layer!). I also poured in the urethane foam in the pillows and floatation boxes. I like how it worked out.

Last night I did what I hope will be a majority of my grinding work. I ground the cap and splashwell areas as well as the outside of the transom and inside where I will be adding more glass when attaching the cap. Then I used my new Chritsmas present shop vac to clean up all of the dust on the parts. I also used the original splashwell cap piece to create the contour for transom center to ensure that my holes on the motor will line up with the transom holes without the motor top bracket holding it up too far. I used my jigsaw to make the cut and I am happy with how it came out.

I bought a few full face respirators off of Craiglist and really wish I had it from the start. It just made it nicer to work.

Also, I've got to say that the 40 grit slap wheel griding wheel was awesome. Wish I had used them from the start. Way better than anything else I've used. Also, I ended up going through in a few places due to the dust and respirator fogging - it was hard to see where I was...


IMG_2989.JPG IMG_2991.JPG IMG_2990.JPG IMG_2992.JPG IMG_2993.JPG IMG_2993.JPG IMG_2994.JPG IMG_2995.JPG IMG_2997.JPG IMG_2998.JPG IMG_2999.JPG IMG_3001.JPG IMG_3002.JPG IMG_3003.JPG IMG_3004.JPG IMG_3005.JPG IMG_3007.JPG IMG_3011.JPG IMG_3013.JPG IMG_3014.JPG IMG_3015.JPG
 

super_dork

Seaman
Joined
Apr 10, 2011
Messages
68
I took everything out of the back hatch and vacuumed it once more then cleaned with a degreaser and acetone then sprayed a matte black to provide some UV protection to exposed glass. Then I mixed up 32 oz of resin with Cabosil to make some Peanut Butter (more like Vaseline). I had exactly the right amount of cabosil left to make this batch work. I spread a good amount on the inside of the transom then on the back of the splashwell and put it all together. It took a fair amount of hammering and wiggling to get the cap on but I got it situated. I honestly think that the hull flexed some (back to front) when we snugged the new transom in. There wasn't much clearance between the cut pieces and some of the original screw holes didn't line up. I moved it around a few times until I got the cut edges to match up and I screwed along the edges to hold it in place. I also screwed down some boards on the top near the hatch opening to keep the pieces aligned as it cured. Since I didn't want to mess up the splashwell work, I decided to wait on glassing the seams until the back set up.

Then I proceeded use the PB as a filler on the splashwell edge as well as all over the outside of the back to help smooth everything out. Then I added a layer of CSM over the 2 side pieces where the back dips into the splashwell. I had a lot of PB piled up there so I wanted to add some structure to that area to help create a nice transition. Then I added 2 layers of 1708 starting from the inside of the splashwell going down the whole back. There were places where the glass extended over where I had prepped so I didn't wet it with resin and plan to cut and grind all of the excess off tonight.

My plan - unless anyone has any other advice - is to add a layer of CSM and maybe some PB over the 1708 to create a smoother surface to work with then once it cures, sand it smooth and feather it into the existing areas in preparation for gelcoat.

I think my next step will be to glass in the cut seams - planning to add some wood underneath for a bit of support. I'll probably regret not reattaching all of the pumps and things before I added the cap back on. Now I get to hang upside down in there!!

Still lots of stuff to do, but I think that the major hard parts are done!

IMG_3020.JPG IMG_3021.JPG IMG_3022.JPG IMG_3023.JPG IMG_3024.JPG IMG_3025.JPG IMG_3026.JPG IMG_3027.JPG IMG_3028.JPG IMG_3029.JPG IMG_3030.JPG IMG_3031.JPG IMG_3032.JPG IMG_3033.JPG IMG_3034.JPG
 

Attachments

  • IMG_3028.JPG
    IMG_3028.JPG
    182.3 KB · Views: 0
  • IMG_3029.JPG
    IMG_3029.JPG
    246.5 KB · Views: 0
  • IMG_3030.JPG
    IMG_3030.JPG
    184.8 KB · Views: 0
  • IMG_3031.JPG
    IMG_3031.JPG
    184.2 KB · Views: 0
  • IMG_3032.JPG
    IMG_3032.JPG
    212.8 KB · Views: 0
  • IMG_3033.JPG
    IMG_3033.JPG
    185.2 KB · Views: 0
  • IMG_3034.JPG
    IMG_3034.JPG
    200.2 KB · Views: 0

super_dork

Seaman
Joined
Apr 10, 2011
Messages
68
Well I got fancy tonight. Generally, I don't take out my phone until the end since I don't want to screw it up. Tonight I decided to do a little time lapse in glassing the cap on. I set up the ladder and rigged it. It fell over at one point and I had to reset it but I think it came out pretty cool.

I ordered some more Cabosil from
Amazon and had it overnighted so it was here when I got home from work. I mixed up a batch and used it to fill the cap seams and do general body work. I also added a little more contour to the splashwell edge. Then I added 2 layers of CSM on the seams as well as 1 layer on the stern to smooth out the finish somewhat before prepping for gelcoat.

I likely won't work on it until sometime next week since I'll be traveling. Next steps are doing surface prep for gel. I'll need to get my friends compressor for that though I want to try painting the gel on just to see how it comes out. I never have much luck with sprayers.

Oh and I'm relatively certain that I won't be doing any metal flake. I just don't feel up to it and have been having a hard time even matching the color so I can order. Plus I'm not going to color match the gel either. I got and off-white color that I'm hoping will be close. I know it kinda sucks to not put the finishing touches on it after all of this but I just don't think it will come out well.


super_dork

Seaman
Joined
Apr 10, 2011
Messages
68
Quick update. I have worked a few more evenings and made some progress.

1) Ground down the transom and repaired seams to prep for gel
2) Drilled and refilled oversized holes in transom to allow me to reduce the chance of water leaking into the wood for the bolts.
3) Did some body work with peanut butter where needed (mostly on the transom). I had a brilliant idea of adding plastic sheeting over the PB to give it a nice smooth texture and reduce my sanding time later. That backfired. The plastic buckled and made the PB wavy. So not I have MORE grinding/sanding to do than I would have if I hadn't added the plastic. Oh well.
4) Got in a whole bunch of parts:

Spashwell drain tubes and flaring tool
Round in dash gauge style Bluetooth radio
Power Pedestal seat post for the bow
Stainless sheet metal screws for the cap/rub rail (they are threaded all the way up the shank and match what I removed from the cap)
New in dash depth finder that mounts into one of the gauge holes that will replace the lowrance flasher unit I have not.
Hydraulic steering oil (holy crap that stuff's expensive!!)
Hydraulic steering filler tube
Stern eyes (got some and they were huge so trying again)
Hot Foot sliding mount & Hot Foot
Various glitters (apparently I have layers of silver, black, green and blue as well as an under layer of black gel (I think))

Needless to say, I'm trying to make sure that lack of parts isn't going to hold me up. I just have to get back the the grind - literally!! :)

I know there are certainly things I could have done differently and things that could be better, but I am very happy with my progress and what I have accomplished so far. I am NERVOUS about the gel though. I know I just need to practice some, but it's very intimidating!
 

super_dork

Seaman
Joined
Apr 10, 2011
Messages
68
Last night I ground off all the wavy finish and re-peanutbuttered the transom. I checked this morning and I am quite happy with the finish. I also drilled out the splashwell drain holes more since I didn't have the right size bit the other day when drilling everything else. I filled the holes with PB as well, but this morning I noticed that the filling had shrunk/cracked so I will likely need to try again. After the fact, I figured I should have coated the inside of the holes really will with resin before adding the PB. Seems like it would have made it stick to the inside walls better. So, I think I'm going to drill then out and try again. Since this is a main area where water can get in, I don't want to take any chances.

On a separate note, I'm pretty sure my electric drill is on it's way out. The reverse gear seems to be stripped. Boo.
 

Woodonglass

Supreme Mariner
Joined
Dec 29, 2009
Messages
25,930
You're moving along nicely. Cut some CSM fibers into strands and put em in the mix to fill the drain holes. That'll keep it from cracking.
 

super_dork

Seaman
Joined
Apr 10, 2011
Messages
68
Well, I just couldn't wait anymore!!

I got lucky and ordered some glitter from eBay that matched for the aqua and just picked up some
Fine glitter from Hobby Lobby for the black and silver. I decided to try out the preval sprayers that I had picked up. I ended up thinning everything with styrene though if I had used my big spray fun I likely would not have thinned it once the styrene causes issues with the texture and coloration. Gotta say, for small stuff the preval is ok. It for the whole transom, just shoot me in the head!! It took forever. It just doesn't have a large spray volume.

First I sprayed the clear for the glitter, blew glitter out of my hand, then sprayed another layer of clear. I did black first then the aqua. Next will be a layer of white then the silver stripe then the clear over the glitter areas. It's not gonna be perfect but it will be better than a big white stripe down the side!

Then I mixed up a batch of white up. I used some "off-white" that was pre-mixed from the fiberglass shop. The color match is pretty decent. I can live with it! As I sprayed the white, a few pin holes and other imperfections showed up. I'm guessing it can make some peanut butter with the gelcoat and Cabosil to fill anything that stands out.

So there you have it. Just a few more coats!!

20160213_214154101_iOS.jpg 20160214_024048296_iOS.jpg 20160214_030648520_iOS.jpg 20160214_030657390_iOS.jpg 20160214_030710957_iOS.jpg 20160214_035026947_iOS.jpg 20160214_032516493_iOS.jpg 20160214_035033309_iOS.jpg 20160214_035036863_iOS.jpg 20160214_035040996_iOS.jpg 20160214_035049149_iOS.jpg
 

Attachments

  • 20160213_215606788_iOS.jpg
    20160213_215606788_iOS.jpg
    289.4 KB · Views: 0
  • 20160213_215606788_iOS.jpg
    20160213_215606788_iOS.jpg
    289.4 KB · Views: 1
  • 20160214_024048296_iOS.jpg
    20160214_024048296_iOS.jpg
    243.2 KB · Views: 0
  • 20160214_030705721_iOS.jpg
    20160214_030705721_iOS.jpg
    206.1 KB · Views: 0
  • 20160214_035026947_iOS.jpg
    20160214_035026947_iOS.jpg
    227.5 KB · Views: 0
  • 20160214_032516493_iOS.jpg
    20160214_032516493_iOS.jpg
    142.3 KB · Views: 0
  • 20160214_035036863_iOS.jpg
    20160214_035036863_iOS.jpg
    91.5 KB · Views: 0
  • 20160214_035036863_iOS.jpg
    20160214_035036863_iOS.jpg
    91.5 KB · Views: 0
  • 20160214_035040996_iOS.jpg
    20160214_035040996_iOS.jpg
    95.3 KB · Views: 0
  • 20160214_035040996_iOS.jpg
    20160214_035040996_iOS.jpg
    95.3 KB · Views: 0
  • 20160214_035055034_iOS.jpg
    20160214_035055034_iOS.jpg
    205.6 KB · Views: 0

super_dork

Seaman
Joined
Apr 10, 2011
Messages
68
So we had a pretty laid back day today and I ended up getting to spend some time working while the kids were napping this afternoon and after bedtime tonight. Before I get into that, here's what I've learned about gelcoat:

1) The solid color stuff really sets up pretty fast.
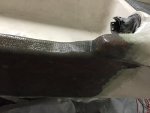
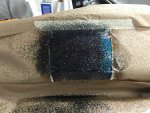
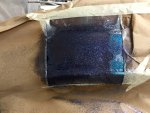
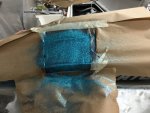
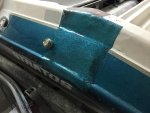
2) I shouldn't have sprayed the blue glitter as high as I did - I ended up having to sand it off of the upper section before adding white. I just looked bad after I added a layer of white to it. I think it was largely due to not having a thick layer of clear yet so it was bumpy.
3) Don't use blue shop towels when wiping everything down with acetone. It ends up making the surface sticky which makes the towel stick and just makes a mess.
4) Surface prep work is the most important thing you can do. When you start spraying gel coat, EVERYTHING shows up.
5) Body work is just like finishing sheetrock - anyone can put fiberglass on - it takes practice to get it to look nice!

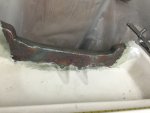
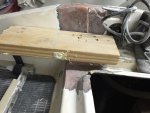
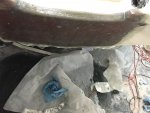
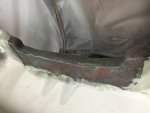
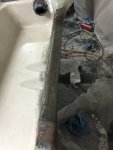
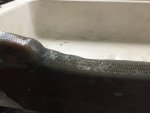
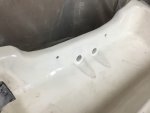
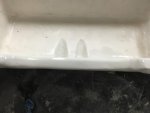
So after seeing all of the pin holes and imperfections, I used some gelcoat mixed with cabosil to make a bondo paste. It worked great. Since it was the same color, it didn't add more work really. The key though was when I remembered that my buddy rgsauger leant me his custom rubber spatula (which he's going to get lucky to get back!!). Oh man, that thing made all the difference in the world. I was able to smooth everything out really nicely. After doing the body work, I sanded down then added a second layer of white everywhere using my 2.3mm HVLP sprayer. I can't say how I had it set because honestly the instructions weren't worth anything so I just test sprayed until I liked it. I did mix in some styrene to thin it just a little since it seemed to be struggling with unthinned. I liked using the sprayer much better than the preval sprayer mainly because I could move faster. The pot time on the gelcoat isn't very long and I had to hurry and clean the gun before it all set up inside.

A note about the sprayer - I read this somewhere then ignored the advice:1) BEFORE you put anything into your sprayer, practice taking it all the way apart and becoming familiar with the parts so when time is working against you, you don't have to stop and read the manual.
2) Have a wash tub with plenty of acetone handy and be ready to wash everything thoroughly.
3) Mix a small batch of gelcoat and start your stop watch. Keep checking it until you notice it start to set up. Stop your stopwatch. That's the max time you have to spray before you risk ruining your gun. Then set a timer each time you spray and when the timer goes off, stop and rinse.

My body work isn't the best and it has big areas of imperfection, but I just ran out of patience in sanding and filling. The structural work is great, but you can tell the finish work is DIY, and I'm OK with that. If nothing else, if someone notices and asks what happens, I'll be able to tell them how awesome I am!! :)

So, after spraying and filing holes and spraying some more, I will be spraying clear and adding silver flake then more clear over the whole glittery area to thicken it up - it will likely be 2-3 more coats - one being the wax layer to finish it up. I also realized that I needed to add just a tiny bit of silver into the blue and I didn't, so I need to do that as well. Then I will spray one more thick layer of white with wax added for the finish and I should be done with the hard stuff.

Here are pics from today:

image_237984.jpg image_237992.jpg image_237991.jpg image_237990.jpg image_237989.jpg image_237988.jpg image_237987.jpg image_237986.jpg image_237985.jpg image_237993.jpg
 
Last edited:

super_dork

Seaman
Joined
Apr 10, 2011
Messages
68
Well I'm still spraying gelcoat. The glitter is taking a lot of clear to get smooth. I ran out of off white and had to pick some up at the fiberglass shop. When I got home it was a different color. Turns out they have 2 suppliers for their house branded gelcoat and I got the wrong one. They are fixing it and ordering and shipping a replacement quart for me for free.

In the meantime, I'm working on building a mold for a recessed trolling motor foot pedal tray.
 
Top