1977 Sylvan Sea Monster Side Console Rebuild

oldrem

Commander
Joined
Nov 7, 2013
Messages
2,002
Thanks guys.

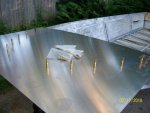
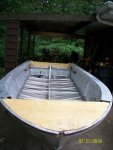
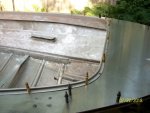
Since I have to wait for the OT to thoroughly dry before top coating it, I decided to start cutting the new bow plate. As the old one was designed to have a considerable arch in the aft section, the only 2 holes that would line up the same were the forward ones. That became my starting point.

I began by clamping the old to the new, lining up the aft edges. Next was to mark and drill the 2 forward holes. I was then able to fasten the new sheet to the hull with 2 Clecos and mark the remaining holes tapping with a hammer on a block of wood with a dowel point inserted in each existing hole. I then fastened it to the hull with Clecos in every hole. That allowed me to use a diamond scribe from underneath to mark the correct shape for cutting.

Bowplate 1.jpg

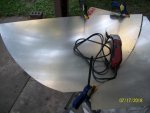
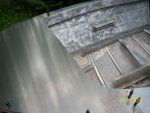
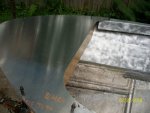
I cut about an inch with the angle grinder before I got tired of the cutoff splatter biting me. I switched over to my cheapo $20 HF oscillating tool with a bi-metal blade and it did not let me down. It cut like magic through that 5052, only having to give the edges a light lick with a file afterwards.

I still have the shape to cut on the aft edge but think I'll wait until the gunwales are back on to get a better fit.

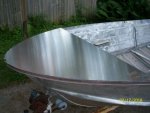
Bowplate 2.jpgBowplate 3.jpg
 

oldrem

Commander
Joined
Nov 7, 2013
Messages
2,002
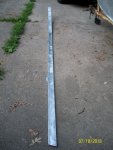
Slow going tonight. After putting a final coat of Helmsman on the transom ends I turned my attention to the inner piece of the gunwale assembly. I started by working out the worst of the dents, dings and bends before cleaning up the old paint residue with the cup brush.. Darned thing tried to gut me when it got caught on an edge and bounced into my stomach. Luckily my shirt took the brunt of it as the shirt ripped and wrapped around the brush stopping the grinder cold. Could have been nasty.

Did I ever mention I was accident prone? lol

gunwale inner.jpg
 

Woodonglass

Supreme Mariner
Joined
Dec 29, 2009
Messages
25,929
Very nice Fabrication on the Bow Plate!!! Careful with dem Grinders...Dey Bite!!!
 

Watermann

Starmada Splash of the Year 2014
Joined
Jan 12, 2013
Messages
13,822
I have a pair of pants that have a torn open hole in a very sensitive location from the same thing happening to me with a wire wheel. :eek:
 

oldrem

Commander
Joined
Nov 7, 2013
Messages
2,002
The only thing I accomplished last night was cup brushing the port side inner gunwale section. Was a bit easier than the first one with very few dents to work out. Decided to wear the old shop apron to add an extra layer in case of another slip. It did slip once onto my old drop cloth which is now more torn up than it already was :laugh:
 

oldrem

Commander
Joined
Nov 7, 2013
Messages
2,002
Amazon Prime Day got me to pull the trigger sooner than I expected on my new GPS trolling motor with anchoring. It just arrived. I sure hope I can get the boat done in time to actually use it this year :eek:
 

AlabamaNewbie

Petty Officer 1st Class
Joined
Jun 25, 2018
Messages
239
Well, I HAVE been trying to shed some pounds. Just not that way. :rant:
If it eases your mind any, your skin is thicker than you think, and once the first wire hits it - you WILL find a way to get away from it.

Was using it to clean gasket off a head, in the winter, and it crawled up my shirt sleeve. 10 years ago, and I can still hear myself screaming. I got away from it quick, but it stil left a half-dollar sized patch on my arm that has to pigment and can't grow hair. :facepalm:
 

oldrem

Commander
Joined
Nov 7, 2013
Messages
2,002
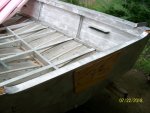
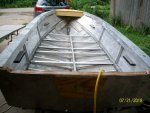
Rained most of yesterday and on and off today. It was dark and dreary when I got home from work today, so kept wheeling the boat out of the carport between sprinkles to get more light and room to work. All the straightening I did paid off and the gunwale sections went together almost perfectly.

It's starting to look like a proper boat again. Once the gunwales were riveted I was able to use the dowel points to locate the final 4 holes I needed to drill in the bow plate and scribe in from underneath to do the final cutout with the multitool.

It's supposed to rain through the night to around noon tomorrow. I'm picking up the repaired transom cap from the welder in the morning and hope to make a run to Menards with the trailer right after the rain quits to pick up the 5/8" plywood for the decking and the Foamular for flotation.

Gunwale Assembly 1.jpgGunwale Assembly 2.jpgBowplate 4.jpgBowplate 5.jpg
 

chevymaher

Commander
Joined
Mar 29, 2017
Messages
2,933
I am working in thunderstorms to. Under the swimdeck LOL. Looking good there making progress.
 

oldrem

Commander
Joined
Nov 7, 2013
Messages
2,002
Picked up transom cap, deck wood and Foamular this morning. The cap had been cracked to the point there was less that 1/2" material holding it together. Had to get the old paint off the cap and do some dressing and straightening, but it fits as good as a 41 year old cap can.

Question - it was previously nailed in with small nails. I have some aluminum nails I could use, or is it better attached with small screws? I'm leaning toward the nails, pre-drilling and filling with sealant. Is there anything else that needs to be done underneath before attaching it?

Transom Cap.jpg
 

oldrem

Commander
Joined
Nov 7, 2013
Messages
2,002
Got the inner trim piece aligned so I could drill the holes for it now rather than after it's painted. After that I just worked on cutting some of the flotation foam.

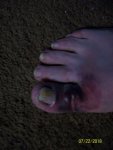
I hate to admit it, but I was moving rather slowly all afternoon after arriving home from picking everything up. Lost my grip on one of the 5/8" sheets of ply while at Menards and it dropped about a foot on my toes. I hobbled around the best I could and didn't want to look at it until about 8PM last night. :(

Watermann I could really use your input on the transom cap installation when you have the time please.

Inner trim 2.jpgToe Injury.jpg
 

Watermann

Starmada Splash of the Year 2014
Joined
Jan 12, 2013
Messages
13,822
Watermann I could really use your input on the transom cap installation when you have the time please.

I decided not to use any fasteners on my SS transom caps (V5 has 3 piece caps) as I didn't want to add numerous holes into such a skinny section of the transom wood. A bead of sealer/adhesive under the cap and weight or clamp, then with a motor over the top insures your cap will never come off. If you want the finish to be perfect then fill the tiny holes and paint it before installing.
 

oldrem

Commander
Joined
Nov 7, 2013
Messages
2,002
I decided not to use any fasteners on my SS transom caps (V5 has 3 piece caps) as I didn't want to add numerous holes into such a skinny section of the transom wood. A bead of sealer/adhesive under the cap and weight or clamp, then with a motor over the top insures your cap will never come off. If you want the finish to be perfect then fill the tiny holes and paint it before installing.

Thank you, that sounds like a plan. My plan is to paint the entire transom inside and out, so will fill the holes after I install it. I have some very long clamps that should do the job. What would you recommend as a fine filler for scratches and dings?
 

Watermann

Starmada Splash of the Year 2014
Joined
Jan 12, 2013
Messages
13,822
I used Marine Tex, "strong as steel, sands like wood" but I have to admit I'm a horrible body and fender man. The MT sticks to AL very well and sands great unlike JB weld and auto body filler is a bad idea on boats as some might suggest using it, it's porous and will absorb water if exposed.
 

oldrem

Commander
Joined
Nov 7, 2013
Messages
2,002
I used Marine Tex, "strong as steel, sands like wood" but I have to admit I'm a horrible body and fender man. The MT sticks to AL very well and sands great unlike JB weld and auto body filler is a bad idea on boats as some might suggest using it, it's porous and will absorb water if exposed.

Thanks again. Probably overkill, but I just ordered the 14oz kit. I didn't think the 2oz would do it.
 
Top