MC-1 Drive Dog failure?

alldodge

Moderator
Staff member
Joined
Mar 8, 2009
Messages
43,061
I'm not the best guy for how to weld a nut on stainless studs, I've only done steel. Machine shop should know how

So far as shimming, it needs to be measured and shimming determined even with using same
 

Pmt133

Master Chief Petty Officer
Joined
Jan 6, 2022
Messages
862
I've used flux core on stainless. Works fine, just run hot. If its a 110 unit you'll probably have to run near max for those studs. Make a large puddle and don't stop otherwise you have to deal with the slag.
 

ratdude747

Petty Officer 1st Class
Joined
Sep 30, 2023
Messages
377
I have the shop working on it... no luck welding, it's going to the mill. They weren't comfortable trying to free the trim cylinder pin (without machining it out, more trouble than I think it's worth), so it's just going to be a captive part (makes installation a bit harder, but whatever). Based on how the bolts are going I'm sure it's pretty frozen!

Pulled it apart before I went to bed so the shop could get it today. Some notes:

  • The bearing races seem to be more of a press fit in the cap/case. Couldn't get out with a mini slide hammer, but since I'm reusing the races, no big deal.
  • The bearings are confirmed to be stained but not pitted. A couple spots of surface rust on bearing cage or two, but the hard parts all seem to be reusable
  • The u-joint gear had a small amount of pitting on a couple teeth. Still way better than the other two.
  • The driveshaft gear had some black dirt (looked like staining but wiped off) and other than some light wear, looks immaculate.
Even if I have to spend some minor $$$ getting the case fixed, I still think I did OK. For $120 in gas and a fun day trip with the wife...

Edit- forgot to mention that the yoke will need a sleeve. not leaking but does have a tiny groove worn.
 
Last edited:

ratdude747

Petty Officer 1st Class
Joined
Sep 30, 2023
Messages
377
Got the drive back... they did have to helicoil it.

But... more broken bolts, this time in the water pocket:
182b3028-7b4e-4d55-ac75-d4a307a36a9f.jpeg

I used my impact on its lowest setting. The two that didn't break I used a 1/2" drive 11mm shallow with an extension (my SAE impact selection isn't too hot). The two that did I had to swap to a deep non-impact 3/8 socket (bad ratdude!) and an adapter... which may have contributed to the different result.

I removed the pocket because I was having trouble getting the pipe seal off in-place.

I'll see what the shop can and can't do next week if I don't try welding it myself this weekend. Given that I did get two of them to come out, there may be hope? Edit: Nope... I'm going to be down until sometime next week waiting on the speedisleeve, so no need to rush and make it worse. As satisfying as DIY'ing is, if this case gets trashed, then I'm done for a while.

As clean as the outside was, this drive is proving to be one corroded mess... seriously! Maybe something's different with the metallurgy of older cases? Neither of the newer 888's had this problem.
 
Last edited:

ratdude747

Petty Officer 1st Class
Joined
Sep 30, 2023
Messages
377
Against my better judgement I tried to weld some nuts to remove the broken bolts... nope, the bolts just kept breaking internally. Once it got below flush I stopped. My nuts messed the surface up a bit, so that may need to be decked while it's in the mill.

The things I do to try to get out of having to shim...

Edit: it seems the pinion depth tool is avialble for not super expensive in the aftermarket... maybe I am wasting my time and money? I already have the preload torque wrench...
 

ratdude747

Petty Officer 1st Class
Joined
Sep 30, 2023
Messages
377
Those water pocket bolts are notorious.
I haven't tried to pull the pocket from the gary drive...

I'm going to try another home solution tonight or tomorrow.

The plan is to use a water pocket as a drilling guide and a Milwakee Shockwave 17/64 drill bit (which has a 1/4" hex shank) with a 12" drill extension to drill the holes for a helicoil. I may take it into work to use their large drill press if it feels like the water pocket isn't going to sufficiently start the bit straight enough.

I needed to get the extension anyway (to use with a 1" wire brush to clean the gasket surface), so I figure it's worth a try...
 

ratdude747

Petty Officer 1st Class
Joined
Sep 30, 2023
Messages
377
If you have 2 good holes maybe make a jig?
Well.. that's what I did. Using the old water pocket! And spoiler alert, it did work.

First, here's the tooling I bought:

The trick here is that the bit has a 1/4" quick-change hex shank, which can be coupled to a long extension to provide the reach/clearance needed. Other brands make them in 17/64 but they're online only. Home Depot and Ace hardware both carry the bits somewhat locally (and while I don't care for HD due to personal objections, they had a lower price and the extension I wanted). The helicoil tap and extractor both have square tap ends, but thankfully I found sockets in my collection that could drive both (a 7mm "universal 12-point" and an E5 external torx respectively), allowing me to use a ratchet and extension on both.

I spun the bit in the two water pocket holes to be drilled to enlarge them to 17/64 (this water pocket won't be reused- I already have the one from the original drive that I've refurbished). Then, I bolted the water pocket down, making sure the other two holes are as lined up as possible with the broken bolt locations. I drilled the bolts out until the drill bit stuck/grabbed once all the bolt had been drilled through, which happened to be just enough depth for the tap to cut enough threads to seat a helicoil.

Fixed:
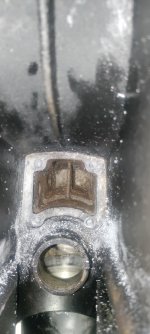
796ff2a1-f177-4640-a21d-798097f9f0c3.jpeg

I did notice the bits walked a bit in the water pocket (why drill guides are normally hardened steel, not plastic!)... but sure enough, the unmolested water pocket I'm actually going to use does bolt up:
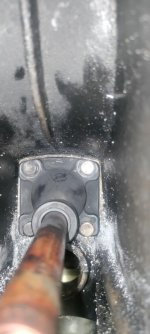
582a0c00-e67e-4f24-92cb-4e2ec275d0bb.jpeg

I then used a wire brush on the aformentioned drill extension to clean the surface up:
ae997237-9598-4969-9fd0-2ef347b0aed2.jpeg

It's not really visible on camera, but the failed nut weld attempts left some gouges that didn't clean up. I'm thinking I may need to use some sealant (aviation gasket maker? "the right stuff" red RTV?) with/in place of the gasket to fill the gouges in.

Obviously it needs more cleaning (lots of oil/exhaust soot mixed with drill/tap chips)... but I think I salvaged it?

Yeah, I maybe spent a bit more on tools that the shop would have charged me... but I now have nice tools I didn't have before that can be used for other things (mainly, additional stripped 1/4-20 holes!).

On another note, I have been working on the gimbal bearing concurrently with the upper case circus going on here. Got the new bearing installed and greased, but the alignment rod was way off. Like 1/4" to the side. Took another look today, turns out bozo here didn't have it fully seated (2lb not enough, 4lb mini-sledge did the trick). Once that was fixed, it slid right in... and have what appears to be an even spline pattern in the grease. Whew...
 

ratdude747

Petty Officer 1st Class
Joined
Sep 30, 2023
Messages
377
Good save. I'll be honest, I fear touching that part for the above reason. Its lazy I know.

No, if there isn't a reason to expect trouble, don't mess with it. The reason I pulled it was partially because I already installed the new pipe seal in the other pocket (and was too lazy to try to move the seal), and partially because having noted what is likely a severe impeller failure in the lower unit, I wanted to verify there wasn't an issue. Granted, the water pocket that's being installed also saw a similarly bad impeller failure (revved too high on muffs). In hindsight, it would have been better to have moved the seal in situ and not touched the bolts/gasket.
 
Top