14' Sea Nymph Oh Yeah! Now 1971 LUND 14-S

bear_69cuda

Commander
Joined
Oct 10, 2008
Messages
2,109
Re: 14' Sea Nymph Oh Yeah! Now 1971 LUND 14-S

Hey gang,

I'm toasted for the weekend... I had fun and made some good progress...

I cut the hatch opening. You can see the trolling motor battery placement.

01DEC2013%2520064.jpg


I still have a nice amount of storage under the casting deck!

01DEC2013%2520065.jpg


Coss member 1/8" x 1.5" angle for TM deck support.

01DEC2013%2520068.jpg


01DEC2013%2520069.jpg


Since space it at a premium I decided not to install a bulkhead. My main tackle box fits perfect leaving the deck clear for action.

01DEC2013%2520071.jpg


The seat will be on a pedestal post (not sure on height maybe adjustable) but gives you the idea of space... I'll be able to remove the post and mount the seat low as shown while underway or trailering.

01DEC2013%2520072.jpg
 

sphelps

Supreme Mariner
Joined
Nov 16, 2011
Messages
11,475
Re: 14' Sea Nymph Oh Yeah! Now 1971 LUND 14-S

Nice work ! Looks plenty fishable to me .. You even have a nice place to kick your feet up when the fish aren't biting .. :D
 

jasoutside

Supreme Mariner
Joined
Dec 20, 2009
Messages
13,269
Re: 14' Sea Nymph Oh Yeah! Now 1971 LUND 14-S

Your work looks great bear, nice man!
 

classiccat

"Captain" + Starmada Splash Of The Year 2020
Joined
Dec 20, 2010
Messages
3,412
Re: 14' Sea Nymph Oh Yeah! Now 1971 LUND 14-S

Nice modification with great attention to detail! Good job! :thumb:
 

tgp***

Senior Chief Petty Officer
Joined
Oct 18, 2009
Messages
768
Re: 14' Sea Nymph Oh Yeah! Now 1971 LUND 14-S

Nice ride there, Bear......
 

Watermann

Starmada Splash of the Year 2014
Joined
Jan 12, 2013
Messages
13,822
Re: 14' Sea Nymph Oh Yeah! Now 1971 LUND 14-S

Thank man!

Yes my brutha I tried to explain that being added along with the bulkhead above the picture... :laugh: Sometimes it's hard reading everyone's text... We love the pics so much!

That was the most polite "read before blabbing" reply I've ever heard! Nice work Bear. :D
 

Pmccraney

Lieutenant Commander
Joined
Jul 26, 2011
Messages
1,734
Re: 14' Sea Nymph Oh Yeah! Now 1971 LUND 14-S

Nice work fabbing up that bow work...looks great!...when I did my roll n roll, I got better results going very skimpy on the reducer.
 

glnbnz

Chief Petty Officer
Joined
Oct 4, 2011
Messages
458
Re: 14' Sea Nymph Oh Yeah! Now 1971 LUND 14-S

Wow looking good Bear!!!
 

bear_69cuda

Commander
Joined
Oct 10, 2008
Messages
2,109
Re: 14' Sea Nymph Oh Yeah! Now 1971 LUND 14-S

Thanks for the kind words everyone...

PMC 10-4 on reduction of reducer to paint ratio info!

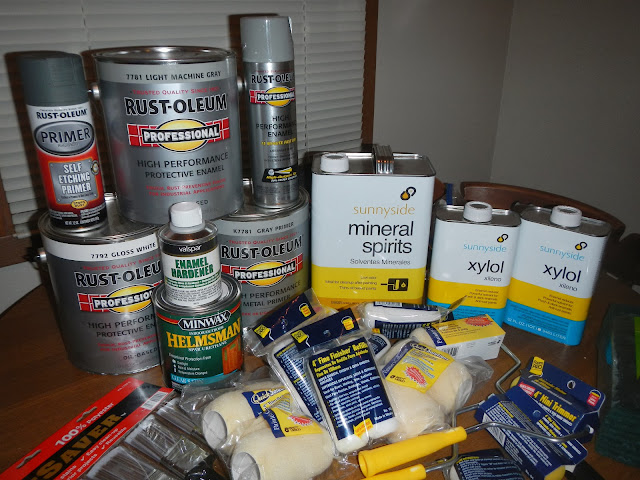
I now have most of my paint and painting supplies covered... I couldn't find any solvent specifically labeled "reducer" so I purchased zylol that says "can be used as a reducer in oil based enamel paint" I think I have a bunch of glasser supplies stashed someplace in my garage attic... poly-resin mixing cups now ala paint cups, mixin sticks, gloves, respirator, etc...

So my paint scheme is as follows.

Interior all Rusto light machine grey.
Bottom bare aluminum. (I'm not going to polish to mirror, but a nice satin look)
Sides of hull Rusto Gloss white.
I'm thinking of a thin black stripe to separate the white hull and bare aluminum bottom. It should look simple and cool!

01DEC2013%2520076.jpg
 

jbcurt00

Moderator
Staff member
Joined
Oct 25, 2011
Messages
25,122
Re: 14' Sea Nymph Oh Yeah! Now 1971 LUND 14-S

I like the bare, white w/ black stripe and gray interior.
 

Woodonglass

Supreme Mariner
Joined
Dec 29, 2009
Messages
25,929
Re: 14' Sea Nymph Oh Yeah! Now 1971 LUND 14-S

A 50/50 mix of the Mineral Spirits and the Xylol will make a nice Reducer for the Paint and Hardener mix.
 

Watermann

Starmada Splash of the Year 2014
Joined
Jan 12, 2013
Messages
13,822
Re: 14' Sea Nymph Oh Yeah! Now 1971 LUND 14-S

Wow! you bought enough to come over and do my boat too!
 

bear_69cuda

Commander
Joined
Oct 10, 2008
Messages
2,109
Re: 14' Sea Nymph Oh Yeah! Now 1971 LUND 14-S

I thought it would be more than enough, but now I have paint for any future issues that arise...

I was talking with Jas about this, but want to make sure I'm thinking about this correctly. Since most of the paint on this boat is in good shape can I scuff it up and prime over then top coat? Or do I need to remove all the existing paint? For the exterior I plan on addressing small scratches, sanding areas to make smooth, wash all surfaces 50:50 water vinegar, self etch prime over any bare aluminum, scuff all the to be painted exterior, primer over the red, then top coat with fresh paint.

For the interior I'll Gluvit any suspect areas, sash all surfaces 50:50 water vinegar, SE prime bare areas, scuff all existing paint, primer everything, then top coat.

Sound like a plan?
 

Woodonglass

Supreme Mariner
Joined
Dec 29, 2009
Messages
25,929
Re: 14' Sea Nymph Oh Yeah! Now 1971 LUND 14-S

If that don't work I don't know what will!!!!
It's all predicated on the adhesion of the old paint. If you're satisfied that it's stuck on really well then wipe it down, prime it and shoot it.;)
 
Last edited:

Watermann

Starmada Splash of the Year 2014
Joined
Jan 12, 2013
Messages
13,822
Re: 14' Sea Nymph Oh Yeah! Now 1971 LUND 14-S

I think people have had luck when the original paint hasn't turned to chalk and is sticking good just sanding down rather than strip clean. I've never been lucky enough to have a boat with just the original coat in good condition. Personal preference though, I strip to bare and start with a clean slate. Stripping isn't that much of a chore over sanding the entire hull and you don't have 30 - 40 year old paint as a base for your new top coat.
 

bear_69cuda

Commander
Joined
Oct 10, 2008
Messages
2,109
Re: 14' Sea Nymph Oh Yeah! Now 1971 LUND 14-S

I normally don't gamble, but if the original paint has held up so well for 40+ years, I feel using is a base should be fine... I'll sand and scuff up the surface for a good bonding surface for my primer... Jas and I discussed the factory has done something correct if the paint has held up this long...
 

jbcurt00

Moderator
Staff member
Joined
Oct 25, 2011
Messages
25,122
Re: 14' Sea Nymph Oh Yeah! Now 1971 LUND 14-S

Jas and I discussed the factory has done something correct if the paint has held up this long...
SC uses some sort of vinyl paint that's really tenacious, Lund probably uses something similar.
 

Watermann

Starmada Splash of the Year 2014
Joined
Jan 12, 2013
Messages
13,822
Re: 14' Sea Nymph Oh Yeah! Now 1971 LUND 14-S

I normally don't gamble, but if the original paint has held up so well for 40+ years, I feel using is a base should be fine... I'll sand and scuff up the surface for a good bonding surface for my primer... Jas and I discussed the factory has done something correct if the paint has held up this long...

Look forward to seeing her sporting the new coat!
 

bonz_d

Vice Admiral
Joined
Apr 22, 2008
Messages
5,276
Re: 14' Sea Nymph Oh Yeah! Now 1971 LUND 14-S

SC uses some sort of vinyl paint that's really tenacious, Lund probably uses something similar.

Lund uses primarally PPG paints and their paint codes are available on the internet.
 

bear_69cuda

Commander
Joined
Oct 10, 2008
Messages
2,109
Re: 14' Sea Nymph Oh Yeah! Now 1971 LUND 14-S

Hey gang,

I accomplished quite a bit though it may not look that way...

I'd hoped to get the deck sealed but it didn't happen...

I did however traced the deck support layout on top of my deck using a cool laser level. I mapped out and pre-drilled all the holes where the rivets will attach to the support frame beneath. Sanded the deck. I also cut the hole for my pedestal mount and pre-drilled holes. This way permanent attachment will be a simple after seal and paint.

I removed the support brackets shown in the pic to ease mounting the pedestal base to the deck. I need to be able to install bolts with large backing washers with locking nuts. In order to do this I had to be able to lift the deck for access and it's not possible with the brackets in place. I thought about using tee-nuts, but feel better big washers with nylock nuts will be stronger as I'm only using 1/2" ply. I could have cut an access hole in the bulkhead but it's simpler just to remove the brackets. I'll do the same on the other two seat benches as well...

Brackets and brackets removed.

01DEC2013%2520080.jpg


01DEC2013%2520078.jpg


Grid of support under sanded deck and seat post mount. Not sure if you can see all the pre-drilled holes? Most of the rivet holes are spaced 5" apart.

01DEC2013%2520079.jpg


Seat mock-up

01DEC2013%2520081.jpg


The PO has these wood blocks mounted on both sides of the boat. No clamp marks on either, the starboard one is forward more than this port side one shown. Any ideas of what they were for? Bumpers? hummmm....

01DEC2013%2520077.jpg
 
Top