1965 Starcraft Jupiter Restore/Repurpose

Watermann

Starmada Splash of the Year 2014
Joined
Jan 12, 2013
Messages
13,822
Have you been following along with StarTed and his similar work?

http://forums.iboats.com/forum/owne...ft-boats/10064423-1963-16-star-dust-i-believe
2016-04-14%20012_zpskbsfpiww.jpg
 

Dabbler_E

Petty Officer 1st Class
Joined
Apr 20, 2009
Messages
338
Time to start on the front raised deck. Took advantage of a large piece of free al sheet (the piece I cut out of the bow). Deck will be raised 12".

Laying out templates


Cut out with circular and skil saws:


Then set up my Stone Age bending brake (angle iron, board, clamps, mallet) on the edge of the picnic table.


Ta dah!
 

Dabbler_E

Petty Officer 1st Class
Joined
Apr 20, 2009
Messages
338
Here it is in place:


With a few screws to hold it down, I can use it to lay out the "waterline" of the deck


Then with a straightedge on the midline, measure perpendicular to the hull.


Sighting down the square every 6"


Then lay these measurements out on a piece of junky old OSB for a template.


Tilt the skil saw a bit to account for hull flare


Et voila -- pretty good fit

 
Last edited:

Watermann

Starmada Splash of the Year 2014
Joined
Jan 12, 2013
Messages
13,822
Nice work there on the bow section :thumb:

Is the plan next to add angle AL to the sides of the hull for edge support of the raised decking?
 

Dabbler_E

Petty Officer 1st Class
Joined
Apr 20, 2009
Messages
338
WM -- it's almost like you've done this before.....;)
Yep, I wanted to get the ACTUAL line of the decking as opposed to the predicted line, so the angle will go in the right place.
 

Dabbler_E

Petty Officer 1st Class
Joined
Apr 20, 2009
Messages
338
Here's the whole shebang dry fit. Decided to go with 3/4 ply to add extra hull bracing goodness.
 

Watermann

Starmada Splash of the Year 2014
Joined
Jan 12, 2013
Messages
13,822
Hey ya know I like your center support design better than the way SC did it. I had to use angle on the backs of my console panels for that bow deck edge on the sides of that center support piece and the panels are at an angle backward so the AL angle was oddly skewed upward.

Oh I was going to add a bit of advice on that bow deck ply, make sure it doesn't come in contact the sides of the hull or when you walk on it there will be a squeak no matter how thick the ply is. It will even do it a little if carpet is used.
 

skyfisher

Seaman Apprentice
Joined
Feb 13, 2013
Messages
45
Dab sure like how that turned out for you. Makes for a nice clean front with good support. Have to keep a couple of ideas for then next time I loose my mind and go through this process again.
 

Dabbler_E

Petty Officer 1st Class
Joined
Apr 20, 2009
Messages
338
Thought hard about access under the front deck. Originally was going to have 3 hatches, but decided not because it'll be a PITA and weaken the structure considerably. Ultimately settled on a single hatch in the nose where the battery will live, and two reach-ins through the sides of the deck support structure.
 

Dabbler_E

Petty Officer 1st Class
Joined
Apr 20, 2009
Messages
338
Also got the gunwales painted OD on the sides and nonskid tan on top (same as on the main deck). Chief Quality Control Officer approves!


Dabbler_E

Petty Officer 1st Class
Joined
Apr 20, 2009
Messages
338
With the front deck support screwed down and the decking secured, I got the underline of the deck drawn in. Then mounted five 1/8" angle brackets (squished a bit in the bench vise to be less than 90deg) on each side. Each secured to the hull with two 1/2" 10-24 SS machine screws with nyloks. Felt queasy drilling through the hull! Secured the deck support structure to the hull with the same screws and nyloks.


Last edited:

Dabbler_E

Petty Officer 1st Class
Joined
Apr 20, 2009
Messages
338
Deck is soaking up epoxy. It will be held down with machine screws. There isn't much material in places to hold, so I'm adding a double layer of fiberglass cloth for extra strength.
 

Tnstratofam

Commander
Joined
Aug 18, 2013
Messages
2,679
With the front deck support screwed down and the decking secured, I got the underline of the deck drawn in. Then mounted five 1/8" angle brackets (squished a bit in the bench vise to be less than 90deg) on each side. Each secured to the hull with two 1/2" 10-24 SS machine screws with nyloks. Felt queasy drilling through the hull! Secured the deck support structure to the hull with the same screws and nyloks.


I would back those screws out and use some 3m 5200 or 4200 sealant on them for good measure. They may all be above the waterline at rest or under way, but if you stuff the bow in another boats wake or even during decelerating you could have some water intrusion through the screws.
 

Dabbler_E

Petty Officer 1st Class
Joined
Apr 20, 2009
Messages
338
Thanks tn -- thanks for catching that step. I did seal the screws w/ 5200 & smeared some on the mating surface of the angle brackets.
 

Dabbler_E

Petty Officer 1st Class
Joined
Apr 20, 2009
Messages
338
Progress! Starting to get buttoned up. Rub rails, cleats, and other trim are on.
Next up: consoles!


Dabbler_E

Petty Officer 1st Class
Joined
Apr 20, 2009
Messages
338
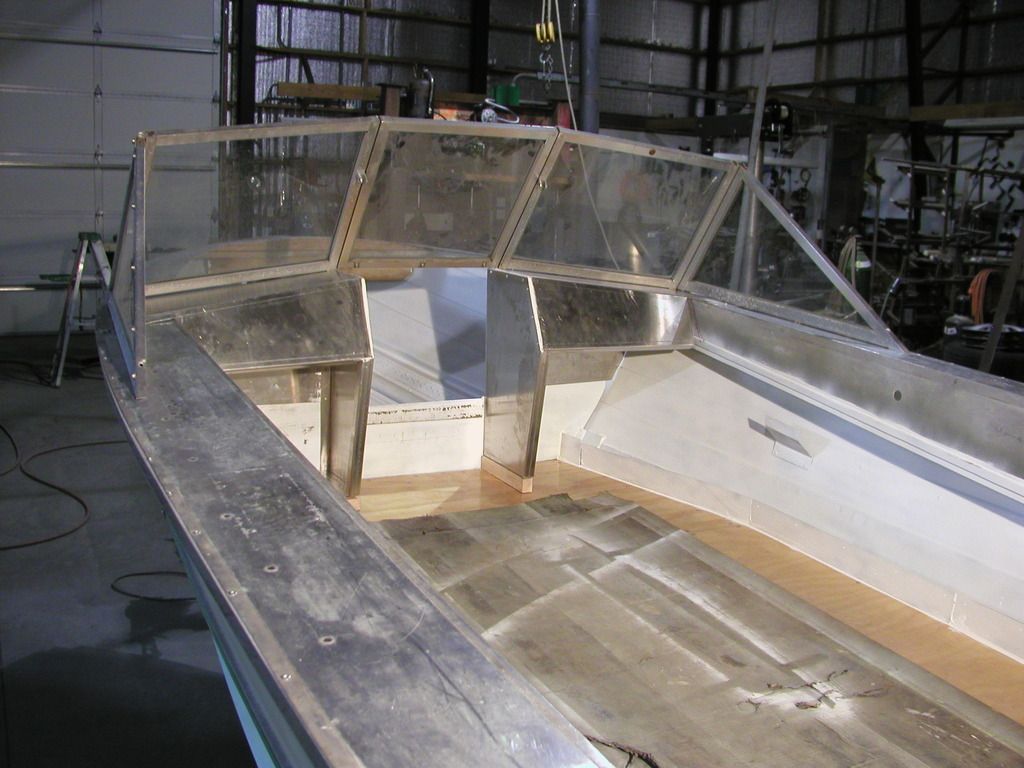
Played with console mock ups and the windshield from the Mark Twain. The gap between the consoles will be narrower than on the Twain so I'm probably going to just remove the hinged center portion of the windshield (which hardly ever gets used anyway)
 

Watermann

Starmada Splash of the Year 2014
Joined
Jan 12, 2013
Messages
13,822
The only other option you'd have is to cut the WS frame down and have the glass cut to fit. Quite the headache for like you say something that really isn't needed.
 
Top