1975 Starcraft 140 Evinrude OB -- Restoration IN PROGRESS FINALLY

wlg

Petty Officer 2nd Class
Joined
Jan 1, 2012
Messages
168
Re: 1975 Starcraft 140 Evinrude OB -- Restoration IN PROGRESS FINALLY

For my side panels I just scabbed them to the rear to get the 11'. Painted them with exterior floor and porch paint and covered them with marine carpet. I have a thread posted that shows them complete, but I left out the assembly process.
 

Grandad

Lieutenant Commander
Joined
Jun 7, 2011
Messages
1,504
Re: 1975 Starcraft 140 Evinrude OB -- Restoration IN PROGRESS FINALLY

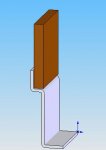
is this the aluminum angle, if so then i do have that. i was just positioning it in the boat to get an idea of where i might be able to cut it at.
Glad to hear you have the angle. If I manage to attach a picture, it should look like this (shortened length) in the drawing below. The brown block represents your wooden side panel. - Grandad
 

Attachments

  • baseboard.jpg
    baseboard.jpg
    27.5 KB · Views: 0

rrumba

Ensign
Joined
May 31, 2011
Messages
901
Re: 1975 Starcraft 140 Evinrude OB -- Restoration IN PROGRESS FINALLY

Check with your local salvage yard for aluminum road signs. They are 1/4" thick and usually cheap. A jig saw with a fine tooth metal cutting blade will make short work of cutting out the pad.


thanks for the idea there WOG. I have some free stuff coming that is 1/4" thick. might just have to trim her down a little on the old rockwell blade runner..... love that one.....
 

rrumba

Ensign
Joined
May 31, 2011
Messages
901
Re: 1975 Starcraft 140 Evinrude OB -- Restoration IN PROGRESS FINALLY

For my side panels I just scabbed them to the rear to get the 11'. Painted them with exterior floor and porch paint and covered them with marine carpet. I have a thread posted that shows them complete, but I left out the assembly process.


thanks for stopping in WLG.......
still not sure which way to go, i have time to think of it as i am still working on the transom and sole right now, just trying to get things ready ahead of time while i cannot work on the things i want right now. i might just cut the the bad sections off the ends and bottom and epoxy them together . I do not want to add any vinyl to the sides so it will just be the deck and porch paint.
 

rrumba

Ensign
Joined
May 31, 2011
Messages
901
Re: 1975 Starcraft 140 Evinrude OB -- Restoration IN PROGRESS FINALLY

Glad to hear you have the angle. If I manage to attach a picture, it should look like this (shortened length) in the drawing below. The brown block represents your wooden side panel. - Grandad


Yep Grandad that is what the pieces i have look like.
 

rrumba

Ensign
Joined
May 31, 2011
Messages
901
Re: 1975 Starcraft 140 Evinrude OB -- Restoration IN PROGRESS FINALLY

Answers to Q#2 & 3...

Roll your own, er I mean make your own... I just did...made a 16 foot long by 2 foot wide by 3/4 inch thick sheet to make my stringers...


You can do the same with 2 sheets of 1/4 inch ply...if you want a 1/2 inch thick finished piece...

Heck if you need 22 feet by about two feet wide, you could carry out this lamination procedure with 3 sheets and end up with a 24 foot long by 2 foot wide sheet of plywood...enough for both sides...

Yeah GT i am somewhere along those lines i think. I had to do the same thing with my stingers in the IMP, was just hoping to avoid it if possible. Oh well guess you hope for the best but expect the worse. I will come up with something.
 

Woodonglass

Supreme Mariner
Joined
Dec 29, 2009
Messages
25,929
Re: 1975 Starcraft 140 Evinrude OB -- Restoration IN PROGRESS FINALLY

Uhhmmm, I'd use the Valspar paint with the Hardener, It'll last longer and look better.
 

rrumba

Ensign
Joined
May 31, 2011
Messages
901
Re: 1975 Starcraft 140 Evinrude OB -- Restoration IN PROGRESS FINALLY

a few more questions fellas........

1. for the drain tubes, i know there are the brass, aluminum and then these i found as well. this is for the splashwell area i am talking about. what do you guys think about them?

http://www.ebay.com/itm/2-New-Boat-Motorwell-Splashwell-Transom-Repair-Replacement-Drain-Tubes-/180801657618?pt=Boat_Parts_Accessories_Gear&vxp=mtr&hash=item2a189e5b12


2. securing the deck to the ribs, this is kind of a 2 part question. Is it necessary to use the thin strip of aluminum that you secure the sections of the deck to from bow to stern? the other question is i have seen both screws and reveets used, what is the "best practicle" method?
 

rrumba

Ensign
Joined
May 31, 2011
Messages
901
Re: 1975 Starcraft 140 Evinrude OB -- Restoration IN PROGRESS FINALLY

Uhhmmm, I'd use the Valspar paint with the Hardener, It'll last longer and look better.


The paine on the interior will be a slightly darker blue, and a semi dark gray. I am going for the ease of repairs should any be needed for touchup. I expect the interior to take some abuse and want to be able to just get off the shelf colors and match up the repairs. The side panels will have a coat of epoxy to help it with the rot factor especially along the bottoms and edges. with the deck my plan was to just use the porch and deck paint on the top, bottom and edges since it will basically be a sacraficial piece. I have toyed with the idea of putting at least one coat of epoxy on the wood as well but i am tossed.

what valspar paint, just the normal oil based paint with the hardner? again, i want easy to find off the shelf colors for ease of repairs. then the other question i have for you WOG would be if it would have to be thin coats like before and do the roll roll method? if it has to be thin coats then i will spray it instead.

what are your thoughts WOG, and anyone else??? prepping the wood for the deck this week
 

jbcurt00

Moderator
Staff member
Joined
Oct 25, 2011
Messages
25,111
Re: 1975 Starcraft 140 Evinrude OB -- Restoration IN PROGRESS FINALLY

a few more questions fellas........

1. for the drain tubes, i know there are the brass, aluminum and then these i found as well. this is for the splashwell area i am talking about. what do you guys think about them?

http://www.ebay.com/itm/2-New-Boat-..._Accessories_Gear&vxp=mtr&hash=item2a189e5b12

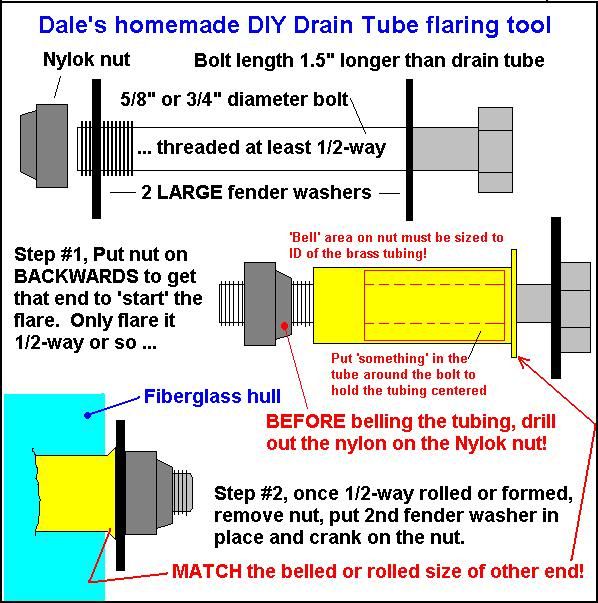
They are indeed serve the same purpose, and will do the same job, cheaper. If you're leaving the boat outside, esp in the sun, I'd probably not use them. There's a 'low-cost' alternative for the flairing tool used to install the metal drains....Pix to follow below...

2. securing the deck to the ribs, this is kind of a 2 part question. Is it necessary to use the thin strip of aluminum that you secure the sections of the deck to from bow to stern? the other question is i have seen both screws and reveets used, what is the "best practicle" method?

If you are describing the strip that goes across the ribs below the seam between the long edges of 2pcs of ply, I think it may depend on the thickness of ply for your floor. 1/2" = yes, 5/8 = probably, 3/4 = maybe not. I would use it in all those cases. It acts like the tongue & groove of floor deck ply or hardwood flooring, & reinforces the joint. At the seam when you just step on the edge of 1 of the 2 sheets, it carries the weight across the joint as though you were stepping into the middle of a sheet not just the edge of 1. In a glasser, it is usually a ply strip glassed down in & across the stringers...
FlaringTool.jpg

FlaringTool.jpg
FlaringTool.jpg
Did that help?
 
Last edited:

jbcurt00

Moderator
Staff member
Joined
Oct 25, 2011
Messages
25,111
Re: 1975 Starcraft 140 Evinrude OB -- Restoration IN PROGRESS FINALLY

The side panels will have a coat of epoxy to help it with the rot factor especially along the bottoms and edges. with the deck my plan was to just use the porch and deck paint on the top, bottom and edges since it will basically be a sacraficial piece. I have toyed with the idea of putting at least one coat of epoxy on the wood as well but i am tossed.

what valspar paint, just the normal oil based paint with the hardner? again, i want easy to find off the shelf colors for ease of repairs. then the other question i have for you WOG would be if it would have to be thin coats like before and do the roll roll method? if it has to be thin coats then i will spray it instead.

what are your thoughts WOG, and anyone else??? prepping the wood for the deck this week

100% just my 1.5cents, busted watch~2X/day....:)

I understand the need to either not spend as much, or get done quicker & back on the water. But I would seriously reconsider the decision to not use epoxy or poly & glass on the deck, especially the underside. Although you think of it as sacraficial, it is by far the hardest pcs of wood to replace (and most expensive based on SqFt) and if you must decide on cost saving measures I'd skip the epoxy on the side panels, and opt to coat the floor deck, even if 'only' a thinned w/ acetone, penetrating epoxy coat, followed by paint. $50-100 now, to get several more years of life, seems like a decent trade off. The side panels won't be easy to redo, but you don't have to totally gut the boat to do it. And as a vertical surface, epoxy just the bottom 6" +/- and paint it, when wet it will drain (& DRY) much better (& faster) then the floor.

Vlaspar doesn't come in a wide color selection at Tractor Supply here, but may offer more colors elsewhere. They didn't have a color chart so I plan to go online tonight to order 1, there are a few choices of red.....The cans all had 3 color id's that looked the same to me. The hardener came in 2 sizes, the small can went w/ 1 gal of paint.
 

rrumba

Ensign
Joined
May 31, 2011
Messages
901
Re: 1975 Starcraft 140 Evinrude OB -- Restoration IN PROGRESS FINALLY

100% just my 1.5cents, busted watch~2X/day....:)

I understand the need to either not spend as much, or get done quicker & back on the water. But I would seriously reconsider the decision to not use epoxy or poly & glass on the deck, especially the underside. Although you think of it as sacraficial, it is by far the hardest pcs of wood to replace (and most expensive based on SqFt) and if you must decide on cost saving measures I'd skip the epoxy on the side panels, and opt to coat the floor deck, even if 'only' a thinned w/ acetone, penetrating epoxy coat, followed by paint. $50-100 now, to get several more years of life, seems like a decent trade off. The side panels won't be easy to redo, but you don't have to totally gut the boat to do it. And as a vertical surface, epoxy just the bottom 6" +/- and paint it, when wet it will drain (& DRY) much better (& faster) then the floor.

Vlaspar doesn't come in a wide color selection at Tractor Supply here, but may offer more colors elsewhere. They didn't have a color chart so I plan to go online tonight to order 1, there are a few choices of red.....The cans all had 3 color id's that looked the same to me. The hardener came in 2 sizes, the small can went w/ 1 gal of paint.

yep, the sides would be easier, but then the seats and all have to come out. my only problem with doing the bottom 6" or so, thought about that as well, is that if water does get in then it will head down and sit in the epoxy and rot anyway so might as well do it all i guess.

decisions decisions......
 

jbcurt00

Moderator
Staff member
Joined
Oct 25, 2011
Messages
25,111
Re: 1975 Starcraft 140 Evinrude OB -- Restoration IN PROGRESS FINALLY

I was actually thinking the other way when I mentioned the 6", keeping it from wicking UP water from the deck...... But yes only doing the bottom would trap water draining from above. If the paint is kept in decent shape, I would hope there would be little water from above though....

If the choice is thinned epoxy applied to everything or not, I reckon I'd lean towards thinned epoxy put everywhere, then regular strength in those areas you are most concerned w/. Prep & paint it well, then keep the paint in good shape.

But definitely get the backside that you won't be able to monitor. Was the strip you asked about the 1 I described?
 
Last edited:

rrumba

Ensign
Joined
May 31, 2011
Messages
901
Re: 1975 Starcraft 140 Evinrude OB -- Restoration IN PROGRESS FINALLY

Yeah, i thought you were not supposed to thin out the epoxy, will have to hope someone else chimes in about thinning it out. I know the first layer gets pulled in rather nicely when it is normal consistency.

that strip is the one that i was talking about. it is under the joint of the 2 pieces of plywood and attached to it from port to starboard.
 

jbcurt00

Moderator
Staff member
Joined
Oct 25, 2011
Messages
25,111
Re: 1975 Starcraft 140 Evinrude OB -- Restoration IN PROGRESS FINALLY

I went back and checked & it appears I may have mis-read some of the details about thinning epoxy. To me, it follows that thinning the epoxy in applications requiring strength, would obviously be ill-advised.

But for water-proofing purposes, although it would seem to make sense (and did to me) to thin it based on what I know about poly & varnish on wood, and water-proofing. However, it seems that you are correct & even in water-proofing situations it is also not advised to thin the epoxy for chemical makeup, adhesion, & water-proofing properties.

Forum page re: thinning epoxy, its a sticky under the how to's heading

I stand corrected.....Changed my last post too......... 1 out of 2......
 

ezmobee

Supreme Mariner
Joined
Mar 26, 2007
Messages
23,767
Re: 1975 Starcraft 140 Evinrude OB -- Restoration IN PROGRESS FINALLY

I used the plastic drain tubes on mine bedded with 5200 and they were just fine. I like cheap and simple.
 

rrumba

Ensign
Joined
May 31, 2011
Messages
901
Re: 1975 Starcraft 140 Evinrude OB -- Restoration IN PROGRESS FINALLY

I used the plastic drain tubes on mine bedded with 5200 and they were just fine. I like cheap and simple.


that was kind of my thought also, but they are not as cheap as i would like them to be. It's above the waterline as well, overthinking this way to much.......

now i have jasonoutside-itis........ :facepalm:
 

jasoutside

Supreme Mariner
Joined
Dec 20, 2009
Messages
13,269
Re: 1975 Starcraft 140 Evinrude OB -- Restoration IN PROGRESS FINALLY

Tell ya what...

I ran the plastic ones with 5200, cheap, easy, sealed up great, look good....

Then I see a nice brass drain tube job and feel like a loser:redface:
 

rrumba

Ensign
Joined
May 31, 2011
Messages
901
Re: 1975 Starcraft 140 Evinrude OB -- Restoration IN PROGRESS FINALLY

good point.

i am going to order the aluminum ones. keep the metals the same
 
Top