1985 Bayliner 2450 Ciera Sunbridge Restoration underway!

Status
Not open for further replies.

Pharmboy62

Recruit
Joined
Dec 23, 2011
Messages
5
Re: 1985 Bayliner 2450 Ciera Sunbridge Restoration underway!

Hello CPO, Just found your thread and read the whole thing.I don't know what you are studying, but if it's
journalism you will have a outstanding career. Your experiences with the swim platform and the inverter are dead on with our1985 2450. Hope we have the same success. We hit the water 2 weeks ago and all was pretty much smooth and comfy(read-the wife was pleased). The only glitch was a cross wind backing into the slip and I managed to clip a 4" chunk off of the swim platform(center section). No luck on replacement so far so I may attempt a repair. Any suggestions? No pics yet, but will post soon. Keep the good stuff coming!

Pharmboy62

1985 Ciera 2450
1996 Crownline 220CC
 

Ciera2450

Lieutenant Junior Grade
Joined
Apr 8, 2011
Messages
1,049
Re: 1985 Bayliner 2450 Ciera Sunbridge Restoration underway!

Thanks for the kind comments Pharmboy! I'm actually going back to school to be an optometrist. I've been an optician for 15years and just want something more. (money!) lol
If you have the same platform as mine it may be toast if the damage is bad enough. Post up some pics and lets take a look at it..
 

lil buggy

Senior Chief Petty Officer
Joined
Sep 24, 2011
Messages
766
Re: 1985 Bayliner 2450 Ciera Sunbridge Restoration underway!

Good luck man! I hope ya get her wet!

thanks your luck given helped for a smooth day,,, she is wet:D
and i aint talkin about the admiral:eek:. dont tell her i dont wana be in the doghouse,,, bahahahaha lmao

i am workin on electical tomorrow, i gotta know more about the inverter,,
 

Ciera2450

Lieutenant Junior Grade
Joined
Apr 8, 2011
Messages
1,049
Re: 1985 Bayliner 2450 Ciera Sunbridge Restoration underway!

Congrats sir!!! I bet your excited...
I'll be happy to help with any questions on the inverter, it really is a pretty simple install if you can access everything. The lil shelve in the "cave" was a great location for me and since our boats are twins, it may work for you. My batteries are also on the starboard side so the cable run was only like 2 feet from batteries through the firewall. You have shore power though and I'm not too sure about all that, I ain't that fancy! lol I have an extension cord. :)
 

Ciera2450

Lieutenant Junior Grade
Joined
Apr 8, 2011
Messages
1,049
Re: 1985 Bayliner 2450 Ciera Sunbridge Restoration underway!

My boy came home with this today from the school book fair....
dylansboatbook.jpg


I'm teaching him right! lol This book actually has some really detailed information!!! I have no idea how it was at a grade school book fair as it really is quite detailed and complex but I'm sure glad the boy bought it! He told me that i could "borrow" it for a while...lmao
 

lil buggy

Senior Chief Petty Officer
Joined
Sep 24, 2011
Messages
766
Re: 1985 Bayliner 2450 Ciera Sunbridge Restoration underway!

Congrats sir!!! I bet your excited...
I'll be happy to help with any questions on the inverter, it really is a pretty simple install if you can access everything. The lil shelve in the "cave" was a great location for me and since our boats are twins, it may work for you. My batteries are also on the starboard side so the cable run was only like 2 feet from batteries through the firewall. You have shore power though and I'm not too sure about all that, I ain't that fancy! lol I have an extension cord. :)
thanks it's appretiated.
i guess they are a lil different after all my batteries are on the port side, i got a bathtub full of fresh water where your batteries are.

i got a lil inverter to power the tv and protect it as well, it should be able to handle charging the laptop but coffee would kill it,,,lol.

so an inverters job is to? i thought it cleaned up 12 volt so you can run house appliances on. does it also store or elongate power from the batteries?

as far as shorepower goes,,, thats a fancy name for an expensive 30 amp extension cord. it just supplies juice to the charger so you dont run outa batteries. i have a few outlets that only run while plugged in for heavier power loads and the elec part of the 2way stove as well.

i had to buy an adapter so i could plug my extension cord into my shorepower cord to keep things fresh,,,,shish,,, it was more expensive than the shorepower cord it attatched to:facepalm:

thanks in advance for the reply.

glad to see your son is following in his dad's footsteps:D, sounds like your teaching him right
 

Ciera2450

Lieutenant Junior Grade
Joined
Apr 8, 2011
Messages
1,049
Re: 1985 Bayliner 2450 Ciera Sunbridge Restoration underway!

No sir mark, an inverter will drain your batteries faster than a typical 12v item. The inverter process to convert 12v to 120v is NOT very efficient and you lose about 15-20% right off the bat. I don't know if all inverters are the same but most of them even suck a small amount of juice even without a load on it. (like .9A or so). The inverter I have states to disconnect power when Not in use for long periods so I just pull the fuse on it since its wired directly to batteries. What size inverter do you have? I purposely got a larger one for making coffee and possibly running the wifes hair dryer/curling iron. I plan to add another battery or two soon. I currently have 23OAH on the house bank(two 115AH batts.) and would like to get closer to 500AH so i'm not draining them to much. As I said before, the two batteries on the house bank will last me 3 days and possibly more. I've never had to switch to the reserve optima starting battery to crank her up.
What you have for batteries? An inverter can really drain em quick...even a small one.

This may help with thinking about inverters and the current they suck out of the batteries depending on the load:

Power (P), in Watts, is equal to the Voltage (V), in Volts, multiplied by the Current (I), in Amperes.

P=V*I

Using Algebra to solve for the Current (Amps) that are required:

I=P/V

Therefore: 2000 Watts / 12 Volts = ~167 Amps

Please note, that this is for a 100% efficient inverter. If the inverter is 90% efficient the actual draw would be:

Iideal*(1+(1-(%Efficiency/100)))=Iactual
167 Amps*(1+(1-(90/100)))=Iactual
167 A * (1+(1-0.9))=Iactual
167 A * (1+(0.1))=Iactual
167 A * (1.1)=Iactual
183 A = Iactual

The continuous current draw for a 90% efficient power inverter, operating from a 12V DC source, out putting 2000W at 120V AC, is 183 Amps.

Compare the amp hour rating you calculate your using and compare that to the batteries. The tv and charging things probably won't draw too much, things with heating elements(coffee maker,hair dryer,etc) really draw a ton of current. I calculated that I could run the coffee maker for 3.62 hours and completely drain my two batteries. The laptop charger would need 18.34hours to drain them.
I really need coffee in the morning tho!!!! lol
 

Ciera2450

Lieutenant Junior Grade
Joined
Apr 8, 2011
Messages
1,049
Re: 1985 Bayliner 2450 Ciera Sunbridge Restoration underway!

btw mark, my water tank is on the port side. lol They are opposites in that respect i guess. :D
Oh, i forgot to mention that it isn't good for your batteries to drain them past 50%. So in my case, I have 230AH available, I would be shooting for 115AH used before they need charging. Mind you, the alternator does SOME charging when running.
 

lil buggy

Senior Chief Petty Officer
Joined
Sep 24, 2011
Messages
766
Re: 1985 Bayliner 2450 Ciera Sunbridge Restoration underway!

thank you sir, that is a great explination.thanks for the step by step with the algebra(refresher course)

i got alil lost at Iideal*(1+(1-(%Efficiency/100)))=Iactual
what is the (1+(1- about? i get the % of efficiency part though


heres the inverter from autozone, 130 watt.
copied the text to make it easier. ********************************************************************************************
Professional design for safe operation-low/high voltage protection, high temperature protection, high current protection, short circuit and over load protection
  • 130W portable inverter transfers your car power (12V DC power) to AC power that runs your household appliances on the road
  • Compact design for easy portability
  • Making your business more efficient and time saving
  • 5V/ 500mA USB port is convenient for the personal devices with USB charging adapter
  • LED indicator shows you the working status
  • Ideal for MP3, Digital Camera, Cell Phone, Laptop


<div class="videoKeywords"> You must have JavaScript enabled to see this Product Video.<br/> Video Name: <br/> This video covers the following areas: and other related topics. </div>
Part Number:
PI-130W
Weight:
0.8 lbs
Warranty:
3 MO
Input Voltage:
11-15V DC
Output Voltage:
104-125V AC
Maximum Continuos Power:
130W
USB output:
5V 500mA
Shipping Information:
Overnight and Two Day shipping are not available for PO Box, APO/FPO/DPO or US Territory addresses


4


*********************************************************************************************
i hacked the cigarette lighter adapter off and stole the power from the radio supply line with a switch, splice, solder and heatshrink. both the tv and the radio work together with no issues and i can turn them off with a switch


all i know abot the tv's power at this point is, 24 in led and costs like $6 a year to run, according to the green tag, there is an on led to show run status. so we felt the need to be able to turn the inverter completely off

my battery info would be hard to complete cause the fridge always steals power from the batteries even when connected to shorepower.
 

Ciera2450

Lieutenant Junior Grade
Joined
Apr 8, 2011
Messages
1,049
Re: 1985 Bayliner 2450 Ciera Sunbridge Restoration underway!

Excellent sir, ya i don't think those LED tv's draw very much current at all. I copied all that algebra stuff from wikihow. lol but, that part your reffering to is to calculate the current draw for a non 100% efficient inverter which NONE of them are. Somewhere in the literature, yours will tell you its efficiency rating. You probably can't run much more on 130W max, but i dunno if you even plan to. I had a small 400continuous//800W max inverter and it wouldn't run the wife's hair dryer and flat iron thing or my coffee maker. Hence the upgrade to the 1200/2000W inverter. I can run just about anything with that besides an air conditioner or something. It's just a matter of how much i'm sucking out of the batteries by doing so.
We usually stay the weekends on the lake and being as I trailer the boat, I have no slip to pull into and charge up. I've got to keep track of the batteries so we don't get stranded!!! lol (i always have the optima battery in reserve, but i don't tell the wife so she isn't going crazy with power usage) She loves having all the freaking lights on in cabin, during the middle of the day! It drives me nuts.

Do you have air conditioning? That is my next big purchase for the boat. Eventually. I have a portable genny that i'll put on the swim platform to run it. I was looking at permanent installed marine genny's and HOLY CRAP! they cost more than my boat!
 

Ciera2450

Lieutenant Junior Grade
Joined
Apr 8, 2011
Messages
1,049
Re: 1985 Bayliner 2450 Ciera Sunbridge Restoration underway!

Btw, i'm picking up 1 more battery for the house bank today. That will get me to 345AH which should be plenty for our uses.
 

Ciera2450

Lieutenant Junior Grade
Joined
Apr 8, 2011
Messages
1,049
Re: 1985 Bayliner 2450 Ciera Sunbridge Restoration underway!

Hello guys,
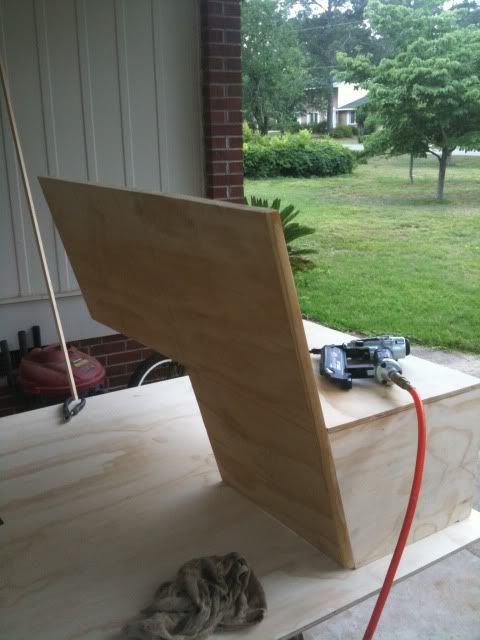
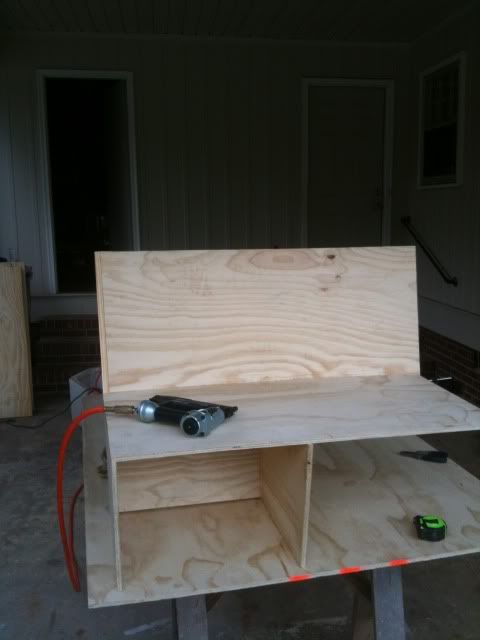
I got a bit too much coffee this morning and decided to start fabricating my new seating for the helm area. The original seating I ripped out shortly after I got the boat because it was rotted/torn/falling apart. I didn't like how the original "L" seating stuck so far out. It was quite a squeeze between the L seat and the captain chair. Last year I made basically a triangle to have as a back rest with NO L part to the seating. Well, I'm unhappy with it and want to add at least another seat and make something a little bit more professional. I just through that triangle backrest together and didn't really make it look nice.
So, I decided to make a smaller L portion, about half the length of the original. this will provide room to get through while still providing a bit more seating and even some storage underneath.
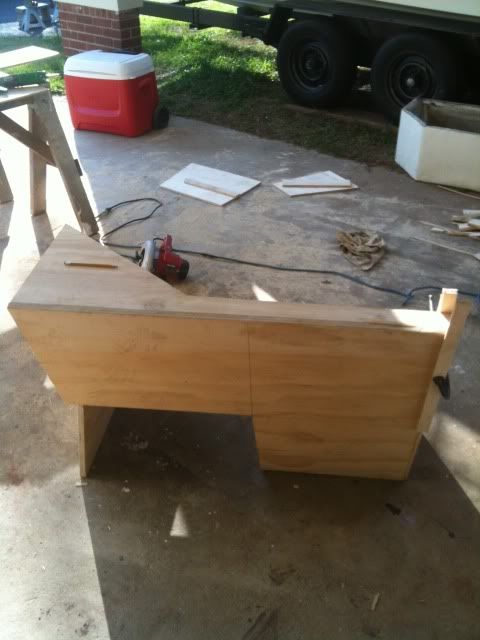
Here is where I started:
seating-beginning1.jpg

seating-beginning2.jpg


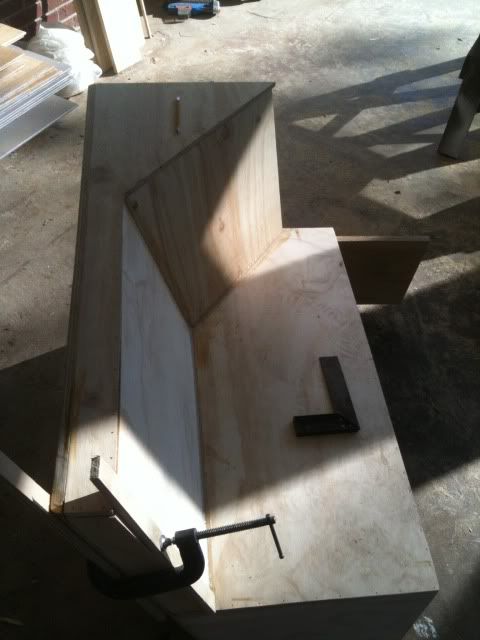
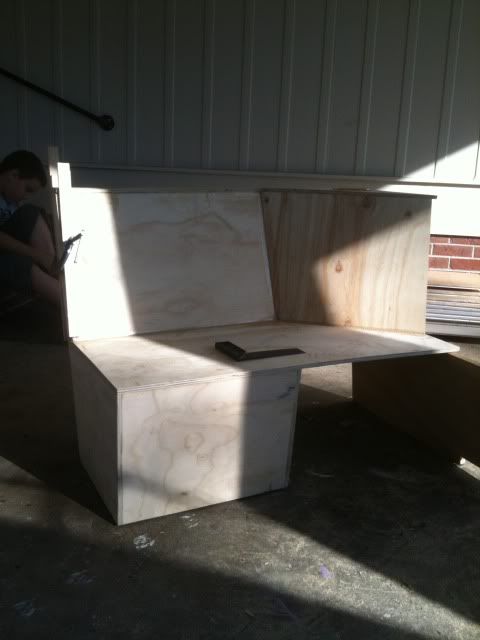
I used 3/4 Arauco plywood for the large back portion, everything else was 1/2" Arauco ply. After, I had the base and back portion glued and nailed together I went to making the very top portion. I doubled up the backrest part with 1/2" ply and several "struts" inbetween for strength.
seating-overallshot.jpg

seating-overallshot2.jpg

seating-backsideshot.jpg


I have been using tite-bond 3 glue and 1.75" and 1.0" nails in my air nailer
 

Ciera2450

Lieutenant Junior Grade
Joined
Apr 8, 2011
Messages
1,049
Re: 1985 Bayliner 2450 Ciera Sunbridge Restoration underway!

I still have to make the portion that will screw to the side of the boat, that acts as a backrest. I need to fit this thing in the boat and take some more measurement prior to cutting the piece for that. I will also cut a door into the "box" under the seat for storage and across the top of the angled part will have three cupholders and a washdown hose.
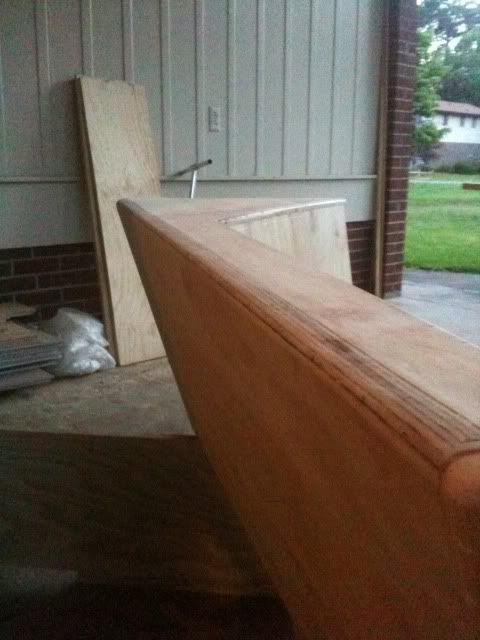
I routered most of the edges so far and need to do some sanding prior to finishing this thing up.
seating-routerededges.jpg

seating-cupholderplacement.jpg


I'm still debating how to finish this thing off. Likely just cover it in a thin layer of foam and wrap it in vinyl to match the stern seating i've done. I was possibly thinking of fiberglass the entire thing and gelcoating it. I"m thinking that the backrest and seat cushion will have snaps to attach them so i can remove them, but may just make it all one unit.
I will be at least using some fiberglass tape to cover all the corners and seams.


Any tips or suggestions guys? thanks in advance!
 

Ciera2450

Lieutenant Junior Grade
Joined
Apr 8, 2011
Messages
1,049
Re: 1985 Bayliner 2450 Ciera Sunbridge Restoration underway!

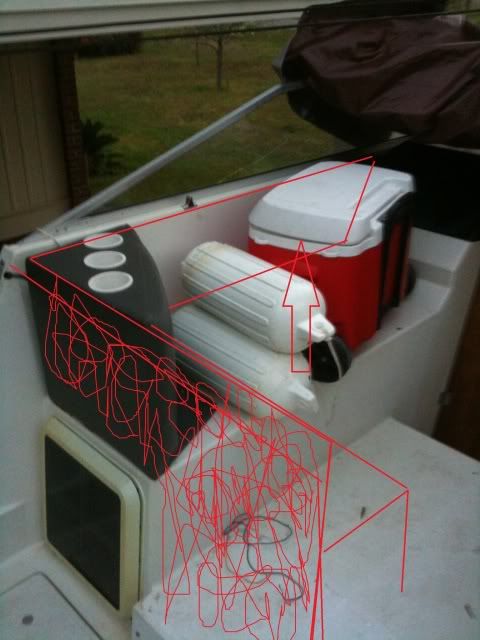
This is kind of an idea of what i'm doing here....
You can see the old triangle thing I made and my super skills with MS paint illustrate the location of the new one. The red arrow is the piece I have yet to make and attach to what i've already got.
benchseat.jpg
 

Ciera2450

Lieutenant Junior Grade
Joined
Apr 8, 2011
Messages
1,049
Re: 1985 Bayliner 2450 Ciera Sunbridge Restoration underway!

I think this is the washdown sprayer i'm going to purchase...it will mount semi-flush with lid on it... it will go centered behind the 3 cupholders in my photo above...
http://www.defender.com/product.jsp?path=-1|51|26832|319660&id=1811179
If iboats has something similar, I'd rather purchase it there. I looked but couldn't find a flushmount type.
What do you think?
 

lil buggy

Senior Chief Petty Officer
Joined
Sep 24, 2011
Messages
766
Re: 1985 Bayliner 2450 Ciera Sunbridge Restoration underway!

i think you been pretty busy:D
the new and improved L is lookin sweet. i am thinking more padding tho. thinner on the back tho, look for a donor couch:eek: for the foam, to save cash. if you glassed it in it would be ideal however that is officially over my head,,lol. that being said, i would suggest that the spraydown hose be mounted a little farther away from the new wood. mine is on the upper outside of the stern, so you can spray down your feet on the swim platform before you get in the boat. also it appeares that my spray nozzle was just a hand shower sprayer(like those in my house with a simple faucet to turn off and on.
i'll do some looking around today and post up my system tonight. you are doing great work. i like the smaller L.
hope you have a good productive day today

p.s. no ac or genny here,,lol. i have a sister boat at my marina that adapted a wallyworld 100cheeseburger ac unit to the rear aft cabin hatch window and it works great on shore power.
agreed the genny's arent cheap. i have had a few suggestions for my boat, most agreed, if going portable get a honda s2000, quiet and reliable, pricey tho.
hope it helps
 

Ciera2450

Lieutenant Junior Grade
Joined
Apr 8, 2011
Messages
1,049
Re: 1985 Bayliner 2450 Ciera Sunbridge Restoration underway!

Thanks Mark, I am shopping online for foam today. The bottom cushion will likely be 5" thick foam and the backrests 3" foam. The rest of it i'll just cover in a very thin layer of foam. I'm looking at the foam that doesn't hold any water to keep this thing from rotting like the original one did.
The wood is also getting sealed up thoroughly before any vinyl or foam goes on it. All the edges and seams will get wrapped in fiberglass for strength and waterproofing. I like doing glass work so perhaps I'll just put a layer of csm over the whole thing. The plumbing is already run to the side of the gunwhale for the washdown. The one i'm looking at has a 6' hose, so i can spray off fish guts and bait goo from the stern area. It runs off of my freshwater system and doesn't pump from the lake, so you could even get a drink. It'll be like a wetbar. :)
Heading out shortly to get some more work done. Hopefully finish all the rounding over with the router and get it all sanded down. I plan to use some short strand filler to make "fillets" in the creases for the fiberglass to conform to and give it a nice rounded look.
 

Ciera2450

Lieutenant Junior Grade
Joined
Apr 8, 2011
Messages
1,049
Re: 1985 Bayliner 2450 Ciera Sunbridge Restoration underway!

Now ya got me thinking....
I'm seriously considering attempting to glass this thing in and gel coat it. Making the cushions removable would allow me to store them in the cabin to keep em in good shape.

That's a whole lot more work tho! I really like the idea but it'd be real tough to match the gelcoat to what is in the boat already.
 

Ciera2450

Lieutenant Junior Grade
Joined
Apr 8, 2011
Messages
1,049
Re: 1985 Bayliner 2450 Ciera Sunbridge Restoration underway!

Alright! I've got the "construction" phase completed. Now its just a matter of routering and sanding things smooth, THEN upholstery work.
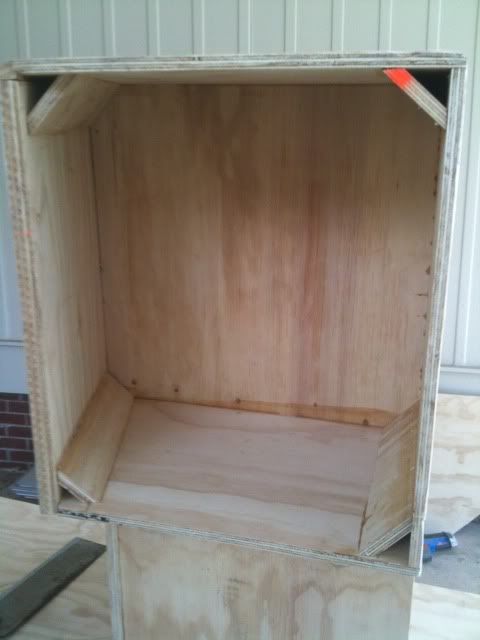
I installed some supports under the seating to give the "box" section some extra strength. I still have to attach some cleats to it to screw it into the deck.
seating-boxsupports.jpg


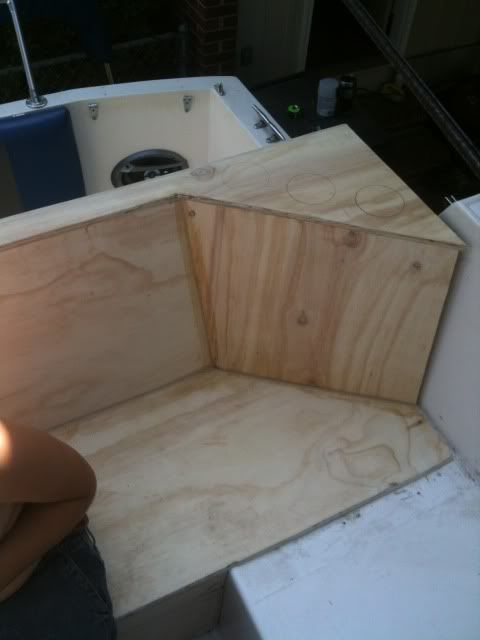
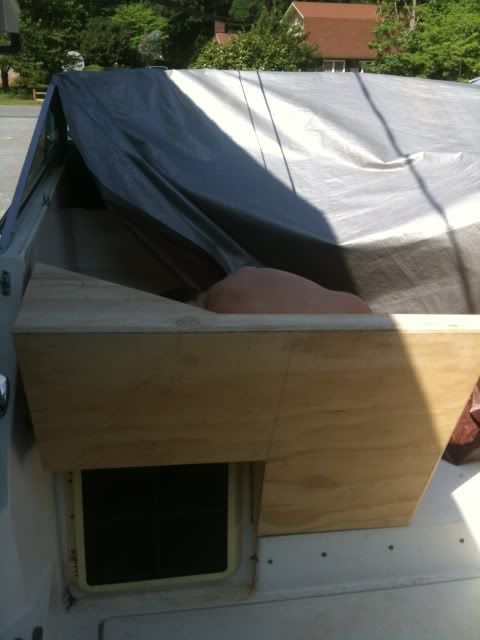
After that I test fitted in the boat to get measurements for the last piece which is basically the back rest along the side of the boat...
seating-testfit1.jpg

seating-testfit2.jpg


Everything lined up great!!! For the most part...GRRRRRRR
If you look closely in the back side photo, just to the right of the hatch window, you can see that the "box section" doesn't quite fit flush to the deck...
How can I fix this????? I"m thinking of just cutting some very small wedge shaped strips and glueing them to the bottom. What is the best method to remedy this guys?
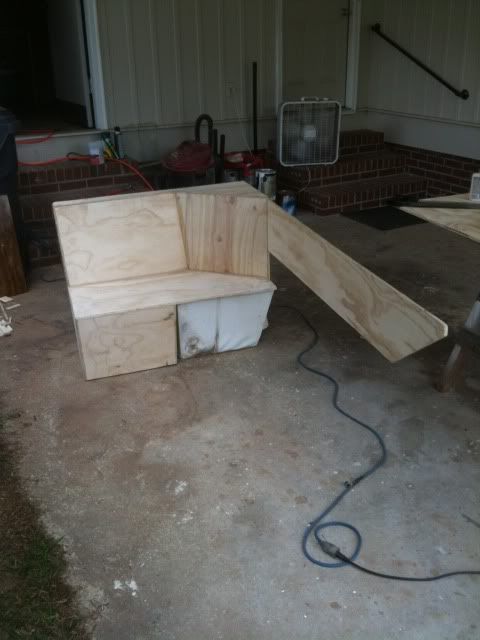
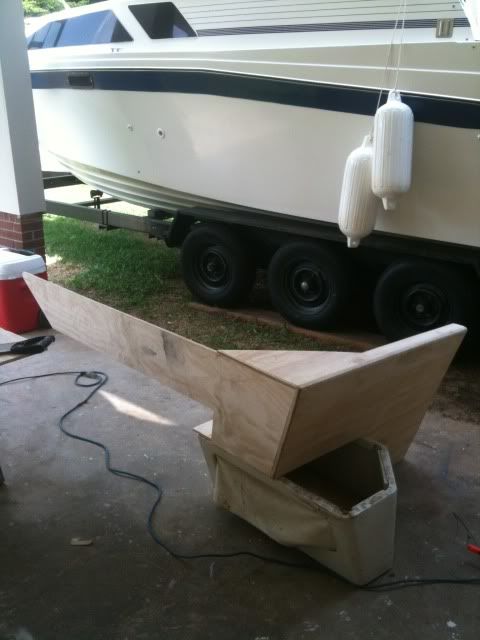
Other than that, the new seating section fits superb!!! After getting measurements and test fitting everything, I went ahead and cut out the back rest portion and got it nailed and glued.
The old L portion is supporting the underside..lol
seating-constructioncompleted2.jpg

seating-constructioncompleted.jpg


I'm taking a break for lunch and will try to get back out there to "fillet" the joints where the bottom meets the back to give it a curved look. I plan to use "bondo glass" short strand filler for the fillets. Anyone foresee issues there?
Ordering glass today to glass over all the joints and seams. How should I finish the rest of the wood? Just glass it all?
Thanks....
 
Status
Not open for further replies.
Top