1988 125 HP Force Rebuild

Sandy-man

Petty Officer 2nd Class
Joined
Aug 10, 2019
Messages
108
I began a rebuild on my 125 HP Force motor back in 2020, had to replace the cylinder block because it overheated real bad resulting in scored cylinder walls. The previous owner had it rebuilt too, which included boring cylinders to max oversize.

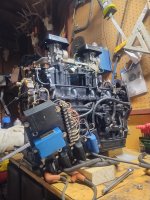
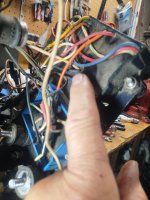
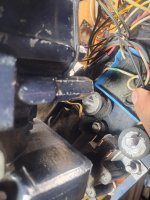
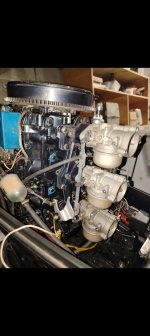
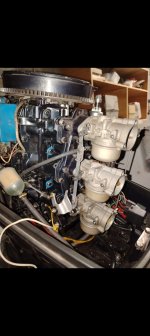
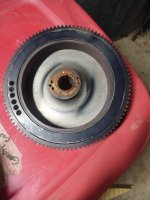
Many life experiences got in the way after tearing it down and finding all the parts I needed, so I had to put the rebuild on the back burner, WAY back burner. Now I'm back at it and have the engine block put back together, head is on, carburetors are on. I got to a point where I needed to refer back to all the pics I took of the motor before I started tearing it down and several during the process. Unfortunately for me, I can't find anything other than some pics of the wiring.

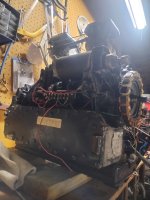
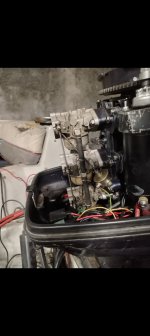
I was hoping someone on this forum has the same motor and, if you don't mind, able to take some pictures of the 3 sides excluding the head side. This would help me a great deal with finishing putting it back together.

I would greatly appreciate any help anyone could offer, even if it is simply websites that may have photos or diagrams I could refer to.

Thank you!

Hi, JerryJerry05, I've gotten plenty of help from you in the past, mostly prior to the tear down.
 

Sandy-man

Petty Officer 2nd Class
Joined
Aug 10, 2019
Messages
108
If anyone is able to provide me with some pics of their motor, please also include the throttle linkage and mechanisms. Thank you in advance.
 

Sandy-man

Petty Officer 2nd Class
Joined
Aug 10, 2019
Messages
108
Attached is a few pics of the 125 HP motor I am currently working on and having issues with figuring out where some wires should hook up. I also made a short video and hope it's not too large to post here.

This motor has 2 C-D units, they are from 2 different manufacturers so the wires are not all the same color, unfortunately. Anyway, all the wires except for one on each of the two are all hooked up where they belong as I did not have to detach them during the tear down process. This one wire from each of the C-D units are located in the same spot so I'm almost convinced they serve the same purpose. Please see pics and hopefully short video. For the life of me I cannot figure out where they are supposed to hook up. Both are too short to reach the port side where there are a few empty spots on the terminal block that is on that side. The terminal block that is located right next to the coils and C-D units is all filled up, no empty spaces where these wires might go. The service manual says the white wire is supposed to go to the e terminal block and thee black wire next to it is supposed to go to ground. One of them has the white wire but the other has a black with yellow stripe wire that is located in the same spot as the white wire on the other unit, see the last two pics on the right side below. The video won't upload, unfortunately.

I am lost with regards to these two wires and could really use any help or suggestions anyone may have.
 

Attachments

  • IMG_20260620_192631763_HDR.jpg
    IMG_20260620_192631763_HDR.jpg
    1.5 MB · Views: 3
  • IMG_20260620_192642849_HDR.jpg
    IMG_20260620_192642849_HDR.jpg
    1.1 MB · Views: 4
  • IMG_20260620_152953211_HDR.jpg
    IMG_20260620_152953211_HDR.jpg
    1.3 MB · Views: 3
  • IMG_20260622_135432541.jpg
    IMG_20260622_135432541.jpg
    1.5 MB · Views: 3
  • IMG_20260622_135415140_HDR.jpg
    IMG_20260622_135415140_HDR.jpg
    1.3 MB · Views: 3

Sandy-man

Petty Officer 2nd Class
Joined
Aug 10, 2019
Messages
108
Oh, one other thing I forgot to ask. When the motor overheated and shut down in the middle of Lake Erie there was never any sign that it was overheating, no alarm of any sort. The motor just suddenly started slowing down while on plane, dummy me, at this point I pulled back the throttle and pushed it full forward again and she took off for a few seconds and then shut down completely. I have to believe that there is supposed to be an alarm of sorts for this. If so, what sends the signal to the alarm as I have to believe that it is faulty or the alarm or wiring to the alarm?
 

Nordin

Commander
Joined
Jun 12, 2010
Messages
2,709
There should be a sensor mounted in the head.
A orange wire goes from the sensor to the terminal strip.
It is a sensor not a sender, it is a bimetal and when to hot it short out to the block (ground).
OEM the sensor is connected to a horn but can be connected to a indicator light.
 

lgaytan

Petty Officer 1st Class
Joined
Jul 15, 2015
Messages
231
Here a few other pics from mine, are you planning to replace the flywheel? It might vibrate if broken?
 

Attachments

  • Screenshot_20260623_074205_com_hihonor_photos_SlotAlbumActivity.jpg
    Screenshot_20260623_074205_com_hihonor_photos_SlotAlbumActivity.jpg
    386.9 KB · Views: 2
  • Screenshot_20260623_074159_com_hihonor_photos_SlotAlbumActivity.jpg
    Screenshot_20260623_074159_com_hihonor_photos_SlotAlbumActivity.jpg
    462.1 KB · Views: 2
  • Screenshot_20260623_074154_com_hihonor_photos_SlotAlbumActivity.jpg
    Screenshot_20260623_074154_com_hihonor_photos_SlotAlbumActivity.jpg
    456.4 KB · Views: 2

Sandy-man

Petty Officer 2nd Class
Joined
Aug 10, 2019
Messages
108
There should be a sensor mounted in the head.
A orange wire goes from the sensor to the terminal strip.
It is a sensor not a sender, it is a bimetal and when to hot it short out to the block (ground).
OEM the sensor is connected to a horn but can be connected to a indicator light.
Thank you, Nordin, I appreciate it. I thought that might be what it is. I don't know why my book wouldn't spell that out for me, but it doesn't. I will just replace it and follow the corresponding orange wire from the boat wire harness. I'm assuming the alarm or light can be tested with a jumper wire from the battery.
 

Sandy-man

Petty Officer 2nd Class
Joined
Aug 10, 2019
Messages
108
Here a few other pics from mine, are you planning to replace the flywheel? It might vibrate if broken?
Yeah, I either will need to find a replacement or take it to a machine shop where they might be able to balance it by drilling a hole out of the steel ring on the opposite side, like it appears the manufacturer did.
 

Attachments

  • IMG_20260623_132841885.jpg
    IMG_20260623_132841885.jpg
    1.4 MB · Views: 1

Sandy-man

Petty Officer 2nd Class
Joined
Aug 10, 2019
Messages
108
Update: I found a few videos on line of people rebuilding this same motor and a 1989. In these videos, I watched a couple times, I found the answers to my wiring questions. I now have all the wiring done except for connecting the wires from the boat wire harness. Tomorrow I will work on lifting this beast off my work bench and onto my yard cart. From there I hoist it up with my come along tied to a tree branch in my driveway, then lower down onto the motor leg. With any luck at all the job will be completed by Friday.

About one week after the motor died on me out on the lake I replaced the water impeller using the same key that slipped out of the keyway and jammed in between the impeller and the impeller housing. I am very nervous about this, what's to prevent the key from slipping out of the keyway again? Also, since that water impeller has been in there for nearly 7 years now and even though it has never pumped any water, should I replace it again simply beecause it's been in there all this time?
 

Mc Tool

Lieutenant Commander
Joined
Aug 7, 2024
Messages
1,537
I dont like waisting stuff but for the price of an impeller and if your already in there Id stick a new one in it .
The key shouldnt dislodge after assembly but you do gotta watch that it stays in place during assembly ....anything sticky like a lump of soap or even grease to stick it in place is helpful.
 

Sandy-man

Petty Officer 2nd Class
Joined
Aug 10, 2019
Messages
108
I dont like waisting stuff but for the price of an impeller and if your already in there Id stick a new one in it .
The key shouldnt dislodge after assembly but you do gotta watch that it stays in place during assembly ....anything sticky like a lump of soap or even grease to stick it in place is helpful.
It shouldn't dislodge but it did once already, that was 3 years after I bought the boat and I had never changed the impeller up to that point. The previous owner had the motor rebuilt because he was burning 100:1 gas/Amsoil, because he said Amsoil claims it can be done and he got tired of smelling the exhaust fumes of the 50:1. Anyway, that was the last time the impeller was changed. The next year is when he sold it to me. What would cause it to dislodge like that after approx 4 years of running without any issues? And who's to say it won't repeat?
 

Mc Tool

Lieutenant Commander
Joined
Aug 7, 2024
Messages
1,537
For it to dislodge while in place it would have to have massive wear , or be the wrong key or impeller , or ...most likely the p o didnt put it in correctly in the 1st place and it has worn some wiggle space and eventually fell out . Have a good look at the shaft ,old key and impeller to see if anything looks naff.
I would imagine that several peeps would have dropped and lost the key whilst doing the job and maybe "made" one that subsequently failed ....who would know πŸ™‚ . Best you can do is make sure you get it right this time . Most pump kits I have seen have a key in it .
 

Nordin

Commander
Joined
Jun 12, 2010
Messages
2,709
Sandy in my opinion you do not need to balance the flywheel because of that little piece missing.
It is just a couple of grams (I am in Sweden Europe) cause of that piece.
The flywheels from factory was not super balance as it is not a racing engine and the highest RPM is about 5000.
I would use that flywheel as it is.
About the temp sensor, you can test the horn or light if connected by ground out the orange wire at the terminal strip. The horn or light has a hot wire (battery plus) when ignition is ON at one terminal and the other terminal is connected to the sensor.
By using a heat gun you can check the sensor, if it is working it should short out to ground when you heat it up with the heat gun.
 
Last edited:

Sandy-man

Petty Officer 2nd Class
Joined
Aug 10, 2019
Messages
108
For it to dislodge while in place it would have to have massive wear , or be the wrong key or impeller , or ...most likely the p o didnt put it in correctly in the 1st place and it has worn some wiggle space and eventually fell out . Have a good look at the shaft ,old key and impeller to see if anything looks naff.
I would imagine that several peeps would have dropped and lost the key whilst doing the job and maybe "made" one that subsequently failed ....who would know πŸ™‚ . Best you can do is make sure you get it right this time . Most pump kits I have seen have a key in it .
Since it's been close to 7 yrs ago when I replaced the impeller, I don't recall how snug of a fit that key was. In an abundance of caution, I just ordered a new key and impeller. Once I get the power head bolted up to the motor leg and the power restored so I can lift the motor all the way up, I will pull the lower end back off to replace them and look them over with a critical eye. I might even put some red loctite on the new key prior to installing in the hopes it will help secure it, especially if the keyway shows any sign of distortion. Thank you for the advice, it was well received.
 

Sandy-man

Petty Officer 2nd Class
Joined
Aug 10, 2019
Messages
108
Sandy in my opinion you do not need to balance the flywheel because of that little piece missing.
It is just a couple of grams (I am in Sweden Europe) cause of that piece.
The flywheels from factory was not super balance as it is not a racing engine and the highest RPM is about 5000.
I would use that flywheel as it is.
About the temp sensor, you can test the horn or light if connected by ground out the orange wire at the terminal strip. The horn or light has a hot wire (battery plus) when ignition is ON at one terminal and the other terminal is connected to the sensor.
By using a heat gun you can check the sensor, if it is working it should short out to ground when you heat it up with the heat gun.
I'm glad to hear that about the flywheel, however, I already found the exact center of the break and on the opposite side I broke a small piece of it off in an effort to somewhat restore the balance. Lol, I kinda felt like Gomer Pile in the process.
While ordering the new impeller and key I also ordered a new thermostat and thermoswitch.
Thank you, Nordin, I really appreciate it. I will test the thermoswitch that is in the head now prior to replacing it.

I now have it all back together, except the flywheel of course. Tomorrow or Friday, using my come along, I will lift it up into the tree in my driveway and back the boat up under it, then ease it down onto the motor leg and bolt it up. Then back down to the lower end for more work. Can hardly wait to get this old girl back on the water.
 

Mc Tool

Lieutenant Commander
Joined
Aug 7, 2024
Messages
1,537
Ha ha ( oops ) , I thought it was the po that had fitted the impeller.
As for the flywheel πŸ˜† yeah ,I was going to suggest perhaps drilling an appropriate lookin sized hole but breakin a bit off would do too .
I have one of them hydraulic engine cranes for lifting stuff ,worth its weight in gold ,....I have even used it to pull out fence posts and my old hedge ....much to the amusement of the neighbours .😁
Its always good to finish a project like this when it leaps into life without drama and you zoom off over the water . 🀞🀞
 
Top