1994 bayliner capri 1800 redeck and restring

wildvortex

Petty Officer 2nd Class
Joined
Jun 22, 2011
Messages
166
Re: 1994 bayliner capri 1800 redeck and restring

Sorry to hear about your cap fitment troubles. That's at least the second time I've seen that situation occur here on the forums. So what do we think would be the advice to prevent that from happening? Decap, do the transom, then recap to do the deck?

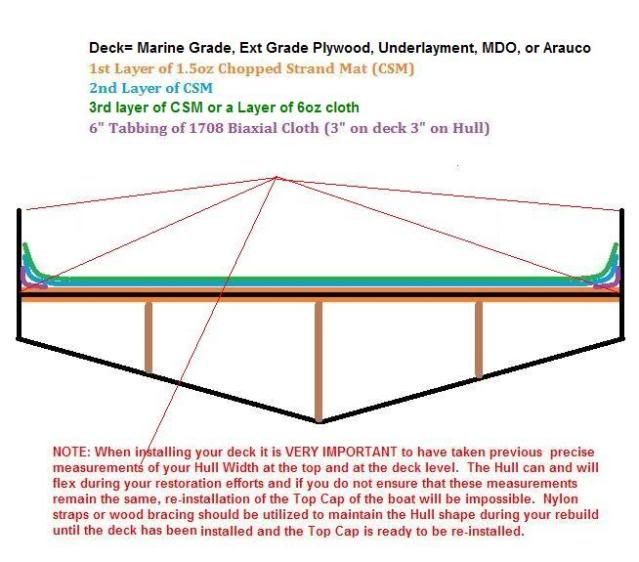
I'm not sure if that would be the best way either alteast with my boat. Under the helm and the bow seats the stringers come up fairly high on the hull as well. I am figuring the best way would be to make something which would cradle the sides prior to removing the cap. wouldn't take much just a few in spacific places along the hull would do and the expense of the wood would be better than the headache.
 

Friscoboater

Captain
Joined
Jul 3, 2009
Messages
3,095
Re: 1994 bayliner capri 1800 redeck and restring

WOW! You move fast. Very nice work on the stringers man. I rolled my gelcoat too.
 

Woodonglass

Supreme Mariner
Joined
Dec 29, 2009
Messages
25,929
Re: 1994 bayliner capri 1800 redeck and restring

Sorry to hear about your cap fitment troubles. That's at least the second time I've seen that situation occur here on the forums. So what do we think would be the advice to prevent that from happening? Decap, do the transom, then recap to do the deck?

I have updated my Deck Installation Drawing with my recommended method of how to prevent this from happening in future restorations.

DeckInstallation.jpg
 

wildvortex

Petty Officer 2nd Class
Joined
Jun 22, 2011
Messages
166
Re: 1994 bayliner capri 1800 redeck and restring

With deck carpet all done
IMG_4286.jpg

IMG_4287.jpg


Posts are gonna be slow now as I am spending time bringing the true color and shine out of her again.....Wet sanding and compounding.
 

wildvortex

Petty Officer 2nd Class
Joined
Jun 22, 2011
Messages
166
Re: 1994 bayliner capri 1800 redeck and restring

Ran into yet another problem from the hull spreading. even though I was able to get the cap on her the hull is still off. this caused the windshield to have an additional 1 inch between them. had to modify the center frameing in order to get the two to meet up. will post a couple pics soon. most of the polishing is now complete. been going at it slow lately. cold weather and all.
 

fishfeatures

Senior Chief Petty Officer
Joined
Mar 29, 2011
Messages
743
Re: 1994 bayliner capri 1800 redeck and restring

Just came across this thread , nice work Wildvortex, will keep tuned in now to see how you get on. keep all those pics coming.
 

wildvortex

Petty Officer 2nd Class
Joined
Jun 22, 2011
Messages
166
Re: 1994 bayliner capri 1800 redeck and restring

Basically finished with her now. Still need the new rub rail insert and the moulding around the base of the windshield. Also still need to do a good cleaning on her but here are some of the pictures.

first is the exterior after wet sanding and buffing. Then a bit of the interior. the panel I am showing is the one that was rotted to pieces. to save money I reused the vynil which was a bit of a bear and as a consequence I did end up with a wrinkle or two.
IMG_4358.jpg

IMG_4359.jpg

IMG_4370.jpg

IMG_4371.jpg


I added a water seperator and made a mount with aluminum. Plus moved the battery switch which would not fit with a 17 series battery

IMG_4376.jpg

IMG_4379.jpg
 

wildvortex

Petty Officer 2nd Class
Joined
Jun 22, 2011
Messages
166
Re: 1994 bayliner capri 1800 redeck and restring

I am not sure how Bayliner had designed covers for the battery hole but I know when I got it there was just a carpeted piece of ply with noting holding it. thing was always falling. so here is what I did to rectify the problem.
IMG_4377.jpg

IMG_4374.jpg

IMG_4372.jpg
 

wildvortex

Petty Officer 2nd Class
Joined
Jun 22, 2011
Messages
166
Re: 1994 bayliner capri 1800 redeck and restring

One of the biggest time consuption the past few months has been polishing the aluminum. I sanded all the grey paint from the rubrails and the windshield with 180, 380, 400 wet, 600 wet, 800 wet, 1200 wet, 1500 wet, finally 2000 wet. Then polished with a buffer and heavy rubbing compound and lastly with mothers aluminum polish. this is the end result. Notice the grey in the center of the lower frame of the windshield? that is the origional color of all the aluminum.
IMG_4367.jpg

IMG_4361.jpg

IMG_4391.jpg

IMG_4385.jpg

Looks almost as good as chrome now that it is done and with each addional polishing it gets even better.
 

Attachments

  • IMG_4391.jpg
    IMG_4391.jpg
    76.5 KB · Views: 0

wildvortex

Petty Officer 2nd Class
Joined
Jun 22, 2011
Messages
166
Re: 1994 bayliner capri 1800 redeck and restring

This is what i had to do to the windshield in order to compensate for the extra spread of the hull. this is the center window which lacked 1 inch from closing properly. basically I extended the frame by moving the rivet points
IMG_4383.jpg

IMG_4381.jpg

IMG_4382.jpg
 

ezmobee

Supreme Mariner
Joined
Mar 26, 2007
Messages
23,767
Re: 1994 bayliner capri 1800 redeck and restring

Your attention to detail has really paid off. That little boat is lookin' SHARP!
 

wildvortex

Petty Officer 2nd Class
Joined
Jun 22, 2011
Messages
166
Re: 1994 bayliner capri 1800 redeck and restring

Splashed her on March 29th. Handles like a charm, MUCH better without all that extra weight!!!! Was a blast to run especially since I put the rack and pinion in upside down :facepalm: Steer left to go right:eek:. Not a big problem on open water but a bit of a trick to load her on the trailer!!!:D
 

maddog238

Seaman
Joined
Oct 31, 2011
Messages
54
Re: 1994 bayliner capri 1800 redeck and restring

Ok, so the final stringers and the bow seat/console area is now done and glassed in altought I do need to run a strip of glass along the edge.
IMG_4252.jpg


And I have got the decking down and resinated. Will start tabbing it and layering it tomorrow sometime.
IMG_4251.jpg


won't be long and I will be putting the top back on her.

Hi, I did't see a drain port exiting from the ski locker. Did you add one? The reason I ask is because I am wanting to do away with my ski locker in my 1996 Bayliner Capri (1952) cuddy in my deck restoration. Is it necessary to have drains from the bilge all the way up to the ski locker space if there is not ski locker there?
 

wildvortex

Petty Officer 2nd Class
Joined
Jun 22, 2011
Messages
166
Re: 1994 bayliner capri 1800 redeck and restring

Yes, there are drain ports running the entire length. I would recommend doing the same even if you do away with the locker. Especially so if you do not plan on foaming the entire area. My thinking on this is that should you encounter any leaks in your tabbing with this area closed off that area will fill without you even knowing. think about it, there is a possibility of the entire area filling with water over time. This is an area that could hold possibly 50 gallons or more of water at 8 lbs/ gallon or 400 lbs. While this may not sink your boat, at the very least you will have one heck of a slug. I always err on caution.
 

93bayliner1800

Petty Officer 1st Class
Joined
May 9, 2011
Messages
239
Re: 1994 bayliner capri 1800 redeck and restring

How much foam did you use? Where did you get new rivets?? Are they 3/16 rivets aluminium? Also your inside or front stringers..is the front part of the stringers extend all the way up to include the sides right under the cap?
 

wildvortex

Petty Officer 2nd Class
Joined
Jun 22, 2011
Messages
166
Re: 1994 bayliner capri 1800 redeck and restring

Rivets came from lowes. yes they are 3/16. I have a bow rider so the front stringers only go up to the seat level. The amount of 2 part foam that I used was 2 gallons I believe. that is 1 gallon of each part.

How much foam did you use? Where did you get new rivets?? Are they 3/16 rivets aluminium? Also your inside or front stringers..is the front part of the stringers extend all the way up to include the sides right under the cap?
 

maddog238

Seaman
Joined
Oct 31, 2011
Messages
54
Re: 1994 bayliner capri 1800 redeck and restring

Yes, there are drain ports running the entire length. I would recommend doing the same even if you do away with the locker. Especially so if you do not plan on foaming the entire area. My thinking on this is that should you encounter any leaks in your tabbing with this area closed off that area will fill without you even knowing. think about it, there is a possibility of the entire area filling with water over time. This is an area that could hold possibly 50 gallons or more of water at 8 lbs/ gallon or 400 lbs. While this may not sink your boat, at the very least you will have one heck of a slug. I always err on caution.

I noticed you took out the seats. How difficult is it to rebuild them being able to use the same back to back chair that came with the both? Did you use a template? any advice would be greatly appreciated.
 

wildvortex

Petty Officer 2nd Class
Joined
Jun 22, 2011
Messages
166
Re: 1994 bayliner capri 1800 redeck and restring

The seat blocks were fairly easy to reproduce. First I took ALOT of pictures through the process. Many more than what is posted here. I also got Graph paper and drew and placed measurements just like a blueprint ( I have mechanical drawing experiance). But most important of all I saved the seat block to get measurements and look at while re building. When I demoed the boat I took the time to mark where all the stringers and seats were placed with a perminant marker just above the tab line so that I could get it back as exact as possible.


I noticed you took out the seats. How difficult is it to rebuild them being able to use the same back to back chair that came with the both? Did you use a template? any advice would be greatly appreciated.
 

havoc_squad

Senior Chief Petty Officer
Joined
Mar 5, 2011
Messages
739
Re: 1994 bayliner capri 1800 redeck and restring

The seat blocks were fairly easy to reproduce. First I took ALOT of pictures through the process. Many more than what is posted here. I also got Graph paper and drew and placed measurements just like a blueprint ( I have mechanical drawing experiance). But most important of all I saved the seat block to get measurements and look at while re building. When I demoed the boat I took the time to mark where all the stringers and seats were placed with a perminant marker just above the tab line so that I could get it back as exact as possible.


For my boat restore, I would have replaced the stock OEM seats with a premium plastic base lounge seat except for the fact of those annoying built-in floor lounge seats bases. Definitely not a fan of them here, at least on the old fiberglass boats. (Pre-2000's).

If it was getting a new boat floor, I'd have gutted them and went with full plastic replacement.
 
Top