1995 Crownline 266BR Restoration

Status
Not open for further replies.
Joined
Apr 26, 2015
Messages
63
No Title

Sorry its been so long since my last update but the last part of our summer has been crazy! I have made a little progress on the demo. I have only had about 4 hours since my last post to work on it. I am hoping to get at it hard starting next week once we get back from another wedding.
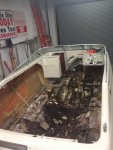
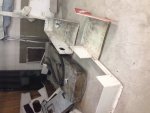
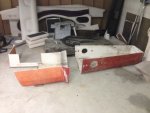
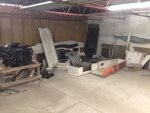
Well I have most all of the wood and foam out of the back half of the boat. The foam was pleasantly easy to remove because it had been so wet that it had lost most of its adhesion to the hull and came out in whole pieces per compartment. The front half, motor mounts, transom and grinding is what I have left as far as demo goes. I have attached some photos. Not the best quality with my phone but you can see what I have accomplished for the most part.

Thanks for tagging along. Hopefully there will be more progress and pics soon.
 

Attachments

  • photo229803.jpg
    photo229803.jpg
    234.6 KB · Views: 16
  • photo229804.jpg
    photo229804.jpg
    280.3 KB · Views: 16
Joined
Apr 26, 2015
Messages
63
WOW, I look at your pics and it's like I'm in my boat:grumpy:. I'm gonna be along for this restoration. We are doing he same thing, and I know how much work I have to do, and your boat is bigger yet. It will be well worth it when your done.It looks like your making good progress.Did you cut out the cap in the front ? I couldn't tell in your video if that was one piece or two. From what I could see that was a really straight cut , if that's what you did. Do you know how your going to glass your stringers yet?

JameO thanks for following along. I did cut the front floor cap out. I had to take it out in 2 pieces because of how big and awkward it is. I will post some pics of the cap after I removed it. I am planning to use the method the woodonglass has posted as far as glassing my stringers. You may already know this from reading this forum but he has some great sketches and ideas. Also using a lot of the same methods friscoboater used. Show some pics of your boat if you have any.
 
Joined
Apr 26, 2015
Messages
63
No Title
 

Attachments

  • photo229811.JPG
    photo229811.JPG
    104.2 KB · Views: 17
  • photo229812.JPG
    photo229812.JPG
    90.3 KB · Views: 17
  • photo229813.JPG
    photo229813.JPG
    101.6 KB · Views: 17

JameO

Petty Officer 3rd Class
Joined
May 22, 2015
Messages
85
No problem, I'm going to cut my cap out similar to what you did. And I'm going to do stringers the same way . I'm not sure of what sketches your talking about with WOG. I know of his revised stringer recommendations that he did . If there is anything else let me know. Is that foam on the side walls? Mine has carpet , but not the entire length of the boat. Don't feel bad about how much you've gotten done. I haven't got as much done as i wanted . Family first:).
 
Joined
Apr 26, 2015
Messages
63
Finally had a little time to work on the boat this past week. I have all of the stringers out and the motor mounts. Now I have to get out the transom, clean up lots of loose debris and get to the fun task of grinding. It is coming along slowly but surely.


Joined
Apr 26, 2015
Messages
63
I have a question. While I was remove the last part of the stringers where they are actually connected to the hull I noticed that the floor looked like it was coming up. I pried on it a little and a sheet of fiberglass came up. It is just a section in what I call one of the cavities. Looking at the rest of the floor it looks like in all the cavities that the stringer system creates that there is a sheet of fiberglass on the floor over the actual hull. It looks almost like the stringers were not just tabbed in but a sheet of fiberglass was laid on the floor and them brought up all four sides of the cavity created by the stringers. Being new to this I dknt know if this is common and if I should remove all these fiberglass sheets off of the hull or leave them. If I leave them the grinding process is going to be pretty substantial. Lease let me know your thoughts. I am going to try and post a video I took of the area in question
 

tpenfield

Moderator
Staff member
Joined
Jul 18, 2011
Messages
18,148
I have a question. While I was remove the last part of the stringers where they are actually connected to the hull I noticed that the floor looked like it was coming up. I pried on it a little and a sheet of fiberglass came up. It is just a section in what I call one of the cavities. Looking at the rest of the floor it looks like in all the cavities that the stringer system creates that there is a sheet of fiberglass on the floor over the actual hull. It looks almost like the stringers were not just tabbed in but a sheet of fiberglass was laid on the floor and them brought up all four sides of the cavity created by the stringers. Being new to this I dknt know if this is common and if I should remove all these fiberglass sheets off of the hull or leave them. If I leave them the grinding process is going to be pretty substantial. Lease let me know your thoughts. I am going to try and post a video I took of the area in question

My thoughts . . .

Not so good. The hull looks like 'chopper gun' or CSM and not fiberglass cloth. Kind of hard to tell which from the video. The tabbing is probably a cloth (like 1708 or similar) . So, the end result is that the tabbing and the area around it are stronger than the hull layup itself. What you are seeing is the 'sheet of fiberglass' is separating from the hull, pulling some of the hull thickness with it.

Probably something you want to check with all of the areas that were between the stringers and bulkheads. You might find a few more of them coming up as well. Certainty can be and should be fixed as you rebuild.
 
Last edited:
Joined
Apr 26, 2015
Messages
63
Thanks Tpenfield. I have checked all the other areas and they have a good bond.

Transom is out of the boat and now the grinding process shall begin. Yeah!!
 
Joined
Apr 26, 2015
Messages
63
It's been awhile since I have given any update so here we go:

The weather had been keeping me from doing any work on the boat itself but it gave me a good opportunity to start working on the interior components that are rotten and need to be replaced. I have cut several templates for different interior parts and have a few more to go including the rear bench seat and the bow cushions that act as the back rests for the bow passengers. I am attaching a few pictures of the templates as they are now. Next step is to sand them and coat them with the waterproof formula shared by WOG, thanks WOG.

The weather did break here in Louisville over the weekend and I was able to work on the boat. I was able to get all of the fiberglass "lips", where the stringers met the hull, cut out and started the process of grinding the hull. I am guessing that I have a solid 6-8 hours remaining on the grinding and that lovely process should be complete.

I have also started removing upholstery that is going to need to be replaced and started the process of finding vinyl to match the existing because some of the vinyl is still in good condition. Now I am debating whether or not I am going to attempt to do the vinyl myself. I think I am going to get an estimate just to see what it would cost but I have a sewing machine, not that I can sew, and it is hard for me to let someone do something that I think I can do on my own. Be glad to hear y'alls thoughts on the upholstery diy situation.

Anyway I am attaching several photos and look forward to your comments/thoughts.

Michael
 

tpenfield

Moderator
Staff member
Joined
Jul 18, 2011
Messages
18,148
On the upholstery . . . the side panels are fairly straight forward, so you could easily do those a la DIY. The seat coverings are a bit more tricky, so you may want to get those done by a local shop. If you are planning on using some of the existing vinyl, then you will want to find out exactly what brand & color it is, so that things will match. If you see that the vinyl has faded from the original color, then you may as well replace it all.

I would buy all of the vinyl needed from a single source, even if you have a local shop make some of the pieces. It looks like Crownline uses Nautolex Vinyl (by Omnova) for their upholstery. Not sure if they used it back in 1996, but they seem to be using it now. there are several online stores that sell that type of marine vinyl.
 
Joined
Apr 26, 2015
Messages
63
I need some help from my fellow Crownline owners. When I bought my boat the entire rear seat sun deck and engine compartment were out of the boat. I am going to need pics of how all this is supposed to go in the boat once I'm ready to start installing the interior. Thanks for any help you can share
Thanks
 
Joined
Apr 26, 2015
Messages
63
I can send some pictures and measurements of the frame that goes under the sun deck.

Thanks happyhours. I have the measurements and have built all the pieces I really need pics of how exactly it all goes back in. One of the biggest questions I have is how the rear bench seat works. I have the brackets and hardware just not sure how the actual seat bottom attaches to the seat box and how it opens. I'll post some pics with questions in the near future.
 
Joined
Apr 26, 2015
Messages
63
So i am posting some pics of updates. Grinding is complete except maybe for some touch up. Been doing lots of wood work for the interior of the boat and have taken a lot of it to a local upholstery shop that gave me a good price. i am very please so far with the upholstery. got the transom cut, glued together and fillets made. have my glass supplies and hope to get started soon on stringers after i get my transom in place. getting ansy now that the weather is turning. starting to see some progress other than demolition so i am excited.


Joined
Apr 26, 2015
Messages
63
Is there any structural integrity reason that instead of putting the original bow floor cap I would run the deck all the way to the tip of the bow and then build my seat boxes out of plywood that I would fiberglass to the existing bow seats and the new deck?

Basically not put this back in but make my own
 

HappyHours266

Recruit
Joined
Mar 7, 2016
Messages
3
Thanks happyhours. I have the measurements and have built all the pieces I really need pics of how exactly it all goes back in. One of the biggest questions I have is how the rear bench seat works. I have the brackets and hardware just not sure how the actual seat bottom attaches to the seat box and how it opens. I'll post some pics with questions in the near future.

The hinge bolts to the wood under the sun d, and to the rear face of the cap. The sun pad just sits on the frame that's built over the motor. The rear bench actually attaches to the side trim panels once those go back in, you can bolt or screw the bench to the tabs that are at the very rear of the side panels. Neither the pad nor the bench are attached to the frame over the motor. It's only purpose is to support the weight of the pad, and whoever is sitting on it. It's just screws right to the deck. I wish I could fine the pictures I have of these in mine before I started demo. Also if you're interested in selling a template for the transom, it would be very appreciated.
 

HappyHours266

Recruit
Joined
Mar 7, 2016
Messages
3
Is there any structural integrity reason that instead of putting the original bow floor cap I would run the deck all the way to the tip of the bow and then build my seat boxes out of plywood that I would fiberglass to the existing bow seats and the new deck?

Basically not put this back in but make my own

I believe these peices were molded into the cap to support the weight of the heavy consoles. If you can make the design better and maintain a little bit of necessary flex for out on the water. I don't think it would be an issue. Be sure the consoles are well supported though, don't want to add stress on the screws in the seam where the cap meets.
 
Status
Not open for further replies.
Top