1999 Celebrity 190 - Engine Mount and Stringer Repair

bvetter

Petty Officer 1st Class
Joined
Jun 2, 2013
Messages
263
Re: 1999 Celebrity 190 - Engine Mount and Stringer Repair

A major milestone was completed yesterday, the substructure is now 100% complete! All I need to do before putting in the deck is wrapping the cleats with CSM.


In other news, mother nature is giving winter one last kick at the can. This is what we woke up to today, a nice sheet of ice.


Edit: Drove up to Prince Albert to visit with the parents today, the snow is falling, at least 1" so far and at this rate a couple more to come. Bummer....
 
Last edited:

GT1000000

Rear Admiral
Joined
Jul 13, 2011
Messages
4,916
Re: 1999 Celebrity 190 - Engine Mount and Stringer Repair

Awesome, absolutely awesome! Great to see this milestone achieved...:cool-new::thumb:
 

bvetter

Petty Officer 1st Class
Joined
Jun 2, 2013
Messages
263
Re: 1999 Celebrity 190 - Engine Mount and Stringer Repair

Slowly but surely some progress since the last update. I made an executive decision to pour in the foam before installing the deck. I had originally planned on doing it like everyone else, through cutouts in the deck after the install. But after talking to a guy I know that works on boats for a living, he was adamant that I would not be able to achieve 100% fill in the cavities by pouring the foam through various holes cored in the deck. I kind of see his point, especially after this last week. What I noticed was that as the foam expands and sets up, it rises more or less vertically rather than spreading out horizontally, so channels tend to be left open which need filling. But regardless, in hindsight, I think pouring it in before hand was actually more work. I do think you could probably achieve near 100% fill with the deck on but you would need to really strategically place your holes for pouring the foam. Enough of the mindless rant, here are some pics.

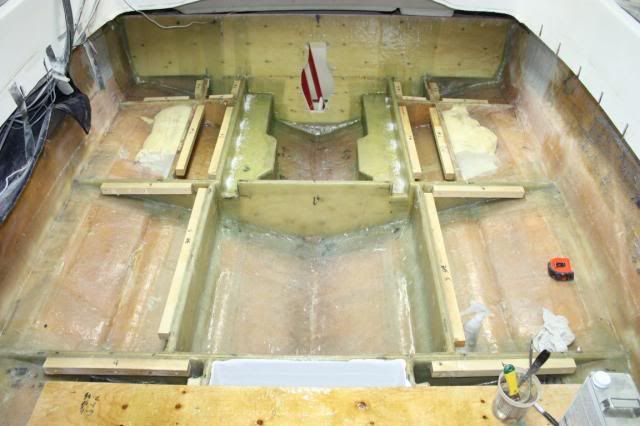
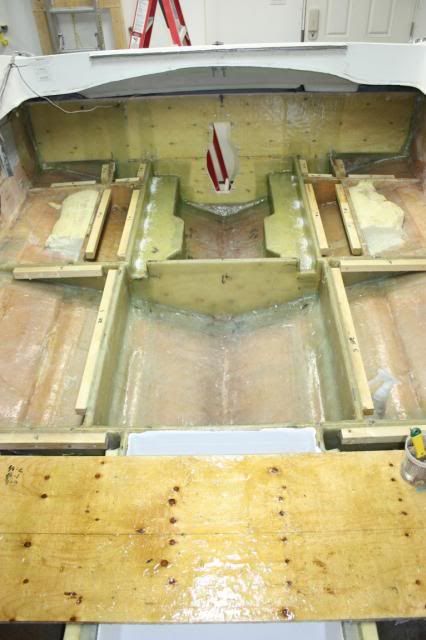
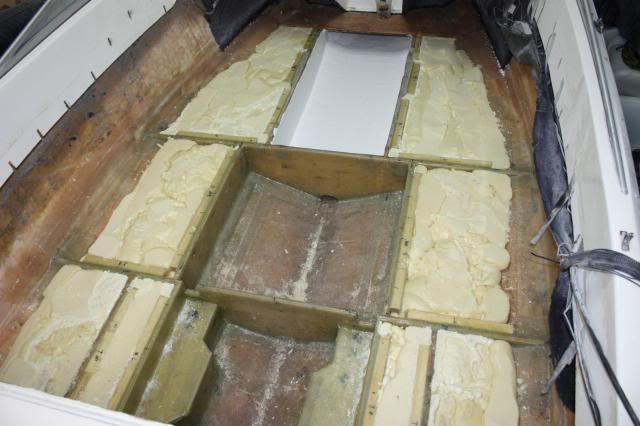
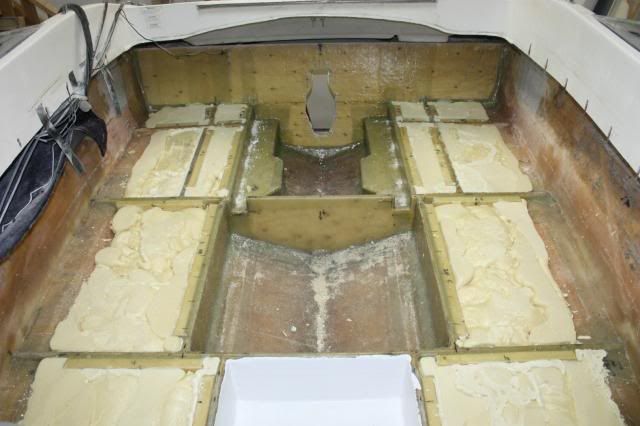
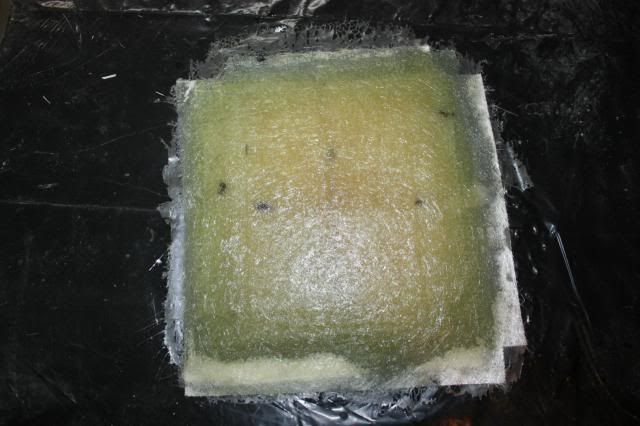
All cavities poured. I used a little bit of Great Stuff to get into the nooks and crannies left over after the 2-part had set up. Used a saw to cut everything down to height. The plan is to install the deck, and note where some of the low spots are that still need filling, like around the outside edges. Then drill 1/4" holes and inject Great Stuff to fill the small voids and tighten things up.


The original plate where the bilge pump was mounted in the bottom of the engine compartment was made of 1/4" ply, with a couple layers of CSM on top (no underside treatment). Rather than using wood, I just layered up a bunch of scrap pieces of 1708 and CSM into about a 1/2" plate. Will cut down to size and tab in. Should be impervious to water now!


Also mixed up a batch of thickened gelcoat to spread over the outer skin of the transom that I had ground down earlier. I made WAY too much, hadn't realized that the 3M microballoons would add volume to the mixture, DUH....

Ratios were:
-750ml white, waxed gelcoat
-1L 3M microballoons
-Around 250ml cabosil

The mixture wasn't too bad, but could have been a little thicker. It's hard to see in the picture where it is applied, the colour matched up pretty good too. Will sand down to likely an overall thickness of 1/32-1/16". The goal is to make the area around the keyhole flat and uniform.


bvetter

Petty Officer 1st Class
Joined
Jun 2, 2013
Messages
263
Re: 1999 Celebrity 190 - Engine Mount and Stringer Repair

Then last night, templated and rough cut all of the deck pieces. I used foam board like a lot of other to make the templates. One problem I ran into, is that the gunwales are very wide, so I can't make the centre section of the deck in one solid piece, there is no way to physically get it inside the boat with the gunwales in the way. So I had to to multiple sections.

Still need to cut out the hole for the ski locker hatch and fuel tank access port, but this is how everything fit.


Two questions:

1) On the gelcoat fairing compound I applied in the above post, will it polish to a shiny finish (knowing there is cabosil and microballoons in the mix), or do I sand, then spray a final coat of gel before the final sanding/polishing?

2) I sawed the pour in foam to the height of the stringers, do the cut surfaces need to be sealed? This was standard 2-part polyurethane pour in foam, 2lb density.

Thanks guys!
 

Woodonglass

Supreme Mariner
Joined
Dec 29, 2009
Messages
25,929
Re: 1999 Celebrity 190 - Engine Mount and Stringer Repair

"The goal is to make the area around the keyhole flat and uniform."

Not an I/O guy but it's my understanding that it's kinda critical that this occur. Tolerances for mounting the outdrive are not that forgiving when it comes to getting a good seal. But, I am just an Old Dumb Okie and I could be wrong!!!
:D
 

bvetter

Petty Officer 1st Class
Joined
Jun 2, 2013
Messages
263
Re: 1999 Celebrity 190 - Engine Mount and Stringer Repair

"The goal is to make the area around the keyhole flat and uniform."

Not an I/O guy but it's my understanding that it's kinda critical that this occur. Tolerances for mounting the outdrive are not that forgiving when it comes to getting a good seal. But, I am just an Old Dumb Okie and I could be wrong!!!
:D

Luckily I was within Mercruiser tolerance (1/16") after my transom was in, but for some strange reason, within tolerance isn't good enough for my little OCD brain. :wacko: Might as well make it as close to perfect as possible. The gimble housing gasket doesn't look too forgiving, even at 1/16" deviation.
 

GT1000000

Rear Admiral
Joined
Jul 13, 2011
Messages
4,916
Re: 1999 Celebrity 190 - Engine Mount and Stringer Repair

Nice job pouring the foam and cutting the deck sections...
If you seal up the deck really good you shouldn't have any issues with the top of the foam getting wet...if however, your OCD kicks in, you could throw a couple of coats of cheap latex paint over it to give it good seal...
 

bvetter

Petty Officer 1st Class
Joined
Jun 2, 2013
Messages
263
Re: 1999 Celebrity 190 - Engine Mount and Stringer Repair

Nice job pouring the foam and cutting the deck sections...
If you seal up the deck really good you shouldn't have any issues with the top of the foam getting wet...if however, your OCD kicks in, you could throw a couple of coats of cheap latex paint over it to give it good seal...

Thanks for the tip GT!
 

bvetter

Petty Officer 1st Class
Joined
Jun 2, 2013
Messages
263
Re: 1999 Celebrity 190 - Engine Mount and Stringer Repair

Ugh.....


tpenfield

Moderator
Staff member
Joined
Jul 18, 2011
Messages
18,141
Re: 1999 Celebrity 190 - Engine Mount and Stringer Repair

I thought we have seen the last of that stuff . . . but you are fairly far north, right?
 

bvetter

Petty Officer 1st Class
Joined
Jun 2, 2013
Messages
263
Re: 1999 Celebrity 190 - Engine Mount and Stringer Repair

I sure hope this is the last of it. :cold:

Unfortunately May is always a wildcard.

We're not that far north, compared to the Arctic Circle, or where Santa lives for that matter. :)
 

bvetter

Petty Officer 1st Class
Joined
Jun 2, 2013
Messages
263
Re: 1999 Celebrity 190 - Engine Mount and Stringer Repair

New milestone achieve, decking is going in!

Here are some pics of the preparation.

The sheets of ply for the deck were 5/8" exterior grade, and not exactly straight and true sheets, quite warped as they dried. So, after the pieces were cut out, I used some unistrut and other metal brackets I had laying around the garage, and screwed them to the top side of the decking in an attempt to maintain flatness before applying a layer of CSM to the bottom side.


Here is the decking with a layer of CSM on the bottom side. Also decided to add some stiffening to a couple of spots, namely right underneath where the seats will be mounted, and also on the fuel tank compartment (it has a decent span between stringers, so stiffener should help with sagging/bowing under weight). Once the resin cured, I removed the metal brackets.


Covered the ski locker with a sheet of plastic to keep resin/PB from making a mess of the gelcoat.


Then marked the location of the stingers, bulkheads, and cleats on the topside of the decking for reference when screwing into place.


More to come....
 
Last edited:

bvetter

Petty Officer 1st Class
Joined
Jun 2, 2013
Messages
263
Re: 1999 Celebrity 190 - Engine Mount and Stringer Repair

I decided to go ahead an do a quick coat of gel inside the fuel tank compartment, just to clean things up a little and seal the poly resin.


Installed the fuel tank and hoses.


Here are some pics of the decking that's in place. Still need to do the fuel compartment, and a couple small pieces on either side of the bilge.


jbcurt00

Moderator
Staff member
Joined
Oct 25, 2011
Messages
25,111
Re: 1999 Celebrity 190 - Engine Mount and Stringer Repair

looking great, nice work
 

bvetter

Petty Officer 1st Class
Joined
Jun 2, 2013
Messages
263
Re: 1999 Celebrity 190 - Engine Mount and Stringer Repair

Thanks JB!
 

GT1000000

Rear Admiral
Joined
Jul 13, 2011
Messages
4,916
Re: 1999 Celebrity 190 - Engine Mount and Stringer Repair

Grrrr-8 Job! Everything is coming together real nice!
 

glnbnz

Chief Petty Officer
Joined
Oct 4, 2011
Messages
458
Re: 1999 Celebrity 190 - Engine Mount and Stringer Repair

Yes I like your attention to detail...it's really coming along nicely!!!!
 

bvetter

Petty Officer 1st Class
Joined
Jun 2, 2013
Messages
263
Re: 1999 Celebrity 190 - Engine Mount and Stringer Repair

Thanks Gents!
 

bvetter

Petty Officer 1st Class
Joined
Jun 2, 2013
Messages
263
Re: 1999 Celebrity 190 - Engine Mount and Stringer Repair

Hoping to get back at it tomorrow night. With any luck will get the rest of the deck in.
 
Top