21' ProLine CC Rebuild Progress with Pics

maxum247

Lieutenant
Joined
Sep 18, 2007
Messages
1,363
Re: 21' ProLine CC Rebuild Progress with Pics

83! What about an update? I need my ProLine rebuild fix!:(
 

83ProLine

Petty Officer 2nd Class
Joined
Mar 23, 2008
Messages
105
Re: 21' ProLine CC Rebuild Progress with Pics

83! What about an update? I need my ProLine rebuild fix!:(

I?m trying, my friend. I?m sure my progress looks like the pace of a turtle compared to some of these guys. Oops not being able to work on his boat is about the only way I will be able to catch up! :eek:

So this weekend was a short weekend of working on the boat ? I had to hang Christmas lights this afternoon. :mad:

So to start, I had a bit of a scare ? while inspecting my work from last week, I noticed that a small piece of cloth didn?t adhere to the hull ? in fact, I was able to peel it right off. Not good. :eek: Fortunately, everything else looked great, so I guess that I didn?t ruff & scruff or acetone the area well enough prior to laying the glass.

Also, earlier this week I pm?d Oops to ask if I was using too much resin ? last week, I burned through an entire gallon putting three layers of tabbing in. His comments are below. As a result, his comments helped reduce my usage of resin by half! :D

Since I ran out of resin, I was forced to go to Home Depot and pick some up. They sell Bondo brand Poly resin, and the first thing I noticed is the color is muddy purple, instead of a deep blue. I?m not sure why that is. . . but I learned immediately that the mixing ratio of hardener is way different then the stuff I got from US Composites. Needless to say, I f*cked up the first batch ? it started to smoke like a wild fire and harden up in just a few minutes.

I got my act together and the second batch came out much better. I was able to lay two sheets of 1708 on the interior transom, bending over the lip and starting down the exterior side.

The halogens helped warmed things up and speed up the curing process. I just checked it a few minutes ago and everything looks great! :D
 

Attachments

  • 1. Uh Oh. . ..jpg
    1. Uh Oh. . ..jpg
    40 KB · Views: 0
  • 3. Halogens.jpg
    3. Halogens.jpg
    43.4 KB · Views: 0
  • 4. Mock Up - Interior.jpg
    4. Mock Up - Interior.jpg
    39.1 KB · Views: 0
  • 5. Ratio Too High.jpg
    5. Ratio Too High.jpg
    32.5 KB · Views: 0

83ProLine

Petty Officer 2nd Class
Joined
Mar 23, 2008
Messages
105
Re: 21' ProLine CC Rebuild Progress with Pics

On a final note ? I gotta? say, I have never met Oops before (or the rest of you, for that matter). . . and you guys don?t know me from Adam. . . but collectively you all have saved my project from outright disaster on more occasions already than I can count - and I am not even a third of the way done! You guys are all dialed in to what you are doing and I cannot thank you enough for your advice and words of encouragement! :D:D

I?m just an accountant that loves to spearfish and I thought it would be nice next year to have a safe, dependable ride to get where I want to go ? I never thought I would learn so much, or meet such a great group of guys in the process. So thanks again!! :D

Right now I am at a high in this roller coaster of a project - things are really starting to take shape! :D


Regards!

James
 

Attachments

  • 6. Interior - Worked In.jpg
    6. Interior - Worked In.jpg
    40.8 KB · Views: 0
  • 7. Exterior - Worked In.jpg
    7. Exterior - Worked In.jpg
    40 KB · Views: 0
  • 8. Christmas Lights.jpg
    8. Christmas Lights.jpg
    32.4 KB · Views: 0

oops!

Supreme Mariner
Joined
Oct 18, 2007
Messages
12,932
Re: 21' ProLine CC Rebuild Progress with Pics

projects are fun eh?

just one thing.....the bondo resin you bought was waxed......now...if you want to put any thing over it....you have to grind off all the wax....or it wont laminate......wax is a release agent for poly resin......and just about the only stuff it wont stick to !

cheers
oops
 

83ProLine

Petty Officer 2nd Class
Joined
Mar 23, 2008
Messages
105
Re: 21' ProLine CC Rebuild Progress with Pics

I thought the finish felt really smooth!!!! Now I know why. . . .
 

maxum247

Lieutenant
Joined
Sep 18, 2007
Messages
1,363
Re: 21' ProLine CC Rebuild Progress with Pics

The weather here on the OBX of North Carolina has been rainy for some time now, plus having to work all week and then there's the little man's to do list, the wife with her honey do list, so I'm moving pretty slow on my project myself. Oh well! Get it done too quick won't have anything else to do.

Questioned the wife today about a future project boat and she said it was out of reach at this time. Should have moved on it two months ago when she gave the ok!:(
 

maxum247

Lieutenant
Joined
Sep 18, 2007
Messages
1,363
Re: 21' ProLine CC Rebuild Progress with Pics

83! You out there? Throw us a picture, anything!:p
 

83ProLine

Petty Officer 2nd Class
Joined
Mar 23, 2008
Messages
105
Re: 21' ProLine CC Rebuild Progress with Pics

83! You out there? Throw us a picture, anything!:p

Holy crap - is that snow in the latest picture on your thread!?!? :eek:


I woke up this morning and was all excited to go out and get some work done today on the boat. . . until I stepped out onto the deck and realized it was 33 degrees and blowing 15-20 out of the NE. Not exactly ideal glasing conditions. I still managed to get some tabbing done though.

Until, of course, I ran out of glass! :mad: I thought the 10yards I ordered from US Composites would at least be enough to completely glass the transom. It only got me about half way though, so I will need to put in another order Monday.

I think tomorrow I am going to set up to start the "post & scribe" method of measuring for my stringers . . . I will get some pictures posted before the weekend is up.

Regards,

James
 

maxum247

Lieutenant
Joined
Sep 18, 2007
Messages
1,363
Re: 21' ProLine CC Rebuild Progress with Pics

It was snow! Friday morning! Don't get that much snow here on the OBX but it sure does get cold at times. Putting shingles on the house today, Saturday was no fun at all!:(
 

83ProLine

Petty Officer 2nd Class
Joined
Mar 23, 2008
Messages
105
Re: 21' ProLine CC Rebuild Progress with Pics

So since I ran out of glass, I thought I would move ahead to setting up to measure for my stringers. The post & scribe method that Oops details on page 11 of his Hull Ext thread looked easy to me, so I simply replicated his process.

I started by taking the grinder and some 36grit to the entire area the stinger would be seated in. I then set up for the post & scribe - I just ran my vertical 2x4's to the floor of the hull - that way I didnt need the second 2x4 brace Oops has pictured.

The only other thing I did differently was to sit and mark the template every couple of inches instead of tracing - I found that it was difficult to trace while keeping the bottom of the broom handle flat on the hull.

Not the easiest one-person job, but the stringer template came out perfect! :D

Regards,

James
 

Attachments

  • Post & Scribe Set-Up.jpg
    Post & Scribe Set-Up.jpg
    42.7 KB · Views: 0
  • Stringer Template.jpg
    Stringer Template.jpg
    45.2 KB · Views: 0
  • Day Dreaming.jpg
    Day Dreaming.jpg
    41.2 KB · Views: 0

maxum247

Lieutenant
Joined
Sep 18, 2007
Messages
1,363
Re: 21' ProLine CC Rebuild Progress with Pics

Man that boat looks huge with you setting up there in the bow, looks more like a thirty some footer. Pretty slick method for mapping out the stringers. :cool:
 

jcsercsa

Captain
Joined
May 21, 2007
Messages
3,401
Re: 21' ProLine CC Rebuild Progress with Pics

Yea it does look like your in a 30 footer !! great work on the stringers !! Ooops will get a kick out of you fallowing him method !! Great Job !! keep them pics comming !! John
 

maxum247

Lieutenant
Joined
Sep 18, 2007
Messages
1,363
Re: 21' ProLine CC Rebuild Progress with Pics

83! I think we're fadeing into the distance, seems we're not making progress fast enough to keep up with all that's going on. :p max!
 

83ProLine

Petty Officer 2nd Class
Joined
Mar 23, 2008
Messages
105
Re: 21' ProLine CC Rebuild Progress with Pics

83! I think we're fadeing into the distance, seems we're not making progress fast enough to keep up with all that's going on. :p max!

Max,

My g/f and I are in Maryland visiting our families for the Thanksgiving holiday - so progress has been haulted for this weekend. :mad:

I seriously thought about towing the boat to Maryland to be able to work on it while I just sit here. . .

James
 

maxum247

Lieutenant
Joined
Sep 18, 2007
Messages
1,363
Re: 21' ProLine CC Rebuild Progress with Pics

Whenever the family and I go camping or on holiday the first thing on my list is to pack all my reading materials for my projects.
I've even been known to take one of my driveable car projects with us on one of our camping trips. :D
 

jonesg

Admiral
Joined
Feb 22, 2008
Messages
7,198
Re: 21' ProLine CC Rebuild Progress with Pics

Interesting project you have going on there, not to rain on the parade but...

a couple of points...ok 3 points

1.does anyone else see some dry layup here, is it my imagination or does some of the glassing look kinda dry.

You may want to have someone with an experienced eye
take an 'on location' look at it so far...before going too far.

2. I just read Bertram used to add a touch of green dye to their resin, it makes it easier to see whether the cloth is saturated through, makes the dry spots stand out a lot more before the resin cures.
Also they had few blistering issues in their hulls because they used higher grade resin on the outter layers , changing over to cheaper resin as the work progressed deeper. This applies mostly to working with a mold.

3. you will save a ton of work by using unwaxed resin, if you failed to sand between cured coats its no good. Is that why you were able to peel a layer off already? Due to the approach you are using, having lost the integrity of the rear corners, I would be diligent about this.

And will the cap fit back on?:eek:
 

jonesg

Admiral
Joined
Feb 22, 2008
Messages
7,198
Re: 21' ProLine CC Rebuild Progress with Pics

**Update**

So its a done deal! I bought a 1987 225 Johnson V6 Outboard, "TX" Series, with a 25" Short Shaft Outdrive, for $650.00. :D It also came with a stainless steel prop. NADA says the value is $500 or so, but, large outboards are a comodity in Southeastern NC - so I ended up paying a premium. Plus, like John said, I think used large outboards are a comodity in general - whatever, I own it now.

So, the motor started right up and ran smooth - the idle when it backed down seemed good - and the head was real clean. I didnt have a compression gauge, but the guy who sold it to me said the compression was over 100 in every clyinder.

The only problem, I currently see, with my purchase is that I dont know the first d*mn thing about an outboard. :eek:

Whats next?? Would it be worth it to have a boat mechanic come give the thing the once over?? How often should I run the thing - its going to be a while before its ready to be installed on the boat! :eek:

Pictures coming soon.

I paid a tech $60 hr I found on craigslist to come and walk me through my johnson 150, I learned a lot just watching him, he said to rebuild the carbs, change water pump, we did a compression test and spark test. test ran it.
It was the best $180 I spent on the boat.
Definately get the factory manual, its simple to work on them.
Carbs usually cost $100 each to have a tech do the work, but theres 6 carbs.
So if you have them do the work it starts to get expensive.
Carbs, water pump and plugs could run over $1000!
Or do it all yourself for less than $200.

For your new engine I would get as much info as possible from the seller, when did he rebuild the carbs, when was the water pump changed etc.
The danger with multi cylinder outboards is you can have a dirty carb which doesn't feed fuel( and lube) yet the engine will still run on 5,
but the dry cylinder will burn up and then you've got junk for an engine.

I'm not trying to scare you, just be methodical and diligent, theres nothing like peace of mind 10 miles offshore, running through tidal rips or idleing around rocks close in.
 

jcsftwre

Petty Officer 2nd Class
Joined
Nov 7, 2008
Messages
181
Question

Question

When you took out the rotted wood was it treated wood or was it just reg. Plywood?
 

83ProLine

Petty Officer 2nd Class
Joined
Mar 23, 2008
Messages
105
Re: 21' ProLine CC Rebuild Progress with Pics

Interesting project you have going on there, not to rain on the parade but... a couple of points...ok 3 points
Thanks so much for taking to time to read my thread ? this type of feedback is awesome! :D If I am doing something wrong, now is definitely the time to make a correction!

Okay ? here are my answers. . .

1.does anyone else see some dry layup here, is it my imagination or does some of the glassing look kinda dry. You may want to have someone with an experienced eye / take an 'on location' look at it so far...before going too far.
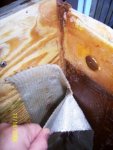
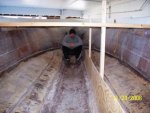
I too have been very concerned about dry glassing as this is the first time I have ever worked with fiberglass. Before each session of tabbing or adding more glass, I have come up with three check methods to determine the quality of my cured work:

First ? I poke, prod and scrape around with a metal putty knife to see if there are any soft spots or edges that can be peeled away.

Second ? I scruff my work up with a grinder to check for soft spots and delaminating.

Third ? after scruffing, I repeat step one while cleaning the area with Acetone.

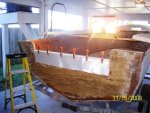
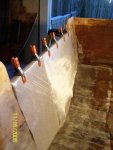
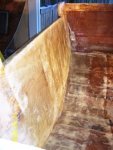
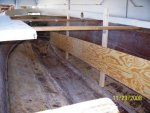
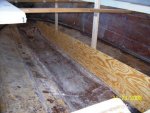
In performing these checks, I have found a few areas of concern. The biggest area was a short section of tabbing I had pictured on page 2. In that example, I peeled and grinded all the old glass away and re-tabbed. The re-tabbing cured fine.

What do you think ? are my methods for detecting bad glass work sufficient? :confused:

2. I just read Bertram used to add a touch of green dye to their resin, it makes it easier to see whether the cloth is saturated through, makes the dry spots stand out a lot more before the resin cures.
I was going to add a coloring agent to do exactly what you said, but the poly resin that I got from US Composites is dark blue and pretty much does the same thing. . .

3. you will save a ton of work by using unwaxed resin, if you failed to sand between cured coats its no good. Is that why you were able to peel a layer off already? Due to the approach you are using, having lost the integrity of the rear corners, I would be diligent about this.
I unfortunately ran out of unwaxed Poly Resin and to be able to keep working, I picked up a gallon of Bondo-brand Poly Resin from Home Depot. I had no idea the Bondo stuff was waxed ? trust me, I will not make that mistake again. :eek:

The layer I was able to peel off had been applied using an unwaxed Poly Resin - I think I just didnt do a good job on the application of that particular piece.

BTW - I placed a new order of unwaxed Poly Resin and 1708 biaxle before I left for the Thanksgiving holiday - it was delivered while I was gone and I will be back to using unwaxed resin starting tomorrow. US Composites saves the day again! :D

And will the cap fit back on?
Yes ? there is no problem with the cap going back on. I test fitted it back into place right after I had seated the transom into place.

I'm not trying to scare you, just be methodical and diligent, theres nothing like peace of mind 10 miles offshore. . .
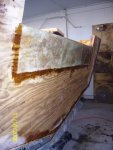
That is actually chief concern I have right now with my glassing ? the southern outer banks of the Atlantic Ocean is not exactly a great place to learn that the transom is delaminating from the hull because I did a crappy job glassing! :eek:

When you took out the rotted wood was it treated wood or was it just reg. Plywood?
The wood from the stringers or the transom? Actually, it doesn?t really matter ? both the wood encased in the stringers and transom was so rotted that it would have been impossible for me to tell what type of wood it was. It literally, crumpled to the touch.


Good questions guys! Keep them coming. . . :D
 

jcsercsa

Captain
Joined
May 21, 2007
Messages
3,401
Re: 21' ProLine CC Rebuild Progress with Pics

Good questions guys! Keep them coming. . . :D

Are you having fun yet ???? hahahah sorry just had to !!

sounds good on your checks !! when i did mine with epoxy it was pertty easy to tell if the glass was wet , the glass was pure white when it wasnt wet !! just had to look really good !!

Keep up the good work and keep them pics comming !! John
 
Top