93 Crownline 196 deck and more

Status
Not open for further replies.

atjohnson

Petty Officer 2nd Class
Joined
Feb 3, 2014
Messages
106
Re: 93 Crownline 196 deck and more

I'm a little behind on updates, so I better get to it. This week was quite busy so I did not get anything accomplished. I did get off early Friday so that gave me a head start. First thing Friday I finished the grinding on the transom and noticed that the backing plate for the swim ladder and the one that is for the anchor point for towing were both rotten so I cut everything else and finshed cleaning it up Saturday morning. That was a small delay in what I had planned for the day. I then started cutting plywood for the transom. I was by myself so crawling in and out of the boat to test fit then back to trim it again.......and the story continues. I finally got it finished and quit for the night. Then today I cut the second piece and got them glued together and ready for PB.

I slightly modified the width of the top support because I did not like the way the stringers mated up. (Will take a picture to explain)
Also, I get pretty lucky on pigments for the gel coat. US Composites has a color that matches the Crownline moonstone; however, I will have to shade the teal just a little.


No big deal, just something else to work around.

Tomorrow I plan to mix my first batch of PB and fillet the transom and fill the screw holes. If that goes pretty smooth I might start putting the backing plates for the ladder and tie downs back in so I can move on with the transom.
 
Last edited:

bvetter

Petty Officer 1st Class
Joined
Jun 2, 2013
Messages
263
Re: 93 Crownline 196 deck and more

That transom is looking good! What did you use to laminate the two layers together? Is the keyhole cut to the exact profile that it needs to be or is it just rough cut? I'm asking because I'll be putting mine together in the next week or two and starting to think about these things.

One note though, if your first batch of PB is going to be for setting the transom, you may want to do a couple of test batches, maybe on some odd and ends that need filling in other areas of the boat. I say this because it took me a couple batches to get the hang of for mixing and getting the ratios right. The stuff kicks pretty fast (even at 1%) and you'll likely be needing a somewhat large amount for the transom. It's just a thought though, base on my personal shortfalls.

Best of luck! Look forward to seeing the updates!

-Brandon
 

atjohnson

Petty Officer 2nd Class
Joined
Feb 3, 2014
Messages
106
Re: 93 Crownline 196 deck and more

Bvetter, I used titebond III to laminate. It was one of the recommendations by woodonglass in his transom and stringer post and just happen to be readily available at the local lumber yard where I purchased my plywood. As for the first batch of PB, I was thinking the same as you have mentioned. The first batch will be to fill in screw holes and fillet the transom face so there is room for error without it being a vital structural area. The keyhole is slightly rough cut. my plans are to do a final test fit clamped in place and take the small router bit on my dremel tool and clean up the edges prior to gluing in permanently. There is only about 1/16" around to get cut. I also plan on cutting the steering arm reliefs outside of the boat as well and then fine tune that cut after installation so I can make sure it is flush with the cut that already exist in the hull. I'm not sure if this is the best idea, but I was more comfortable with cutting it this way.
 

JASinIL2006

Vice Admiral
Joined
Feb 10, 2012
Messages
5,716
Re: 93 Crownline 196 deck and more

Two thoughts: trimming your keyhole with a Dremel tool sounds like a pretty unpleasant task unless you have a lot of patience and a really powerful Dremel. You might consider trimming it before you do the final install. It really doesn't make installing the transom shield more difficult and it's a lot easier to work on that big piece of wood when it's sitting on sawhorses...

Similarly, I cut my steering arm reliefs before installing the transom shield, but I didn't give enough clearance for the steering arm. It was much more difficult to work on those after the transom was installed than before. If you can do those before installation, too, you might be a happier camper later on...

Just my $.02....

Good luck!

Jim
 

atjohnson

Petty Officer 2nd Class
Joined
Feb 3, 2014
Messages
106
Re: 93 Crownline 196 deck and more

Thanks Jim. I will definitely consider that this afternoon before I move on and get everything glued in place. Just out of curiosity, did you not cut the angle sharp enough for the arms or something else?
 

JASinIL2006

Vice Admiral
Joined
Feb 10, 2012
Messages
5,716
Re: 93 Crownline 196 deck and more

I don't think I cut them at a sufficiently sharp angle. I tried to follow the directions on the template for cutting the keyhole, but I see to have set my hole saw at the wrong angle. I'm not sure how I did it, but when I test-fit the gimbal housing and the inner shield, I noticed the steering arm hitting on the edges of the cutout. I clearly messed up the angle. It was 10 times harder to cut holes with the correct angle while the transom was in the boat.

I think I must have not been paying very good attention when I first cut those holes...
 

bvetter

Petty Officer 1st Class
Joined
Jun 2, 2013
Messages
263
Re: 93 Crownline 196 deck and more

Two thoughts: trimming your keyhole with a Dremel tool sounds like a pretty unpleasant task unless you have a lot of patience and a really powerful Dremel. You might consider trimming it before you do the final install. It really doesn't make installing the transom shield more difficult and it's a lot easier to work on that big piece of wood when it's sitting on sawhorses...

Similarly, I cut my steering arm reliefs before installing the transom shield, but I didn't give enough clearance for the steering arm. It was much more difficult to work on those after the transom was installed than before. If you can do those before installation, too, you might be a happier camper later on...

Just my $.02....

Good luck!

Jim

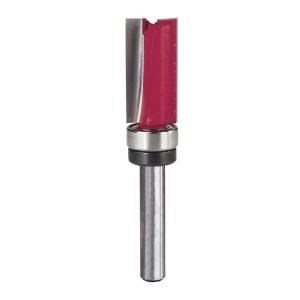
What about using a router with a flush cut bit (with a guide bearing), like this one:


A cutting head length of 1" would be good, using the original transom skin as a template after the plywood is installed. That way you would get a perfect matching profile to that of the keyhole, and it would be cut at exactly 90 degrees. You would have to do two passes, the second pass would use the first passes cut as a guide for the bearing. I saw it done this way in an older thread, looked like it worked really well.

-Brandon
 

jbcurt00

Moderator
Staff member
Joined
Oct 25, 2011
Messages
25,114
Re: 93 Crownline 196 deck and more

Yep ^^^ that's one way.
 

JASinIL2006

Vice Admiral
Joined
Feb 10, 2012
Messages
5,716
Re: 93 Crownline 196 deck and more

What about using a router with a flush cut bit (with a guide bearing), like this one:


A cutting head length of 1" would be good, using the original transom skin as a template after the plywood is installed. That way you would get a perfect matching profile to that of the keyhole, and it would be cut at exactly 90 degrees. You would have to do two passes, the second pass would use the first passes cut as a guide for the bearing. I saw it done this way in an older thread, looked like it worked really well.

-Brandon

That would probably work much better than a Dremel. Personally, I'm not skilled enough with a router to free-hand the keyhole. With my luck, the bit would grab and plough into the hull and the transom core. I'm much more comfortable cutting with a saber saw while the piece is nice and flat on some sawhorses. That way, a screw-up only ruins the board. Mess up the cut badly after the board is installed, and you have a much bigger job... That's just me and what I'm comfortable with, though.
 

atjohnson

Petty Officer 2nd Class
Joined
Feb 3, 2014
Messages
106
Re: 93 Crownline 196 deck and more

Ok guys I filleted my transom and somewhat filled in the screw holes. I was a little concerned with my glass kicking off. The temp was around 70 degrees but it took a long time. I'm guessing I need to vary the amount of hardener but I'm not sure how much it should be increased by. Any suggestions? Due to the glass taking so long, I did not get to trim the keyhole. Looks like this will be on the list for Thursday. I am a little concerned with my skill level with a router to free hand the cut as suggested above but I guess the guide bearing would solve that issue. I have a drill angle guide that I plan to use with my hole saw on the steering arm relief so I will start with it first. I will update Thursday on how it went.
 

jbcurt00

Moderator
Staff member
Joined
Oct 25, 2011
Messages
25,114
Re: 93 Crownline 196 deck and more

Since I don't know what %MEKP you used today, I can't judge whether you can up the % or not. At 70F, you're only 10f above the MINIMUM required temp. If it started to get dark & still hasn't kicked, I'd get out a small portable heater &/or some halogen lamps to gently warm the new work for a bit before calling it a night.
 

atjohnson

Petty Officer 2nd Class
Joined
Feb 3, 2014
Messages
106
Re: 93 Crownline 196 deck and more

Sorry left that detail out. The included sheet recommended 2% but no temp range so that's what I tried. It was getting dark and the last time I checked the temp was 62. In a case like this will it fully cure given enough time or will I have to try again?
 

jbcurt00

Moderator
Staff member
Joined
Oct 25, 2011
Messages
25,114
Re: 93 Crownline 196 deck and more

hope for some sunshine tomorrow & roll it out in the warm sunshine for a bit. Should do fine...

Measure using the metric system?

Probably a temperature problem. You don't want to use more then 2%
 

atjohnson

Petty Officer 2nd Class
Joined
Feb 3, 2014
Messages
106
Re: 93 Crownline 196 deck and more

Been out of town for a couple of days so I finally went over to check my fillets. They had cured but after the concern I'll either wait for decent temps or run the heat. Looks like mid to low 60's for the weekend so looks like I will be doing other things besides glassing until I run out of options.
 

jbcurt00

Moderator
Staff member
Joined
Oct 25, 2011
Messages
25,114
Re: 93 Crownline 196 deck and more

You can glass down to 60F (and below) you just need to pre-heat the hull, anything else you'll glass, the resin & etc. Then keep the area you've glassed tented (a tarp will do) and keep the heat on during the cure. Start @ noon & glass til nearly dark. Then check before calling it a day, and if cured, turn off the heat.
 

atjohnson

Petty Officer 2nd Class
Joined
Feb 3, 2014
Messages
106
Re: 93 Crownline 196 deck and more

I got my steering reliefs cut. One of them is not very pretty but I managed to get it cleaned up so I could live with it. Also got my key hole trimmed down. There was very minimal cutting so my Dremel actually worked pretty well. I have a question. Do I need to lay CSM on both sides of the transom?
 

jbcurt00

Moderator
Staff member
Joined
Oct 25, 2011
Messages
25,114
Re: 93 Crownline 196 deck and more

Yep, BEFORE you install it
 

Woodonglass

Supreme Mariner
Joined
Dec 29, 2009
Messages
25,929
Re: 93 Crownline 196 deck and more

No, only the back side. If you're using 1708, it has CSM stitched to it, and having recently had conversations with one of the expert factory reps on the subject of 1708, CSM, and Polyester Resin, I've been convinced that the amount of CSM stitched to the 1708 is adequate to provide a good bond to bare wood as well as between additional layers of 1708. The additional layers of CSM make a resin rich laminate and only add bulk add little strength to the overall lamination. It will save us all a bit of time and money by not using the additional layer(s) of CSM. I will in the very near future be updating my Stringer, Deck and Transom Link to reflect this new information. Of course this is just my personal opinion and understanding and you can do your own research to make your own conclusions.;)
 
Last edited:

jbcurt00

Moderator
Staff member
Joined
Oct 25, 2011
Messages
25,114
Re: 93 Crownline 196 deck and more

If you don't use CSM on the initial wrap, pre-installation, WOG, are you now suggesting 1708 prior to it's installation?
 

atjohnson

Petty Officer 2nd Class
Joined
Feb 3, 2014
Messages
106
Re: 93 Crownline 196 deck and more

Despite the battle with weather this weekend I got as much as I could done. I was able to get the CSM payed down on the back of the transom so it is ready to be PBed in.
20140316_180402_zpshllmyuy9.jpg

I actually meant to get it in Saturday evening but the overcast hung around too long so I moved on to the engine mounts. I used 4x4 post with a layer of plywood in the center to get to the overall height that I needed. Most of the odd cuts that I needed was done with a band saw.
20140316_180337_zpswhe8phpi.jpg

I had enough sunny skies to get these coated in resin and as I had finished up everything to PB the transom in, a cold front moved in and it dropped into the 50's on me. So whenever I get some good weather, everything is ready to go. One question I thought about today, my original motor mounts were not PBed in, but I was planning bedding the new ones in PB. Is this correct or is there some reason they weren't?
 
Last edited:
Status
Not open for further replies.
Top