First Boat Project

archbuilder

Vice Admiral
Joined
Sep 12, 2009
Messages
5,697
Re: First Boat Project

Looks like you are heading in the right direction. Make sure you get a bubble roller too, works wonders.
 

jetskier16

Petty Officer 2nd Class
Joined
Sep 26, 2010
Messages
197
Re: First Boat Project

We finally have switched from taking apart to building. Got the last bit of grinding done and we washed down the hull with acetone. We also go the ply cut for the core.

CIMG4441.jpg
 

archbuilder

Vice Admiral
Joined
Sep 12, 2009
Messages
5,697
Re: First Boat Project

Now you are getting to the fun part! I'm sure you won't miss the grinding!
 

jetskier16

Petty Officer 2nd Class
Joined
Sep 26, 2010
Messages
197
Re: First Boat Project

Ha ha, if I have to put on that tyvec suit and smell grinded fiberglass one more time...:mad:....haha.
 

Woodonglass

Supreme Mariner
Joined
Dec 29, 2009
Messages
25,929
Re: First Boat Project

R U going to glass both sides of the Deck? I hope? What Mat/Cloth are you using? R U Gluing or Screwing your deck down or letting her float? What width of Tabbing R U planning on using on the edges? Make a Plan to follow so you can follow the plan.

I'm just sayin...:D
 

jetskier16

Petty Officer 2nd Class
Joined
Sep 26, 2010
Messages
197
Re: First Boat Project

Resin- http://www.tapplastics.com/shop/product.php?pid=37&
Fiberglass Mat (1.5oz.)- http://www.tapplastics.com/shop/product.php?pid=89&
Fiberglass for tabbing- http://www.tapplastics.com/shop/product.php?pid=81&

Transom- we are going to use Pl Premium to bond the two plys together then to the transom skin. Then cover the exposed face with matting then tab in with 12inch (6in on transom and hull) cloth strip

Deck- I know that close to everyone on here will tell us to glass both sides of the deck but what needs to be understood is that this boat isnt something that we will be keeping for ever. We are both seniors and will be going off to college next year. We live in California but im going to Texas A&M and my friend is going to Montana State so there is a good chance we will have to sell the boat in the near future. Also we are paying for this all ourselves and being students we dont make a lot. Because of this we are going to glass the top side of the deck with mat and use wood preservative(we bought the best they had at HD) on the bottom side, then fill in the valley on top with a sealant, then tab it in using 12inch cloth. I know it wouldnt be that much more expensive in contrast to the entire project but we have to try and save as much as possible anywhere we can.

Also we are leaning toword gluing the deck down as to put as least amount of holes in it as possible.
 

redfury

Commander
Joined
Jul 16, 2006
Messages
2,657
Re: First Boat Project

I used beads of of PL premium on my stringers and the edges of the wood...anywhere it made contact with the boat and ran screws to hold the plywood down until it set. I kept the screws in, but I used marine bondo and smoothed over all the seams and screws before I glassed in the deck. Made glassing easier, and I second the bubble buster for the deck glassing. I used one 6 inches long and about the diameter of a nickle...worked great. The trick to the bubble buster is to just keep it moving. initially it will pick up a few strands of the mat, but quickly will just roll over it and help you saturate the mat and get rid of the bubbles.
 
Joined
Aug 17, 2009
Messages
941
Re: First Boat Project

Jet,

Good plan on the transom and deck. Just make sure you run the CSM out onto the hull sides and bottom wherever the tabbing is going. You need the CSM underneath the cloth wherever you plan to put the cloth.
 

jetskier16

Petty Officer 2nd Class
Joined
Sep 26, 2010
Messages
197
Re: First Boat Project

We got the transom (two plys) cut yesterday. We were going to glue them together today but my friend's dog got sprayed by a skunk so he had to take of that today.

So I went down to TAP Plastics and got the fiberglass supplies. 3 gallons poly resin, 7 yards 1.5oz CSM, 13 yards tabbing, 6'' bubble roller, squeegees, 10 oz. MEKP, small MEPK drop vile, and a couple quart buckets. $181.00 (with 9.25% tax :facepalm:)

I also tried my hand at glassing for the first time. We will see how it comes out. it was 60 deg outside but I set up some lamps for heat. I fixed the two holes in the transom skin. I mixed to much resin so i just coated it over the transom skin, i figure that could only add strength and make it more tacky for the PL to bond to.

CIMG4448.jpg

CIMG4458.jpg

CIMG4459.jpg

CIMG4461.jpg

CIMG4462.jpg
 

Woodonglass

Supreme Mariner
Joined
Dec 29, 2009
Messages
25,929
Re: First Boat Project

Sounds like you got a plan!!! I would use the PL on the stringers to glue the deck in. You will need your friend to help you lay it in to keep it from rubbing it all off. Use some concrete blocks or other heavy items to hold it down over night while it dries. Mix up some PB to fillet in around the edges of the deck before you tab it in. You'll be a Glassin Pro in no time. I got a lot of my upholstery done. You might want to check it out on my thread.

I'm just sayin...:D
 

proshadetree

Lieutenant Commander
Joined
Jul 19, 2008
Messages
1,887
Re: First Boat Project

Dump excessive resin. Without cloth it is brittle and will not add strength. Did you v that hole out? how many layers did you use?
 

jetskier16

Petty Officer 2nd Class
Joined
Sep 26, 2010
Messages
197
Re: First Boat Project

I just checked out the transom skin and The patches came out really well! The bigger hole still needs a bit more resin filler but over all they came out good.

Wood- thanks for the tips. And I have been keeping up on your thread and I cant believe the work you have done. Great job!

Proshadetree- Ya i dumped out the rest and cleaned the tub a little with acetone. I did feather out the two holes when i was grinding and a i used two layers of 8.5 oz cloth (the tabbing I bought)
 

archbuilder

Vice Admiral
Joined
Sep 12, 2009
Messages
5,697
Re: First Boat Project

One tip, I left my extra resin in my plastic buckets (pint ones from HD), once it dries the whole mess will pop out....more or less cleans the bucket out. You may have to squeeze on the bucket a little. Saves the time of cleaning and the acetone.
 

jetskier16

Petty Officer 2nd Class
Joined
Sep 26, 2010
Messages
197
Re: First Boat Project

Go the transom plys glue together yesterday and the transom glued to the skin today. When smooth. That PL is ok to work with. I have a video of us applying the PL to the skin then us placing the transom that I'll post tomorrow maybe.

Also as a note to others we only needed 1 28oz tube of PL to glue it all together.

CIMG4467.jpg


CIMG4482.jpg
 

jetskier16

Petty Officer 2nd Class
Joined
Sep 26, 2010
Messages
197
Re: First Boat Project

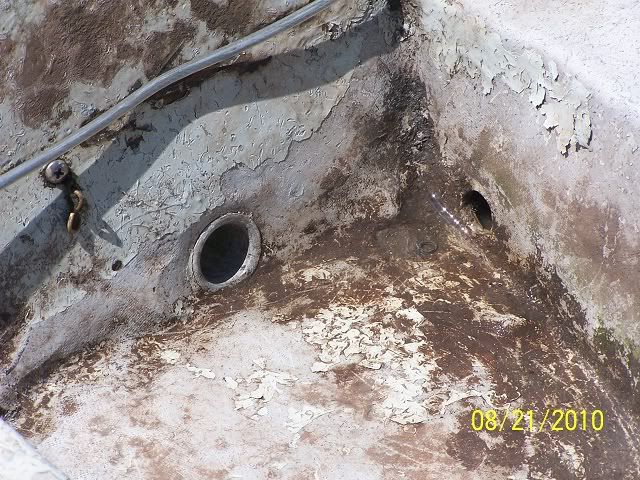
For drain under the deck should we use the 1" brass tube like was for the drain above the deck? This is what was originally used as the drain for under the deck:

CIMG4306-1.jpg
 

Woodonglass

Supreme Mariner
Joined
Dec 29, 2009
Messages
25,929
Re: First Boat Project

Hey JS

Do you have drainage holes in the stringers to allow the water to flow to the center lowest point? Are you going to have a hatch to acces the plug? I do NOT see a bilge. R U going to create one? If you do you could drain the underdecks to the bilge and then out thru the transom. That's how my boat is designed and it works well. You could just cut out the middle stringer and create a box to create the bilge. Here's a picture of mine.

100_3458.jpg

The small hole on the right drains the "below decks" Doing this would keep you from having to have Two drain tubes in the transom.
 

redfury

Commander
Joined
Jul 16, 2006
Messages
2,657
Re: First Boat Project

There are a lot of ways to create the drain for the boat. I used a plastic garboard style in mine, which was really easy to install. I cut the hole for it, slathered a bunch of 3m 4200 marine adhesive/sealant and pushed it in, then put the 3 screws in. After that, I went back and did some grinding and light glass work around the inside of the transom to make sure it was good and tight on that end and then smoothed it out with my dremel. I should be able to use the screw in plug as well as a rubber expansion plug from the inside in case I do something stupid like forget to put the plug in, I'll have the rubber one on the inside to pop in and stop the flow of water just in case!
 

jetskier16

Petty Officer 2nd Class
Joined
Sep 26, 2010
Messages
197
Re: First Boat Project

Thanks for the advise but we just decided to keep the two as it was.Havent posted ina while but we have gotten quite a bit done. Mainly we go the transom glassed. Whet well, had a little trouble at first with fibers coming off as we tried to brush on resin but got the technique down after a little while. Over all it came out great. Had a hell of a time getting the drain hole drilled, due to my lack of a 1" bit and being forced to use a hand driven aurger. But got it done and slathered with 5200. We have to have the floor glassed in by the end of this week cuz we are getting some very nice weather right now but we are lookin at a wet spell after this Friday. I have some great videos of the glass work and some other stuff i will post later today.

CIMG4495.jpg

CIMG4498.jpg

CIMG4512.jpg

CIMG4497.jpg

CIMG4509.jpg
 
Top