Reel Peachy - 1993 Stratos 280 SF - Transom Rebuild

super_dork

Seaman
Joined
Apr 10, 2011
Messages
68
EDIT 11/16/2015 - I have fixed all the photos so they are all embedded in the site now and not referencing Photobucket.


I've been keeping a progress thread over at another forum, but I've been getting lots of good info from iBoats so I thought I'd post my progress over here and see if anyone has any insight or pointers as I go along. At this stage, I've cut the back cap off and done most of the tear down work and just started the first fiberglass work last night. These initial posts are from the other thread and I'll update more as I go along.

I bought a used 19' 1993 Stratos 280 SF with a 1993 Johnson 150 in July. 1.JPG
IMG_1279_zps5suzkoyq.jpg


It was my first fiberglass boat and I have been learning some lessons. Lesson # 1 is, always get an expert opinion when you aren't sure. I had noticed some stress cracks in the transom when I was buying the boat, but didn't think it was a big deal. Later I went to the mechanic who had serviced the boat and he asked me if the seller told me about the bad transom. I was pissed. I knew the price was too good to be true. Anyway, that's water under the bridge. Fast forward a few months. I've replaced the powerpack and rebuilt the carbs, replaced the livewell valves and cables, upgraded the trolling motor to a 24v model and taken the family out a few times (cautiously).

After lots of research, I decided that I want to do a full "cap off" rebuild on the transom. I've never done fiberglass or any real boat maintenance but I've been reading and watching how-to's and I'm ready to get rolling. I've got 2 small kids, so most of my work will be after work for a few hours.

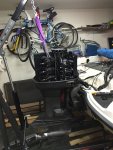
My first challenge was removing the motor. I decided to buy a shop crane/hoist to get it off. I picked up a 1-ton unit from Harbor Freight on sale with a 20% off coupon. It only took all night to get it together. Next, I pulled the motor, which wasn't too bad. Since I will need the crane for the cap removal, needed to get the motor off of the crane so I built a motor stand out of a bunch of spare wood I had laying around. After a couple hours, I threw in the towel on using the stand and picked up an engine stand from Harbor Freight the next day. That still didn't go so well. I ended up lay the motor on the ground, raise the crane up on boards enough to clear the engine stand, then pick the motor back up and mount it. IMG_1482_zpsph7nvmhw.jpg


IMG_1482_zpsph7nvmhw.jpg
IMG_1528_zpseybivzpt.jpg
IMG_1626_zps05kneglx.jpg
IMG_1628_zpsyee1k4x6.jpg


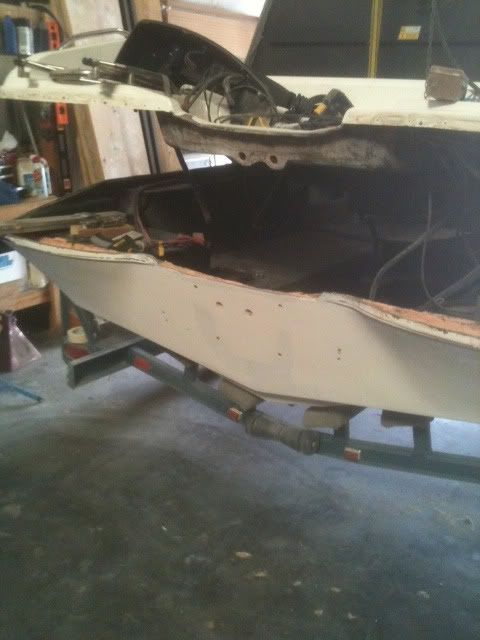
After removing the motor, I was astonished at how bad the transom really was. I cut a small strip of the cap off to see inside and it made my heart sink. I couldn't believe that someone would sell a boat in this bad of shape and that I could have had my family on it when the motor flew off. Anyway, good thing I listened to some of you guys and decided to rebuild it. So that's where I am at this point. I will be unhooking everything and removing as much stuff from the boat as I can. I plan to remove the carpet to make it easier to find attachment points. Per Stratos support, I know that the floor is glued to the hull and bulkheads, so I'm still not sure how much access I will have underneath to cut everything free without actually cutting the floor up.
IMG_1484_zps66lvua5z.jpg
IMG_1485_zps40rr13x6.jpg
IMG_1487_zpsbbltnjg8.jpg
IMG_1492_zpswqnk4dbu.jpg
IMG_1497_zps7isunuwq.jpg
IMG_1498_zps0wtduojn.jpg
IMG_1502_zpsztvvjnj7.jpg
IMG_1503_zps6wdwmqao.jpg
IMG_1504_zpsak7svx4c.jpg
IMG_1507_zps2sjxaoru.jpg
IMG_1508_zpstb7jrvpw.jpg
IMG_1509_zpsg41mx0yl.jpg
IMG_1510_zpsmiy9dsqz.jpg


Anyway, I wanted to get this thread going and will post more as I make progress. I'm certainly open to any suggestions or comments.
 

Attachments

  • IMG_1482_zpsph7nvmhw.jpg
    IMG_1482_zpsph7nvmhw.jpg
    233.4 KB · Views: 3
Last edited:

super_dork

Seaman
Joined
Apr 10, 2011
Messages
68
Update:

So I'm not very patient when I've got a project in progress. Once I start, I want to keep rolling. So, I decided to just cut the back open instead of taking the cap off. I spent a while unhooking everything and cutting the transom u-bolts off - couldn't get them off using an impact driver or socket. I use the shop crane to attempt to pop it loose, but, as Stratos told me, the splashwell is attached. So, the challenge is figuring out how to cut the splashwell free. I took a video showing where the splashell contacts the inner skin of the transom. It looks like a big pile of adhesive as well as some fiberglass was used to join it all together. So, I think I'm going to try to cut between the splashwell and the transom wall, just got to figure out where to start with it.

Overall, it's been easy going. I just want to be sure that whatever I so, it's easy(er) to put it back together. I don't want to have a blind cut somewhere that I can't get some fiberglass back into.

**Note to self - wear long sleeves and pants. Man are my arms and legs itching today from fiberglass!!**


003784EB-C334-423B-82A7-A86EE62B6C12_zpst5yuvmfy.jpg9A335728-F349-40C4-A237-4955BB98CA90_zpsharmbvkh.jpg824F00CC-3E18-4D92-A5F3-75FFBB9869EF_zpssdxlcetb.jpg2B7BCF3A-0F82-46B5-85A5-55B10E517E08_zps8hahbb5r.jpgE5C10732-626A-482B-9795-C41A8CFBC94F_zpsld4h27v2.jpg3DB3E5EA-408B-4CD9-B252-0965D0026019_zpswip775cm.jpgC8246F50-21A2-4D44-B7F5-3E65E22E2E66_zpswo0y0nwk.jpgB1D896AE-3A97-4EB4-95B6-10FA0F17AFA4_zpsudqjfykx.jpg322ACA3A-DD28-4944-B789-9B94BD0CF026_zpsvltvla7g.jpg00C8BFC6-8807-44D5-BFB1-89A1F1414164_zpse8mbbhdt.jpg
 
Last edited:

super_dork

Seaman
Joined
Apr 10, 2011
Messages
68
So, I did some digging and I think I can see how to get the splashwell off.

I found this guy's post - he's doing a 1995 Stratos SF - so it's likely pretty similar. It's on another site so I'm not going to link to the whole thing.

photo.jpg


So, basically, I just need to find the seam between the splashwell and inner transom skin and cut it loose. *fingers crossed*
 

super_dork

Seaman
Joined
Apr 10, 2011
Messages
68
Well, I spent about an hour last night getting everything cut loose. After finding a post on another forum with a guy who did a 1995 version of this boat, I had a better idea of where to cut it apart. Basically, they back side of the splashwell was bonded to the inside of the transom wall. I got my recip saw with an 8" blade (needed 10, but that's all I had) and started cutting. At one point, I laid on my back inside the back hatch and used an oscillating multi-tool to cut loose where the blade couldn't reach. Turns out, it's pretty hard to get down inside the back hatch but WAY HARDER to get back out of it by yourself. I had honestly decided that I was going to just die inside there breathing in gas fumes before my wife could rescue me. Eventually I pulled myself out.

DDA9578C-4B96-489C-8F56-8BBC5B1F5E32_zps4gmbrn6p.jpg

F17B9B81-88AC-493E-A9CC-C22A8B3BAF8E_zpsl1wwm5rn.jpg00BBBA97-1529-43D4-9903-386B000ECF90_zpsrjjsajh7.jpg

Since I bought the shop crane, I figured I should use it, so I used it to hoist the back cap off once I popped it loose.


F94BB1ED-6E31-464F-9E37-EFD040130DF2_zpspc5j2twr.jpgCCDCC149-23A2-4611-81AB-DD4F984A97C2_zpsqy1sj6he.jpg


Then I cut a strip of the transom covering off to see how it looked. I've seen where folks cut everything out, even the covering over the pillow foam, but I figured I'd start with a strip and go from there. Anyway, it's not rotten... the center section is mush but the sides are SOLID. I guess I've got my work cut out for me. I'm planning to get a small electric chainsaw and start cutting it out. Overall, it's coming along well. I feel like the hardest part is going to be the tedious work of cutting everything out. I'm probably mistaken!

C306470F-35B9-4B32-8235-95270AA0B47F_zpsunwkr0rj.jpg275B6A53-5306-41EA-A4B2-EEB05FBA46D2_zpspesbs6wy.jpg16C0D11E-962D-432C-A8DB-FCAACC7AB957_zpscvrc0gps.jpg663B0540-B37A-4DC3-93BF-FEE820EFAFF1_zpsszefmadp.jpg77716845-F462-48C5-AABB-5D92A9E29DFA_zpsww3gsln1.jpg6D13831B-6C95-4150-9BCD-21BAEBEF0E50_zpsjmabmbhw.jpgC6E0D46A-3001-4A04-93BD-A7B56EF9F730_zpst2yijwgo.jpg30C89D73-6026-4168-8EC5-DDA034E66F96_zpspb6g5icl.jpg
 
Last edited:

super_dork

Seaman
Joined
Apr 10, 2011
Messages
68
Well I made a new friend today. Rgsauger stopped by to take a look at my progress and helped change my plans a little. So I took his advise and man am I glad that I did. I had been contemplating just digging the old transom out and using seacast. He suggested going the wood route and ripping out the inside skin so we could get good access to it. He even loaned me his sweet Rockwell oscillating multi tool! I started work on one side and when I got down to the stringer, I discovered that the whole side area next to the stringer was holding a lot of water. The stringer itself looked well protected but I'll have to investigate further to see how bad it may be. Anyway, the family came home and I had to take a break. More to come.


22.JPG

23.JPG

24.JPG

25.JPG

26.JPG

27.JPG

28.JPG
 
Last edited:

super_dork

Seaman
Joined
Apr 10, 2011
Messages
68
Sunday shenanigans!

We I've got it down to the back wall now. Now I've got to do some fine work to get everything clean, cut some stuff down smooth, remove the layer of wood on the transom wall with a sander/grinder.

I also used my shop crane (you know, since I have one!) to list the bow up as high as I could to get some better drainage. Unfortunately this thing has a tri-vee thing which makes the lowest point about a foot in from the tail. (See pics). I'm debating cutting the side decking back to that point to be sure there isn't more water holding there and that the stringer is in good shape.


29.JPG

30.JPG

31.JPG

32.JPG

33.JPG

34.JPG

35.JPG

36.JPG
 
Last edited:

super_dork

Seaman
Joined
Apr 10, 2011
Messages
68
I did about an hour and a half of cutting, grinding and sanding tonight. It probably would have been faster if I had gotten the right size attachments for my 4" grinder - I got 4 1/2 and they wouldn't work. Anyway, I made do with what I had. I used a then metal cutting disc to clean up some of the tab joints before it broke and I went back to the Rockwell tool. Honestly, the grinder with a cutting disc was AMAZING, but it's seriously scary how easily you could have a hole in the hull. Using the multi-tool is great because it's slower and gives you more time to plan and execute your cuts. Then I pulled out a regular grinding disc and went nuts! I tried 40 grit on my orbital but it was just too slow. The grinder wasn't perfect but it did a nice job on the back skin. Then I used the knotted wire cup attachment to do some of the smoothing out where the grinder left high spots or seams. When I got to the cracks in the transom, I decided to grind them down until all of the separated pieces were gone. I feel like this will give me the ability to ensure I get it patched up solid instead of having some delaminated pieces sandwiched between new fiberglass.

Anyway, after sweating like mad in the Tyvek suit (BUY SOME OF THESE!! THEY ROCK!!) I looked up to see what my entire garage is covered in a layer of dust. CRAP! I didn't have much choice. I have to work at night after the kids go to bed and don't want to spend my weekends working during the day, so I'll just have to clean up after I'm done.

It's not obvious in the pics how sanded everything because of the dust, but I feel like I made good progress. I'm going to start cleaning everything next to see what still needs to be done.


Oh and I think I need some goggles! Safety glasses just don't cut it.

37.JPG

38.JPG

39.JPG

40.JPG
41.JPG

42.JPG

43.JPG
 
Last edited:

super_dork

Seaman
Joined
Apr 10, 2011
Messages
68
Well tonight I did a bunch more grinding and sanding. I'm gonna have to get in there with my blower when this is all over with just to clear out the dust. EVERYTHING in my garage is covered in dust. Oh well. I can't sand at night on the driveway so I'll just have to deal with it. Im going to try to pick up some foam at Lowes tomorrow and see if I can start making a template for the new transom. Then I'm hoping to head to Houston Hardwoods over the weekend to pick up some marine plywood. I still need to order fiberglass and resin, so I may be on hold until I get what I need. I'm gonna go broke with this stupid boat!!!

Either this is really coming along well, or I'm in for a big surprise somewhere along the way!!

Anyway, no pictures today.
 

super_dork

Seaman
Joined
Apr 10, 2011
Messages
68
Bought some supplies today and did some more grinding.

5 yds of 1708
3 yds of chopped mat
Cabosil
5 gal polyester resin
4" bias tape
3/4" plywood (I've decided to use cabinet grade ply instead of maring grade)
Other misc stuff

I picked it all up at Johnson Fiberglass in southeast Houston.


44.JPG

The boat is looking happy!


45.JPG

At this point I'm going to have to make a punch list of tasks in the order I want to do them. I think I'm pretty much done sanding on the transom itself but will need to do some more on the float boxes and other areas. I'm also thinking about whether I'm gonna put a sheet of glass over the outside and if I do, I'll have to sand more back there I guess. Anyway, I'm reading up and watching videos on ways to do fiberglass. Most likely I will start repairing the inside crack next before I cut the transom to ensure I have a good fit.
 
Last edited:

super_dork

Seaman
Joined
Apr 10, 2011
Messages
68
I decided to try the fiberglass out after all. I just couldn't wait! I taped the back to give me a surface to work with then used the mat and tore it to the shape I needed. I cleaned the surface then wet it with resin then added the glass. my plan is to add at least 1 maybe 2 layers of cloth over the mat then gonna add a layer of cloth over the whole inside area where the wood will contact the transom.


46.JPG

47.JPG

48.JPG

49.JPG
 
Last edited:

super_dork

Seaman
Joined
Apr 10, 2011
Messages
68
Slowly building up layers. Added another small layer of mat to fill the low spots a little bit more then added a layer of 1708. My next layer will likely be a full sheet of 1708 over the middle section.


50.JPG
51.JPG
52.JPG
 
Last edited:

super_dork

Seaman
Joined
Apr 10, 2011
Messages
68
I laid up a full sheet to even everything out. Next I'm going to make my core templates.


53.JPG
54.JPG
55.JPG
 
Last edited:

super_dork

Seaman
Joined
Apr 10, 2011
Messages
68
I had a bunch typed up then the browser crashed. So here’s the short version.

I sanded the outside some more, cut the template for the new core and applied a waterproofing coat. Out of everything, the template has proven to be the most frustrating and difficult due to the contour of the exterior of the hull.

For my waterproofer, I used 50/50 resin and acetone with catalyst and rolled it on. I’m going to do a second coat then laminate everything with CSM in the middle then fully wrap it in 1708 since the sides won’t be making contact with anything else. I just want to be sure that it’s as solid and encased as possible.

Also, you can see the sanding “booth” I finally made. It sure has helped, though I think it was too little too late honestly. I’m going to have a crap load of cleanup to do when this is over. This is not a mistake I will make again.


20151101_032509854_iOS.jpg 20151101_202927856_iOS.jpg 20151101_202931116_iOS.jpg 20151101_202936315_iOS.jpg 20151101_204424584_iOS.jpg 20151101_210923341_iOS.jpg 20151101_211102094_iOS.jpg 20151101_211109504_iOS.jpg 20151101_215809037_iOS.jpg
 
Last edited:

sprintst

Commander
Joined
Apr 18, 2009
Messages
2,066
I'm not a fiberglass boat type guy but that is a lot of work you've done there. It looks like you are well on your way... It's a lot of work but well worth it in the end.
 
Last edited:

super_dork

Seaman
Joined
Apr 10, 2011
Messages
68
No Title

I'm not a fiberglass boat type guy but that is a lot of work you've done there. It looks like you are well on your way... It's a lot of work but well worth it in the end.

I wasn't a fiberglass guy either until this "deal" (money pit) came along. I should have listened to my gut and walked away. Oh well. On the plus side, the level of confidence that I'm gaining from this is awesome. I'm really starting to feel like I can do more as long as I just take my time and get good instruction before I start.
 

Attachments

  • photo233411.jpeg
    photo233411.jpeg
    106.1 KB · Views: 0

super_dork

Seaman
Joined
Apr 10, 2011
Messages
68
As I am getting prepped to install the transom, I've been reading up on peanut butter. Currently I have a gallon of cabosil and some chopped strand mat. I forgot to pick up 1/4 chopped fibers at the fiberglass shop which is about an hour away and only open on week days. So, I'm debating about heading down to pick some up or if I can make do with what I have.

So, my question is, how much PB do I need? I know the OOPS ratio is 50% cabosil, 25% fibers and 25% resin. So if I have a gallon of cabosil that would mean I need 2 quarts of fibers. Can I just shred some of the chopped strand to make the mix, or should I just make a trip to the supplier?

If the math is right, I should end up with about 2 gallons of PB overall (not gonna mix it all at once). Will that be enough to bed the transom in properly? The center and bottom edges will be the only parts touching the hull.
 

jrttoday

Lieutenant Junior Grade
Joined
Feb 8, 2010
Messages
1,081
am not MR FIBERGLASS either!! but have done some... and found that a Tiger Paw wheel 120 or so grit does a great job of removing old glass(or anything) in a hurry. And w/o gouging easily; also, the more it gets used the less it takes

good job!!
 

Woodonglass

Supreme Mariner
Joined
Dec 29, 2009
Messages
25,930
Based on your glueing area, You'll only need about 2-3 qt's of PB to install the transom IMHO. I'd mix it like this... Pour out 2 separate quarts of resin. Pour the first quart in a 1/2 gallon container and add the MEKP. Then add about 1 1/2 qts of cabosil and stir till its like creamy Peanut butter. Cut up some scrap CSM into 1/4" pieces. You only need about 1/4 cup per quart of resin. Mix this in last. Use a 3/8" notched trowel to spread the mix onto the outer skin of the boat AND the wood transom. Do the same with the other quarts of resin until the entire transom and outer skin is covered. You may or may not need the 3rd quart. You have to work quickly. The resin will KICK in about 20 mins soooo it has to be mixed, spread, and clamped in place in that time frame. There should be some OOZE out around the back side of your transom and on the bottom soooo, have a big plastic spoon ready to smooth out this excess to form a nice coved fillet . That about covers it.;) Do you have your Clamps lined up??
I'd recommend looking at this Fabricating Decks, Stringers, and Transoms
 
Last edited:

super_dork

Seaman
Joined
Apr 10, 2011
Messages
68
Cool that sounds like a plan!

I found your post about the clamps and plan to make some next. Unlike nurseman, I don't have any clamps so I'll need them for the laminating as well.
 

Rick Stephens

Admiral
Joined
Aug 13, 2013
Messages
6,118
Big project. Nice patch job on the transom glass! Can't tell you how important it is to follow WOGs advice on PB - it takes a lot and it has to flow if it is gonna fill in everywhere. Dropping the transom plate in is one place not to short the goo.

RIck
 
Top