Restoring 1986 Sea Nymph SS155 (pics)

Huron Angler

Admiral
Joined
Apr 7, 2009
Messages
6,025
Re: Restoring 1986 Sea Nymph SS155 (pics)

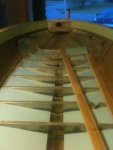
One other tactic that has been employed is to use pool noodles for flotation. However in your case I think the sun will be able to penetrate and UV can break down the noodles over time possibly.

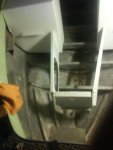
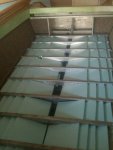
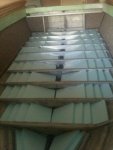
Is the blue foam gonna show thru the gaps in the deck at all?

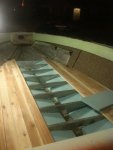
Woodonglass...I'm curious, about the thinning with acetone. Is it just to make it easier to apply the epoxy or is there another purpose?
 

Woodonglass

Supreme Mariner
Joined
Dec 29, 2009
Messages
25,929
Re: Restoring 1986 Sea Nymph SS155 (pics)

Piece715
If you put down the epoxy and then 2 coats of varnish, apply the sand and then another coat of varnish AND the boat is covered in the off season it should say looking VERY NICE for a minimum of 5 years. Some scuffs etc.. but NO fading or blotching. The Classic Wood boat guys use epiphanes on their boats and it stays looking good a long time. You'll like it.


HA..
Two Things. One the oils in the cedar. The acetone helps break them down and helps the Epoxy adhere to the wood fibers better and Two it Thins the epoxy to penetrate deeper and flow better and make it go further. Epoxy is ONLY needed to create a barrier for the Epiphanes Marine Varnish. The Oils in the Cedar will react negatively with the Varnish. Varnish is needed for the UV protection for the Epoxy.
 

Piece715

Senior Chief Petty Officer
Joined
Jan 26, 2009
Messages
757
Re: Restoring 1986 Sea Nymph SS155 (pics)

Huron Angler: I have already been thinking bout that and how would I hide the blue that will show through. I mean I could just paint it but how long before that paint peels and clogs the bilge? Any suggestions!?
 

Piece715

Senior Chief Petty Officer
Joined
Jan 26, 2009
Messages
757
Re: Restoring 1986 Sea Nymph SS155 (pics)

Ok more help is needed. I need ideas on how to brace the deck in the bow of the boat. I want to do the same wood as the floor but I am going to need supports. I need to brace without decreasing my storage space. Under these seat is really the only storage compartments. Here are some pics to help out but the boat doesn't have the floor in so you'll have to imagine. Thanks


Any ideas?
 

Attachments

  • photo(1).jpg
    photo(1).jpg
    112.4 KB · Views: 0
  • photo.jpg
    photo.jpg
    118.5 KB · Views: 0

bouttime007

Chief Petty Officer
Joined
Apr 21, 2007
Messages
546
Re: Restoring 1986 Sea Nymph SS155 (pics)

I totally forgot about this thread.

Its been 2 years? LOL

I was wondering how you were going to finish up in the bow with the cedar. I suppose you could fab up one last stringer out of wood to screw to.
 

Piece715

Senior Chief Petty Officer
Joined
Jan 26, 2009
Messages
757
Re: Restoring 1986 Sea Nymph SS155 (pics)

bouttime: I know it's sad isn't it! In July I will have had the boat for 3 years (NO SPLASH MIND U)... its tough goin to grad school and trying to re fab a boat. But that part of my life is over and I have the time and most important the money now that I have graduated. I have been trying to think of some way to finish the bow seating from aluminum supports to 2x4 legs but I can't figure it out without losing all my storage space. The console will be mounted to the cedar floor its just that dang seating platform. Right now I'm leaning toward a nice sheet of ply since cushions are goin to be on top of it anyway.

The foam is almost done... just need to finish the last layer. The cedar boards have all been fit just need to space and predrill holes. Plan on ordering Penofin Red label Transparent Western Red Cedar oil finish today. Here is a pic I snapped with my phone last night when cleaning up. I'll try to get more tonight.
 

Attachments

  • photo(2).jpg
    photo(2).jpg
    141.3 KB · Views: 0

bouttime007

Chief Petty Officer
Joined
Apr 21, 2007
Messages
546
Re: Restoring 1986 Sea Nymph SS155 (pics)

I guess Im not understanding your intent with the bow seats.

Arent you going to use the aluminum bracing with the 2 access holes in the sides that the bow seats sit on? If so, run your cedar boards all the way up into the bow like the plywood was and put her together.

Or are you talking about the plywood bow seat bases? I just made my own using the old ones as patterns.
 

Piece715

Senior Chief Petty Officer
Joined
Jan 26, 2009
Messages
757
Re: Restoring 1986 Sea Nymph SS155 (pics)

BoutTime: We may be on the same page but unsure. I am talking about the actual seating surface itself (the lids to the storage space). I am wanting to do these like the floor but with the bracing spaced the way it is there is no support for that type of set up. I am wondering if there is any way to support these surfaces without decreasing the storage space available. I hope this is making sense.

I did a rough mock up in paint of what I'm talking about... hopefully this will help.

Also there is another picture of the foam/floor progress.
 

Attachments

  • photo(1).jpg
    photo(1).jpg
    64.7 KB · Views: 0
  • photo(3).jpg
    photo(3).jpg
    125.9 KB · Views: 0

bouttime007

Chief Petty Officer
Joined
Apr 21, 2007
Messages
546
Re: Restoring 1986 Sea Nymph SS155 (pics)

Ok, I got ya.

I would definately use plywood on the seat bases as its much stronger and easier to use. I assume you are going to pad and recover the bow seats, so there isnt much point in trying to use the cedar.

My old seat bases...

Picture002.jpg


My new seat bases...

Picture003.jpg


I just brushed on some deck sealant to prolong the life of the plywood.

Not the best quality job but hey...

Picture006-1.jpg


Picture005-1.jpg


Picture-1.jpg
 

Piece715

Senior Chief Petty Officer
Joined
Jan 26, 2009
Messages
757
Re: Restoring 1986 Sea Nymph SS155 (pics)

Bouttime: Yep I came to the same conclusion. I was gonna do the cedar and make removable cushions but if I use ply, separate it into lids and then pad and cover in vinyl I would save a lot of headache and time.

Here are the pics of the finished foam. It was a lot longer process then I was anticipating. I cut the foam with the jig saw which was waaaay easy, but those Styrofoam particles LOVE static electricity! It was frustrating but that part has past now just waiting on the stain to come in... should be in the next day or two
 

Attachments

  • photo(4).jpg
    photo(4).jpg
    119.7 KB · Views: 0
  • photo(5).jpg
    photo(5).jpg
    117.3 KB · Views: 0

Piece715

Senior Chief Petty Officer
Joined
Jan 26, 2009
Messages
757
Re: Restoring 1986 Sea Nymph SS155 (pics)

Had some down time at work and was bored sooooo why not design a boat interior...
 

Attachments

  • Boat interior(1).jpg
    Boat interior(1).jpg
    18.6 KB · Views: 0

Huron Angler

Admiral
Joined
Apr 7, 2009
Messages
6,025
Re: Restoring 1986 Sea Nymph SS155 (pics)

The way that foam is laid down looks good, as long as there's a good path for water to drain to the bilge. Maybe a few holes along the way to allow proper flow?

This interior is gonna look nice with all that cedar, great wood to use in a boat being naturally resistant to water. We have tons of cedar on our property, I'm always tempted to try to make a cedar strip canoe.:)
 

Piece715

Senior Chief Petty Officer
Joined
Jan 26, 2009
Messages
757
Re: Restoring 1986 Sea Nymph SS155 (pics)

Huron: I was lookin at the pictures this morning... by the way its amazing what u notice in pictures rather than standing right in front of the boat.. but anyways... The water should flow well. I left a 6 inch gap in the middle at the V so the flow won't be impeded toward the bilge. The only issue that I'm seeing now is the ridges in the stacked foam. I should of stacked it the other way but that would have displaced a lot of foam. This setup allows for the most foam possible but water could collect in the ridges on top.... Hmmmmm maybe making little channels in the ridges to allow collected water a chance to get to the middle!?!?

The cedar is awesome. Its super easy to work with and SUPER light weight. Compared to ply it is unbelievable the weight difference. Hopefully it'll help me gain some MPH out on the water with that ole 50hp
 

ezmobee

Supreme Mariner
Joined
Mar 26, 2007
Messages
23,767
Re: Restoring 1986 Sea Nymph SS155 (pics)

Great job on the foam.
 

bouttime007

Chief Petty Officer
Joined
Apr 21, 2007
Messages
546
Re: Restoring 1986 Sea Nymph SS155 (pics)

Bouttime: Yep I came to the same conclusion. I was gonna do the cedar and make removable cushions but if I use ply, separate it into lids and then pad and cover in vinyl I would save a lot of headache and time.

Here are the pics of the finished foam. It was a lot longer process then I was anticipating. I cut the foam with the jig saw which was waaaay easy, but those Styrofoam particles LOVE static electricity! It was frustrating but that part has past now just waiting on the stain to come in... should be in the next day or two

Hey Piece, what did you use to glue the the foam together and down on the hull?

Im thinking Im going to have to re-deck in the near future, and Im going to redo the foam at the same time.

Yours looks pretty good to me. Its kinda nice to see someone with essentially the same boat as me doing upgrades, so I can get different ideas.
 

Woodonglass

Supreme Mariner
Joined
Dec 29, 2009
Messages
25,929
Re: Restoring 1986 Sea Nymph SS155 (pics)

This setup allows for the most foam possible but water could collect in the ridges on top.... Hmmmmm maybe making little channels in the ridges to allow collected water a chance to get to the middle!?!?

You could drill some 3/8" holes in the foam to let the water through.


ezmobee

Supreme Mariner
Joined
Mar 26, 2007
Messages
23,767
Re: Restoring 1986 Sea Nymph SS155 (pics)

That foam looks like it would drain amazingly well to me just the way it sits. It's sitting on top of ribs isn't it? I wouldn't mess with it and I don't quite understand the fuss.
 

Piece715

Senior Chief Petty Officer
Joined
Jan 26, 2009
Messages
757
Re: Restoring 1986 Sea Nymph SS155 (pics)

Bouttime: I cut the foam just a hair larger than the space between the stringers that way i had to force it into place. It wasn't such a tight fit that I couldn't reposition it but it took some umph to get them out. Now my hand isn't the steadiest when it comes to a jig saw and the ease it slices through that foam so the pieces that were somewhat loose I just used a hot glue gun. Most of my loose issues had to deal with the stacked foam none of the ones near the bottom. Hot glue sticks that foam together really well.

Woodonglass: Yeah ill take a look and see what will work best. May get the hose out and see how the water drains before I go putting holes everywhere. I just don't want it to pool anywhere... but the deck will be slotted and allow for great evaporation

Ezmobee: I believe it will drain well too. The bottom pieces are flat on the hull between the stringers. No real ribs. Although now that I'm looking at pictures the edges of the bottom pieces of foam in each sit on top of a row of rivets that hold the stringers to the hull... so that prob provides enough gap to allow for proper drainage
 

Huron Angler

Admiral
Joined
Apr 7, 2009
Messages
6,025
Re: Restoring 1986 Sea Nymph SS155 (pics)

As long as the boat is angled with the bow up just a bit, your drainage is going to be great, I agree.

The only concern I have is it looks like it could collect in the voids right under the deck, where the foam is "shingled" so to speak. This would only happen if the boat is sitting perfectly level, which is not very likely, so maybe not an issue at all.:)
 

Piece715

Senior Chief Petty Officer
Joined
Jan 26, 2009
Messages
757
Re: Restoring 1986 Sea Nymph SS155 (pics)

I didn't even think about the boat in motion. That would definitely help for drainage. I do believe all is well in foam land of the Sea Nymph!

Now to the dreaded task of spacing deck boards 1/16 in. I found a flat piece of aluminum strip that is 6'x1"x1/16" that I am going to use to space. Just sandwich it between the boards press together, screw down, and remove strip! VOILA!.... well I'm praying its that easy
 
Top