Restoring 1986 Sea Nymph SS155 (pics)

Woodonglass

Supreme Mariner
Joined
Dec 29, 2009
Messages
25,929
Re: Restoring 1986 Sea Nymph SS155 (pics)

Duh, I agree, Bow Up and the water will flow, NO PROBLEMO!!!! MY BAD!!!:facepalm:
 

bouttime007

Chief Petty Officer
Joined
Apr 21, 2007
Messages
546
Re: Restoring 1986 Sea Nymph SS155 (pics)

I think the drainage will be fine, a non issue.

You can use a roofing nail or some other kind of nail or a series of a few pushed through cardboard (in a straght line) as a spacer for your cedar Piece. Just slide it along and push/pull the boards to snug up as you go.
 

Piece715

Senior Chief Petty Officer
Joined
Jan 26, 2009
Messages
757
Re: Restoring 1986 Sea Nymph SS155 (pics)

Bouttime: My first choice was a nail... that's how my dad and I built all our decks. The only issue was I couldn't find one that was thin enough. I really want to keep to the 1/16" so the blue foam doesn't show its ugly color but allows for drainage. All the thin nails didn't have heads on them and I was afraid it would fall through. Didn't think of the cardboard idea :facepalm:

Woodonglass: I really know how ya feel :facepalm: x2
 

Piece715

Senior Chief Petty Officer
Joined
Jan 26, 2009
Messages
757
Re: Restoring 1986 Sea Nymph SS155 (pics)

Happy Easter everyone! Here are some updated pics of the floor. It is stained as well as my set up for the new splashwell area. The Penofin stain is awesome to work with. The pictures don't do the color justice. I will try to get some better ones. ENJOY!
 

Attachments

  • floor1.jpg
    floor1.jpg
    117.1 KB · Views: 0
  • splash well.jpg
    splash well.jpg
    105.9 KB · Views: 0
  • stain.jpg
    stain.jpg
    117 KB · Views: 0
  • floor2.jpg
    floor2.jpg
    112.7 KB · Views: 0
  • splash well stain.jpg
    splash well stain.jpg
    120.5 KB · Views: 0

bouttime007

Chief Petty Officer
Joined
Apr 21, 2007
Messages
546
Re: Restoring 1986 Sea Nymph SS155 (pics)

Cool beans, shes lookin good Piece.

I may have to redo my floor soon too, but if it can wait one more year it would be ideal.
 

Piece715

Senior Chief Petty Officer
Joined
Jan 26, 2009
Messages
757
Re: Restoring 1986 Sea Nymph SS155 (pics)

Boat got put on hold... Had a bunch of tornadoes rip through Arkansas yesterday. Prayers to those affected here and in the surrounding areas
 

copeman5011

Cadet
Joined
Apr 28, 2011
Messages
15
Re: Restoring 1986 Sea Nymph SS155 (pics)

I'm looking at buying an 84 17 ft fish and ski with a 60 mariner outboard. My question is how hard would it be to rip out the console and only install the driver side of the console. I want a side console as my main use of the boat will be to tend a layout box for duck hunting. I need as much storage space as possible so I want the front to be all open. Since you tore out the console on yours I figured you would have a pretty good idea. Boat looks great man hope you can get it in the water soon.
 

Piece715

Senior Chief Petty Officer
Joined
Jan 26, 2009
Messages
757
Re: Restoring 1986 Sea Nymph SS155 (pics)

Actually it is quite easy to remove. It is held in place by pop rivets that need to be drilled out. If memory serves me its like 3-4 on each side attaching it to the shoulder rails (i think that's what they are called... the sides)... and then a bunch on the tabs that attach it to the floor. There are none through the hull... the only ones there are three for the throttle mount and they are above water line. I will be reattaching floor and console with SS screws. But just get a drill bit and drill out the centers and it'll just pop right out. Watch out after ya drill those pop rivets out they are HOT. So if one gets stuck on the drill bit wait a sec to pull it off... Learned by experience:mad:
 

copeman5011

Cadet
Joined
Apr 28, 2011
Messages
15
Re: Restoring 1986 Sea Nymph SS155 (pics)

Thanks a lot. I did end up buying the boat and I never intend to remove the drivers side console except to redo the floor or paint the boat. When fall comes around I will be removing the passenger console and the platform up front to leave more room for hunting stuff. Just bought it yesterday night so today after work was all cleaning and getting the necessary equipment to take it out on lake erie. Hopefully ill get it in the water soon, gotta get my boaters license first.
 

Piece715

Senior Chief Petty Officer
Joined
Jan 26, 2009
Messages
757
Re: Restoring 1986 Sea Nymph SS155 (pics)

I don't know if yours is the same way but my consoles are connected. You'd have to do some cutting. Here is what mine looked like


EDIT: Actually it may be riveted together and u could just drill them out... I can't remember but i know its connected
 

Attachments

  • Front view of center console out of boat.JPG
    Front view of center console out of boat.JPG
    95.1 KB · Views: 0
  • Back view of center console out of boat.JPG
    Back view of center console out of boat.JPG
    93.8 KB · Views: 0

markn88

Seaman
Joined
May 2, 2011
Messages
64
Re: Restoring 1986 Sea Nymph SS155 (pics)

wow. piece great job on this restore. i just joined i boats and stumbled upon your posts and read through all of them from the beggining of this project. looks like a great job. i just boat my first boat and hope to do some small restoring on the inside(gauges lights and reboarding seats). i like the idea of using plywood for bottoms. i wonder if when i put the foam back on the wood if putting like a thick plastic on the wood to protect it additionally from water or would be worth the trouble. what do you think.
 

copeman5011

Cadet
Joined
Apr 28, 2011
Messages
15
Re: Restoring 1986 Sea Nymph SS155 (pics)

They are somehow connected but definitely won't require cutting, probably rivets. Shouldn't be a problem. I don't remember if yours had a livewell under the drivers seat or not, did you remove it? What did you do to plug the inlet and outlet in the stern if you did?
 

Piece715

Senior Chief Petty Officer
Joined
Jan 26, 2009
Messages
757
Re: Restoring 1986 Sea Nymph SS155 (pics)

markn88: WELCOME TO IBOATS! There is tons of information available on this site and plenty of people to help ya out. I appreciate the comments... I started out like you... wanting to do the just the cosmetic stuff and after I dug in a little I knew she needed a little more TLC. When I saw what it would take just to do the surface I decided to start from square one and brought her down to the hull. When ya start in on her make sure you check everything out. You want to fix it all at once trust me and ALWAYS do it the best way possible the first time and you'll never have to touch her again besides normal yearly routine stuff. When it comes to the wood I would seal it rather than using the plastic. Do a search on here I'm sure the topic has been hit. The plastic may seem like a good barrier but moisture can become trapped between the wood and the plastic and actually speed up rot. Just seal the wood, use a nice marine foam, and finish em with a good marine vinyl. If ya do it right from the beginning you'll have seats that will last for years if properly maintained. I took the easy way out and bought overton's back to back lounge seats. They are lighter due to composite material and well constructed. Sometimes is better just to go new so way your options and see which fits best for ya Smooth Waters to ya and thanks again for the comments.

copeman5011: I did have the livewell under the drivers seat. I had every intention of keeping it but as I started to look at seats and saw the price of captain's chairs I opted not to continue down that road. Another reason I did away with the livewell was weight. Mine is only powered by a 50hp and I want the most performance from her that I can achieve. Just getting rid of the seat boxes reduced a good deal of weight. If I do need a livewell i have ran across plenty of sites with DIY cooler livewell. The livewell inlet I am going to connect to a bilge with an aerating sprayer nozzle to use as a homemade mist system. Haven't tried it out yet but that's the idea. It gets hot in Arkansas... I hope it works like I'm hoping. The other hole will prob just get a permanent plug.
 

markn88

Seaman
Joined
May 2, 2011
Messages
64
Re: Restoring 1986 Sea Nymph SS155 (pics)

piece: thanks, ya ive found some interesting things here. ive been looking at the back to back lounge chairs from overtons and iboats. if i went that way id be done in about a day and that would be it. but i think i want to try and do it myself to say i really put work into the boat lol. the only other things i need are some new bulbs for gauges and the new side trim on the inside since that has started to rot. either way ill put pics up when i finish it to show off my new "lil boat" haha.. ill be keeping track of your progress too. good luck
 

Attachments

  • IMG_4473.jpg
    IMG_4473.jpg
    140.3 KB · Views: 0

Piece715

Senior Chief Petty Officer
Joined
Jan 26, 2009
Messages
757
Re: Restoring 1986 Sea Nymph SS155 (pics)

Floor is finished and screwed down. Went easier than I thought. Sorry bout the bad pic... I keep forgetting my camera and all i got is my phone. Right now I am finishing up painting the center consoles and ordering parts that I need.
 

Attachments

  • photo.jpg
    photo.jpg
    142.5 KB · Views: 0

Woodonglass

Supreme Mariner
Joined
Dec 29, 2009
Messages
25,929
Re: Restoring 1986 Sea Nymph SS155 (pics)

I LOVE IT!!!!! Being a Woodworker, I think All Tin Boats should have decks like that!!!! Stay on top of the finish and it will last for YEARS!!!!! GREAT JOB!!!!!
 

Piece715

Senior Chief Petty Officer
Joined
Jan 26, 2009
Messages
757
Re: Restoring 1986 Sea Nymph SS155 (pics)

Thanks so much Woodonglass. I'm hoping it will last for years. The stain I used had simple application so keeping on top of it should be a breeze. I agree about the floor... carpet covered plywood doesn't do these old ladies justice. The compliments mean a bunch... Thanks again!
 

Piece715

Senior Chief Petty Officer
Joined
Jan 26, 2009
Messages
757
Re: Restoring 1986 Sea Nymph SS155 (pics)

Ok I'm looking for replacement parts for my windshield. Its off a 1989 Sea Arrow and the support bars measure just shy of 7" from ball joint to ball joint. Anyone have an idea of where to find this size of support bar. The only sizing anyone carries are 11"-15". If someone has tackled this problem please let me know

EDIT: Now if i straighten out the ball joints and include the mounting piece in the length it comes out to 11"... but i thought u measured from ball joint to ball joint? Isn't it the length of the tube that you want or am I wrong? I refuse to be out done by windshield hardware:confused:
 

Piece715

Senior Chief Petty Officer
Joined
Jan 26, 2009
Messages
757
Re: Restoring 1986 Sea Nymph SS155 (pics)

Ok... couldn't find much about the supports but I did realized that I could just replace the ball joints because overall the supports are in good shape.

Next I bout a bunch of stuff yesterday - red and white vinyl, NFB rotary safe TII steering, CMC Trim and Tilt unit w/o gauge... Let just say THANK THE BIG MAN that this Friday is pay day:eek:

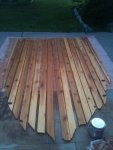
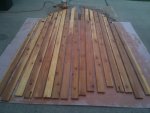
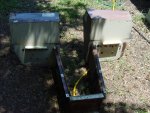
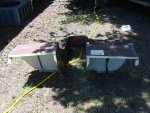
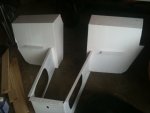
Progress is held up by the painting of the consoles. Can't measure and cut anything without it being mocked up and with paint needing 24hrs before next coat kinda slows things down.

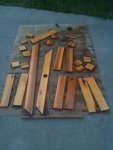
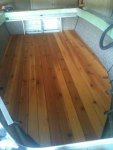
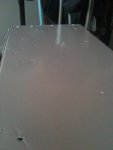
Here is the progress so far.. My roll and tip is a little... well U can tell its definitely my first time. Any suggestions?
 

Attachments

  • photo(1).jpg
    photo(1).jpg
    82.6 KB · Views: 0
  • photo.jpg
    photo.jpg
    80.9 KB · Views: 0
  • photo2.jpg
    photo2.jpg
    107.4 KB · Views: 0

Huron Angler

Admiral
Joined
Apr 7, 2009
Messages
6,025
Re: Restoring 1986 Sea Nymph SS155 (pics)

The cedar deck looks awesome, very nice work Piece:)

Is the wood going to swell at all when it gets wet?

You will love the CMC unit, I refuse to part with mine. Did you paint two coats on the consoles? Maybe if you sand a bit and recoat it will lay more flat?
 
Top