Bayliner Capri unintentional restoration project

jmmacky

Petty Officer 2nd Class
Joined
Jun 20, 2011
Messages
177
Re: Bayliner Capri unintentional restoration project

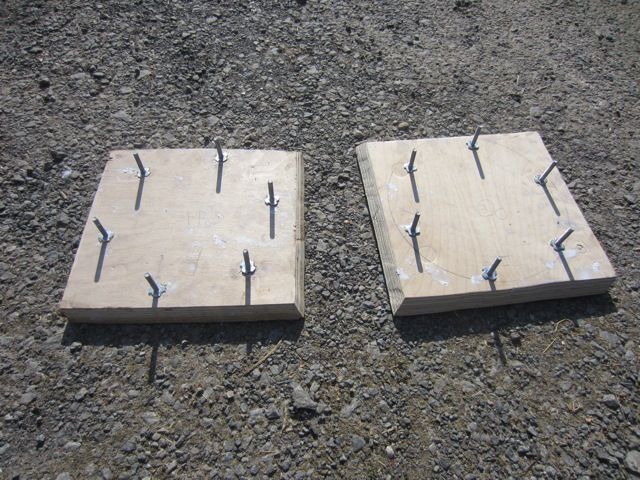
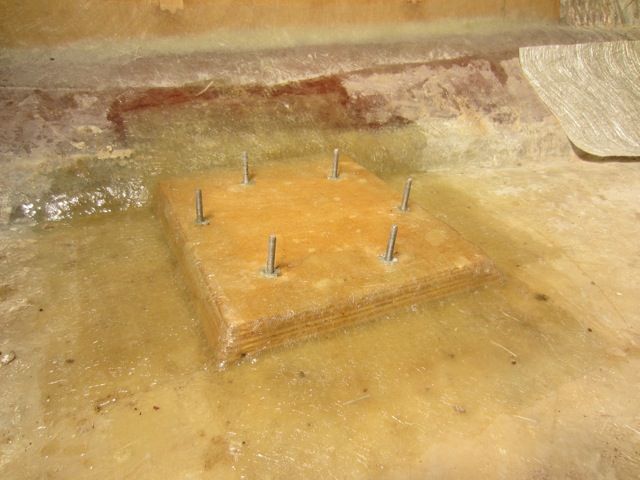
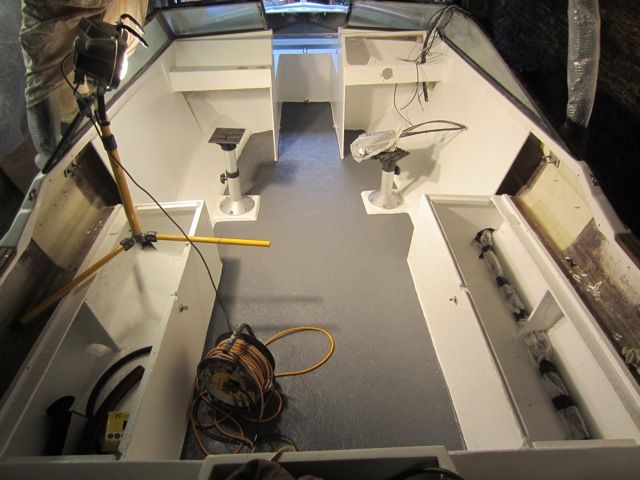
When all this had dried I mounted it to the cap at the bow of the boat. I had some ss right angle/L-shaped brackets left over from the trailer resto so I used these to mount it using ss bolts countersunk into the wood so it can be filled over afterwards. Through cap fixings were sealed with sikaflex.

file_zpsc462f6d5.jpg


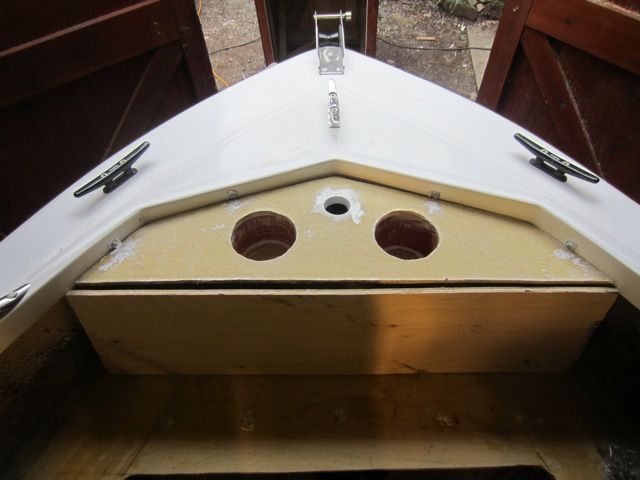
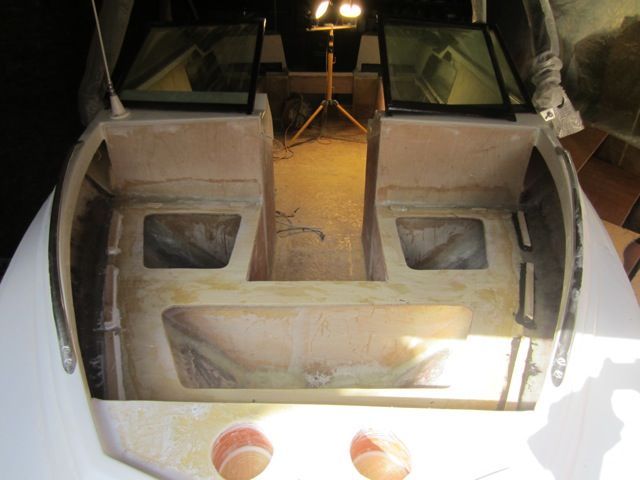
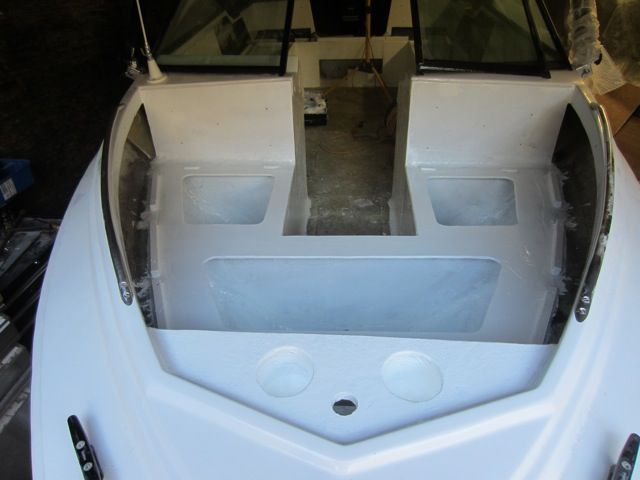
And so you can see what I mean about using the anchor compartment through the hole in the bow section or through the bow seat locker:

file_zpsbc3b4ca9.jpg


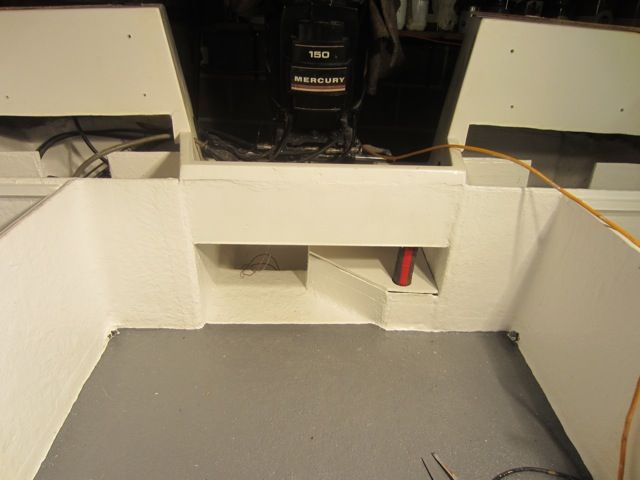
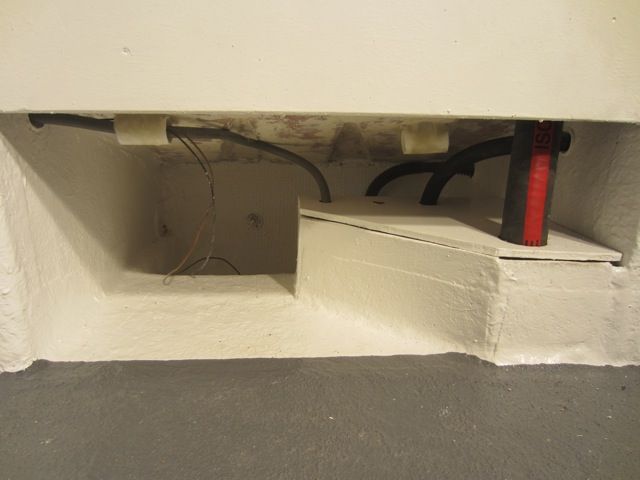
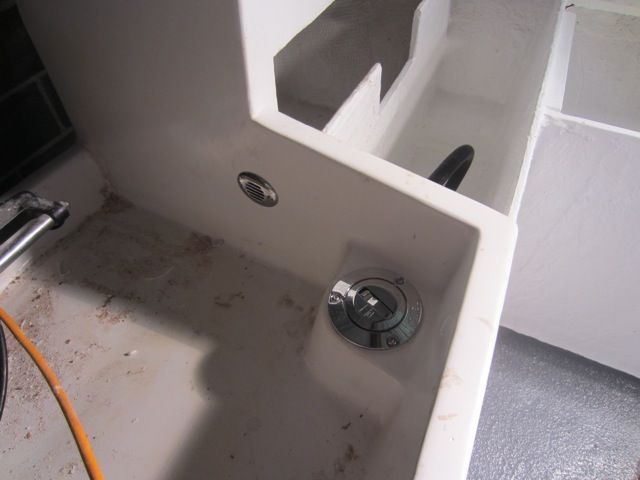
The top will obviously get filled with fairing filler to make a smooth transition to the cap and cover the metal brackets. Everything will get gelcoated including the cup holders. I started gelcoating today with the bilge; 1 coat of non-waxed gelcoat and 1 coat of waxed. I'm going to build a section around the exposed fuel tank so water drains around it rather than into it to get to the bilge. The top of this will be covered with holes for the hoses to come through, which will then get sealant around them so hopefully no water will get into the fuel tank area.

file_zps0c6e8c88.jpg


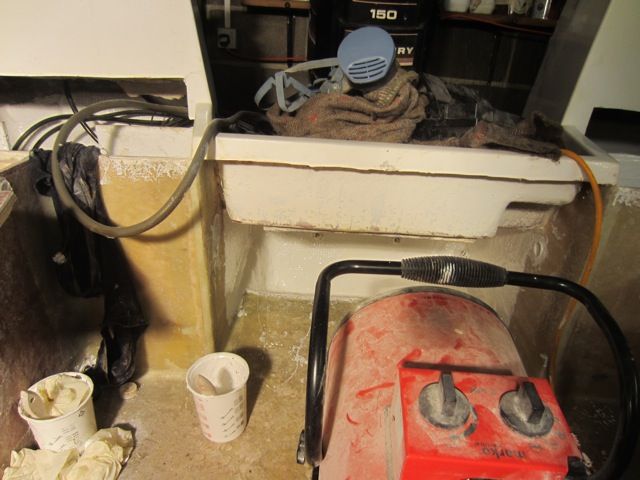
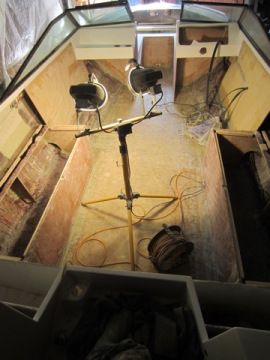
Pretty cold here still so the heater is in place to make it cure properly and it's covering up the exposed fuel tank on the port side just in front of the bilge.
 

jmmacky

Petty Officer 2nd Class
Joined
Jun 20, 2011
Messages
177
Re: Bayliner Capri unintentional restoration project

The list of jobs that I have to do on the boat which has always seemed endless is suddenly getting quite short! I have done what I think is my last bit of fibreglassing on the boat!!

I have made the pedestal seat bases now and installed them. I've pretty much done what many others on here have to make 'sacrificial' bases glassed to the deck so that no screws go down through the deck itself. I cut 2 bits of 9mm exterior ply to size and glued together with waterproof glue. Then cut the edges to 30 degrees with a circular saw to make laying glass easier and so they look better. I then drilled the holes which the pedestal bolts on through and placed ss bolts up from the bottom with sikaflex to seal, burying the heads in the wood and locking them in place with t-nuts on top.

file_zpsa417dc86.jpg


I then mixed up some PB and stuck them down in the right place on the deck (after sanding and acetone) and smoothed off the PB that squidged out the sides. I weighted them down while that dried and then tabbed in with combi/stitch mat followed by csm over the top of the whole lot to give a smoother finish and waterproof.

file_zps4ab88662.jpg


I will use sikaflex around the pedestal bases when I fit them on to try and prevent any water getting anywhere near the bolt holes!

I've also made and glassed in the barrier around the fuel tank opening which will drain water around it and to the bilge but forgot to take any photos.
 

jmmacky

Petty Officer 2nd Class
Joined
Jun 20, 2011
Messages
177
Re: Bayliner Capri unintentional restoration project

Afraid I haven't got any photos of the latest progress as have been racing to get stuff ready for the upholsterer in time. I've finished all the seats now and test fitted everything with all the fixings. The seat bases have been covered in waxed gelcoat and the seat back pieces with epoxy. Unfortunately I ran out of time to apply a second coat of epoxy which would have been better but can't be helped.

I sanded the entire interior today; all flat surfaces with 40 grit paper on a random orbital sander and I rounded off all the plywood edges with 80 grit paper on a belt sander. I made a lot of itchy fibreglass dust but I think that is the last time I will have to grind/sand fibreglass on this project!! Tomorrow I'll start gelcoating the interior.
 

jmmacky

Petty Officer 2nd Class
Joined
Jun 20, 2011
Messages
177
Re: Bayliner Capri unintentional restoration project

Some before and after shots today. Got the first coat of gelcoat down everywhere it's needed. This is obviously unwaxed and I will do the topcoat with waxed gelcoat (flowcoat). Some places where it's needed have had 2 coats of the unwaxed gelcoat. I used foam rollers to do large surfaces and chip brushes for awkward/pitted areas. It's good to have it starting to look like a boat again inside!

Before:

file_zpsd5578c08.jpg


file_zps247c99fd.jpg


After:

file_zps35c7b1fc.jpg


file_zps0d170b93.jpg


The areas where there is no gelcoat will be covered by the seats. All bare wood has been protected with gelcoat as well. The actual deck I will be covering with Protectakote non-slip paint (I think is called Durabak in the US). I'm sorry I know lots of people like carpets in boats but I am not a fan myself! I've not seen this stuff before but I really like the sound of it and I've see a few people mention similar sounding things on iboats before. Also they mention it for boat decks on the website and it's UVR.
 

GT1000000

Rear Admiral
Joined
Jul 13, 2011
Messages
4,916
Re: Bayliner Capri unintentional restoration project

Wow! That is certainly a huge step towards looking like a finished boat...Looks Fantastic!
Now that you mentioned "Protectakoat", I decided to look into "Durabak" and asked the company for a couple of color samples...they arrived the other day, and I have to say I think I like it...Seems cost effective, is supposedly used by the U.S. Navy, stands up to the Marine environment and I like the texture...it is also used as a bedliner for trucks and is used anyplace you want an abrasion resistant, tough covering...
 

avpaulb

Petty Officer 1st Class
Joined
Jun 19, 2011
Messages
298
Re: Bayliner Capri unintentional restoration project

This isn't going to be very helpful to your project, but... VERY IMPRESSIVE WORK!
 

Speak

Chief Petty Officer
Joined
Jul 29, 2012
Messages
467
Re: Bayliner Capri unintentional restoration project

Absolutely fantastic. Cant wait to start my own resto project. Well done!
Cheers,
Stuart
 

jmmacky

Petty Officer 2nd Class
Joined
Jun 20, 2011
Messages
177
Re: Bayliner Capri unintentional restoration project

Wow! That is certainly a huge step towards looking like a finished boat...Looks Fantastic!
Now that you mentioned "Protectakoat", I decided to look into "Durabak" and asked the company for a couple of color samples...they arrived the other day, and I have to say I think I like it...Seems cost effective, is supposedly used by the U.S. Navy, stands up to the Marine environment and I like the texture...it is also used as a bedliner for trucks and is used anyplace you want an abrasion resistant, tough covering...

Thanks GT, I will let you know how I find it when I apply it next week. I've gone for 'mid-grey' as I thought white might look a bit dirty on the floor after a while.

This isn't going to be very helpful to your project, but... VERY IMPRESSIVE WORK!

Absolutely fantastic. Cant wait to start my own resto project. Well done!
Cheers,
Stuart

Thanks guys! Appreciate the comments!
 

jmmacky

Petty Officer 2nd Class
Joined
Jun 20, 2011
Messages
177
Re: Bayliner Capri unintentional restoration project

Have got 2 coats of Protectakote (Durabak) down on the deck. I found it really easy to use but masking tape does not work well with it and I got nice edges doing them by hand with a brush. In fact I put the whole lot down by sort of dabbing with a chip brush. I found this gave the nicest/even spread finish. Also got the pedestals installed on the bases so I can now sit in the drivers' position and pretend it's finished!

file_zpsf5e4194b.jpg


file_zpse85a9c86.jpg


I finished off the new drainage system for the fuel tank area as well and plumbed in the pipes/hoses. The lid will get screwed/sealed down but the fuel gauge still needs to be wired up at the moment so it's just resting in place in the photo.

file_zpsf9bb546a.jpg


file_zps5714e0ce.jpg


I did a bit of research into where the fuel vent should go as I was going to vent it into the stern compartment underneath a seat. But decided not to do this as gas may not escape well/quick enough. The length of my fuel vent hose restricted where I could situate it but I have placed it in the splashwell area after much deliberation. I think it should be well enough ventilated here and high enough that water shouldn't get into it. I've placed a loop in the hose so that water has to go up from the vent and fuel up from the tank to try and stop them going the wrong way into/out of the tank.

file_zpsd9e0725d.jpg


Sorry about the amount of dust and rubbish in the splashwell in this photo!
 

jmmacky

Petty Officer 2nd Class
Joined
Jun 20, 2011
Messages
177
Re: Bayliner Capri unintentional restoration project

I forgot to say in my last post...

Today I bought some nice looking planks of Western Red Cedar to use for my dashboard to sink gauges in. I know not exactly a local wood for me but this is what the local timber merchant had that was the right size and best looking!

My plan is to clamp a couple of planks together using some waterproof wood glue and sash cramps, cut to size etc, sand and coat with 2 layers of epoxy. I will then sand this to quite a fine grit (400?). The epoxy says it's UV stable so does this mean it doesn't need to be varnished? I will then fit the gauges in place and seal with sikaflex and mount in place using ss bolts.

Does anybody think I should do anything differently or does this sound ok?
 

GT1000000

Rear Admiral
Joined
Jul 13, 2011
Messages
4,916
Re: Bayliner Capri unintentional restoration project

Really nice outcome on the Protectakote...
Makes the deck look amazing...Thanks for sharing your findings.
 

Nickypoo

Petty Officer 1st Class
Joined
Mar 21, 2012
Messages
287
Re: Bayliner Capri unintentional restoration project

I forgot to say in my last post...

Today I bought some nice looking planks of Western Red Cedar to use for my dashboard to sink gauges in. I know not exactly a local wood for me but this is what the local timber merchant had that was the right size and best looking!

My plan is to clamp a couple of planks together using some waterproof wood glue and sash cramps, cut to size etc, sand and coat with 2 layers of epoxy. I will then sand this to quite a fine grit (400?). The epoxy says it's UV stable so does this mean it doesn't need to be varnished? I will then fit the gauges in place and seal with sikaflex and mount in place using ss bolts.

Does anybody think I should do anything differently or does this sound ok?

Hey jmmacky, I read through your thread a while back and was pretty impressed, especially with your paintjob. I just realized you were the same person who was kind enough to help me out on a question about my interior recently. Anyway, I just wanted to stop by and say hi, and leave a comment so I can see when you make a new post on here easier. I don't have a good answer for your dash question, sorry. I put it in my comment so it wouldn't get buried.
 

jmmacky

Petty Officer 2nd Class
Joined
Jun 20, 2011
Messages
177
Re: Bayliner Capri unintentional restoration project

Really nice outcome on the Protectakote...
Makes the deck look amazing...Thanks for sharing your findings.

Thanks GT. I'm pretty pleased with the way it looks next to the gelcoat and think it makes it look 'finished'!

Hey jmmacky, I read through your thread a while back and was pretty impressed, especially with your paintjob. I just realized you were the same person who was kind enough to help me out on a question about my interior recently. Anyway, I just wanted to stop by and say hi, and leave a comment so I can see when you make a new post on here easier. I don't have a good answer for your dash question, sorry. I put it in my comment so it wouldn't get buried.

I've caught up on your thread and sorry my post didn't really answer your question but I see someone else has at least! Thanks for tagging along.

Back to the boat:
I've pretty much finished everything now which is a strange feeling! I've installed rod holders, bilge pump outflow drain, steering assembly, throttle, window hold-ups, cup holders and drains, and various other bits and pieces.

The dash is the main job I have left. I glued up a couple of boards today for the main part which will house the gauges and decided to give it the full 24 hours for the glue to set before going on to the next step. Tomorrow I will cut the gauge holes, fit and shape etc and then apply the first coat of epoxy. I'll post some pictures of it once it's shaped.
 

jmmacky

Petty Officer 2nd Class
Joined
Jun 20, 2011
Messages
177
Re: Bayliner Capri unintentional restoration project

Here are the first photos of the dashboard pieces. I used a couple of sash cramps and waterproof glue to join 2 cedar boards which had a nice pattern on them. Once dried the following day I cut the board to rough shape using a circular saw and rounded off the edges with a belt sander. A couple of extra bits of wood trim I planed down to make thinner, cut to size and did the same with the belt sander.

I then cut the holes for the gauges and sanded all the wood with a random orbital sander working my way up to 400 grit.


The steering wheel fits in the space in the middle and the chart plotter/fish finder will get mounted in the space on the upper right hand side.

I coated the back of all the wood with 2 coats of epoxy. I did the back first so I wouldn't end up with runs from the back onto the finished front surface. Despite my best efforts I was glad I did the back first as the resin got over the sides and onto the front of the wood in places. So I sanded all the sides and fronts down again working my way up to 400 grit.

I brought the wood into the house for the fronts to try and reduce dust settling onto the epoxy as it dries, so I can control temperature more easily and ensure no drips land on them. I stirred the epoxy and hardener really carefully to try and reduce small bubbles in the mixture and applied with a foam roller to try and get as good a finish as possible.


I've still ended up with quite a few tiny bubbles in the epoxy on the wood so I don't know if there is anything I could have done differently to reduce this further? I thought maybe higher temperatures might help but it doesn't seem to have made much difference. Anyway, I'm quite happy with the result so far and I will sand them down again tomorrow with 400 grit before giving them a coat of clearcoat stuff (Coelan clear coating) to provide UV resistance.
 

GT1000000

Rear Admiral
Joined
Jul 13, 2011
Messages
4,916
Re: Bayliner Capri unintentional restoration project

New dash panel looks sharp...
A tip on popping bubbles in the epoxy...use a hair dryer on a low heat setting and play it over the bubbles...most of the time the warm air and the air movement itself releases the trapped air...
Another tip is to brush it on in only one direction, very slowly...foam rollers and such tend to introduce bubbles...
 

jmmacky

Petty Officer 2nd Class
Joined
Jun 20, 2011
Messages
177
Re: Bayliner Capri unintentional restoration project

New dash panel looks sharp...
A tip on popping bubbles in the epoxy...use a hair dryer on a low heat setting and play it over the bubbles...most of the time the warm air and the air movement itself releases the trapped air...
Another tip is to brush it on in only one direction, very slowly...foam rollers and such tend to introduce bubbles...

That makes sense. Luckily it isn't too bad so will hopefully sand to a nice finish tomorrow. Thanks though GT...I'll know for next time!
 

Okieboatguy

Petty Officer 1st Class
Joined
Jul 28, 2012
Messages
204
Re: Bayliner Capri unintentional restoration project

Wow, Just finish reading and catching up on your entire post. I myself with a Bayliner and similar issues took quick notice of your attention to detail. I will be following along and waiting for the finished project.
 

jmmacky

Petty Officer 2nd Class
Joined
Jun 20, 2011
Messages
177
Re: Bayliner Capri unintentional restoration project

Wow, Just finish reading and catching up on your entire post. I myself with a Bayliner and similar issues took quick notice of your attention to detail. I will be following along and waiting for the finished project.

Thanks Okie. Hopefully you won't be waiting too long...!
 

Woodonglass

Supreme Mariner
Joined
Dec 29, 2009
Messages
25,929
Re: Bayliner Capri unintentional restoration project

GT led you right on the Epoxy and the Heat Gun/Hair Dryer. It really works. Another Trick is to Thin it with some Mineral Spirits (no more than 10%). Makes it flow better and easier for the bubble to get to the top. I'm a Woodworker at Heart and you did a nice job on the Dash!!!


jmmacky

Petty Officer 2nd Class
Joined
Jun 20, 2011
Messages
177
Re: Bayliner Capri unintentional restoration project

GT led you right on the Epoxy and the Heat Gun/Hair Dryer. It really works. Another Trick is to Thin it with some Mineral Spirits (no more than 10%). Makes it flow better and easier for the bubble to get to the top. I'm a Woodworker at Heart and you did a nice job on the Dash!!!


Thanks Wood! I think I could do it better a second time after yours and GT's advice but pretty happy with the way it's turned out.

Yesterday I sanded the epoxy down from 400 grit up to 1200. I wasn't brave enough to completely sand out all the bubbles as I didn't want to accidentally sand through to the bare wood but figured I'd probably opened most of them up so the clearcoat could penetrate. I used the foam roller to clearcoat it to provide UV resistance. I found if I put it on quite thick and was really careful/slow with the roller I could get almost no bubbles!

Today I sanded the drips on the back sides off and installed on the boat. I used SS screws from the back into the wood so nothing was visible on the front of the wood as well as sikaflex to seal screws and the wood in place.


I've used some of the left over rub rail from the outside of the boat to finish off the bottom of the consoles. There was originally a metal strip around them but it was bent and old-looking so I removed it a while ago.


The space on the upper right of the dash panel is where the chart plotter/fish finder will get mounted.


I also got a lockable glove box which I've fitted in on the port side. More by luck than judgement it fits really nicely into the console area here. The VHF is in the place I'm planning to install it but nothing is wired yet (the cables won't be hanging over the front after installation).

I've fitted rod holders and grip pads on the stern. There are also rod holders on each side towards the stern and the cup holders on the bow can double up as rod holders:


Not very exciting but I used some of the left-over rubber from the fuel tank compartment to line the anchor locker with. I'm hoping this will protect the glass in there and also reduce the noise of the chain etc as the boat is moving:

 
Top