Upon Further Review..#$%@..1973 Slickcraft Trans/String Overhaul

jcsercsa

Captain
Joined
May 21, 2007
Messages
3,401
Re: Upon Further Review..#$%@..1973 Slickcraft Trans/String Overhaul

Hay Bud, get it ground out then tab it in to the sides with the 1708, you got to get the strength back in to that corner !! 2 inch 4 inch 6 inch tabs !! the worst part is going to be getting to sit in that corner !! the epoxy should fill in any voids by then !! john
 

Seawench

Recruit
Joined
May 13, 2010
Messages
3
Re: Upon Further Review..#$%@..1973 Slickcraft Trans/String Overhaul

You've got some good work going on! That's how it happens. From the inside out.
 

83mulligan

Senior Chief Petty Officer
Joined
Feb 7, 2009
Messages
687
Re: Upon Further Review..#$%@..1973 Slickcraft Trans/String Overhaul

Red: Thanks, I cut some scraps today and started working to build up some of the void areas. I'm trying to use more glass and less pb there!

Johnnie: Yep, strength in the corner is the goal. Can't have my beautiful kicker falling off the back.

Seawench: So good to see you here! Thanks for the encouragement. Yep, trying to give her the best love from the inside working out. Hope to see you back here.
 

83mulligan

Senior Chief Petty Officer
Joined
Feb 7, 2009
Messages
687
Re: Upon Further Review..#$%@..1973 Slickcraft Trans/String Overhaul

Well, had a really productive evening on the boat. Have to thank my friends Paul and Bob for stopping by to give me some advice.

Progress Today:

1) Refit the transom. Spaced 1/8" off hull at lowest point of contact. Cut the top down to proper height. Routed 3/8" roundover on inside top edge. Marked and drilled through holes for lifting hooks.

2) Put transom back in. Bolted up lifting hooks. Drilled 1/2" outdrive stud holes. Used a drill guide for this. Marked cut out hole for transom. Pulled back out and cut hole. Used a jigsaw with a couple new heavy blades. It cut well.

3) PB cover screws in transom lamination. PB any gouges or voids visible in transom ply. Got one coat of resin on cut out hole and edge of transom.

4) Sanded outer skin of transom hull where i had filled 50 holes with marine tex. It came out really nice. Thanks Bob

5) Counterbored and filled with marine tex all but compass hole on dashboard.

6) PB filleted in damaged corner of transom near cap. Filled a couple gouges and what not with the left over way too much that i made up.

7) Patched hole I had cut in hull with sawzall. Yep, a big oops. Used 3 layers of 1708 biax. I have a feeling i'll be grinding this out tomorrow. I think there is an airgap at the cut which i previously filled with PB.

This was the first glassing on the hull I have ever done, lol.

8) Laid some filler pieces of glass in the damage area of the hull. Again, I wasn't impressed with my work. It may be coming out. More on this in my next post.

All in all a great night. Got some important things done. I hope the transom hole matches well when i put it back in tomorrow.
 

83mulligan

Senior Chief Petty Officer
Joined
Feb 7, 2009
Messages
687
Re: Upon Further Review..#$%@..1973 Slickcraft Trans/String Overhaul

First time fiberglassing on the hull. It didin't go that well. I need some advice or something

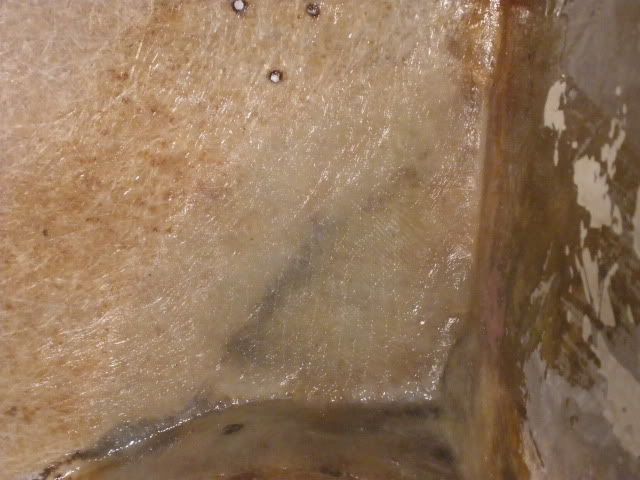
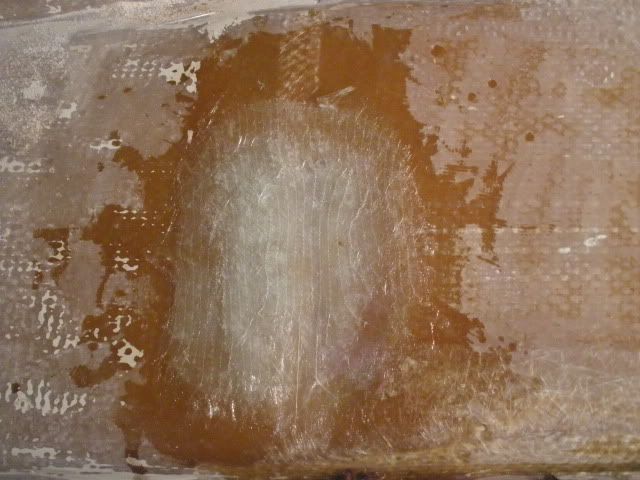
The first attempt was a small hole i had cut in the hull with a sawzall. It is about 4 inches long. I had previously ground it out to a dish shape and put some pb in the cut itself. It looked good. Next I cut 3 pieces each a little smaller in size to put over the area. I had a friend wet it out on a table and i laid it down and rolled it out. I don't think it adhered at the deepest part. In retrospect, I should have brushed more resin over the whole thing. With three layers, I had a hard time telling if it was saturated or not.

Second attempt was another 3 layer job along the top of the damaged corner just under the cap. The first piece about 14 inches by 6 inches, next 12 by 4, next 10 by 2. Anyway, i laid them on togeter and brushed resin over it all. I was having problems with the mat seperating from the cloth. It got kind of sloppy. I rolled it out and it looks ok, but i think there may be some bubbles in it too. There was a lot of waviness under it, so I'm not sure.

Third piece was a triangle in the corner of the transom. It wrapped the transom to the hull sidewall and the hull bottom. It was tough to get it to lay right in all 3 planes. It was tearing apart too. I didn't expect the stuff to be coming apart. Is this too much resin causing that? The material is in good shape dry.

Tomorrow morning should tell alot. I need to get better at this. Any advice on the methods i used would be appreciated. Its epoxy resin, btw.
 

ondarvr

Supreme Mariner
Joined
Apr 6, 2005
Messages
11,527
Re: Upon Further Review..#$%@..1973 Slickcraft Trans/String Overhaul

It sounds like you need to apply more resin and not work it around so much with the brush, if you're working on flat surfaces just pour the resin on and move it around lightly with the brush. Don't push on the mat, this will shred it.
 

83mulligan

Senior Chief Petty Officer
Joined
Feb 7, 2009
Messages
687
Re: Upon Further Review..#$%@..1973 Slickcraft Trans/String Overhaul

It sounds like you need to apply more resin and not work it around so much with the brush, if you're working on flat surfaces just pour the resin on and move it around lightly with the brush. Don't push on the mat, this will shred it.

Ondarvr, Thanks I'll try and do more gentle saturating next time. Following are some pics of the results.

Here is a shot above where the transom board will go. It covers the hole that was there. In red, i circled what are air bubbles. This is 3 layers of 1708. I'm not sure what it should look like exactly. I'm used to seeing shots by you people over new wood stringers and transoms. I plan on grinding out the air bubbles and filling with more resin and 1708. Does the rest look ok? It feels solid.
P6060104a.jpg


this next shot is the lower right of the transom. Just some filler resin and 1708. Please critique this too. Is it good to go? My goal was just to build up the area where glass had come off with the old transom. You can see the shallow spot a few posts back.
P6060102.jpg


Finally, the repair area where i cut the hole in the hull with the sawzall. This feels solid, but I don't believe it bonded over the cut. Also, I don't think it was wetted out enough. I'll be grinding this out.
P6060106.jpg


Looking for feedback and critique here. Trying to learn to do this right.
 

jcsercsa

Captain
Joined
May 21, 2007
Messages
3,401
Re: Upon Further Review..#$%@..1973 Slickcraft Trans/String Overhaul

pic 1 . really isnt to bad on the bubbles on the top of that pic the corner there it looks like the glass didnt stick to the side,looks like it kind of curled back at us !! the bubbles you could grind them out and just pour some epoxy in them !! them really arent to bad for bubbles !!

pic 2 looks great

pic 3 yep it sure doesnt look like you wet it out enough !!

Not to shabby there steve !!! John
 

BobsGlasstream

Commander
Joined
Sep 11, 2009
Messages
2,128
Re: Upon Further Review..#$%@..1973 Slickcraft Trans/String Overhaul

83mulligan,
Don't beat yourself up about a few bubbles. We all have to deal with them.
I agree with the previous post. Just make sure you wet the area with resin that you are going to glass. Also !708 is pretty heavy glass and it doesn't want to go around corners that easy. It will take some time.
Over all not bad for the first time.
Take care
Bob
 

83mulligan

Senior Chief Petty Officer
Joined
Feb 7, 2009
Messages
687
Re: Upon Further Review..#$%@..1973 Slickcraft Trans/String Overhaul

john: Thanks bud. Was fun to finally lay some glass on the hull. Hope your motor situation works out. I'm feeling for you.

Bob: Thanks for the encouragement! I'll get this.

Hey guys, doesn't look so bad after all. The parts i circled in the one photo are actually gelcoat that had been scuffed white. It was showing through. Pic 3, the sawzall incident, yeah, that needs to be redone. Grind and sand tonight. Maybe try again if i have time. Thanks for the support!
 

83mulligan

Senior Chief Petty Officer
Joined
Feb 7, 2009
Messages
687
Re: Upon Further Review..#$%@..1973 Slickcraft Trans/String Overhaul

Here is a shot of the transom with the marine tex all sanded out. Man, that stuff sure sands down nice. All the useless holes back there are gone, yay!

P6060108.jpg


Did some non exciting work tonight. Ground out the fiberglass over hole in hull that didnt' get wet out properly. PB'd a few spots in corner repair area and some areas of hull. Put another coat of epoxy on endgrain of transom board.
 

tdrudd87

Petty Officer 1st Class
Joined
May 28, 2009
Messages
288
Re: Upon Further Review..#$%@..1973 Slickcraft Trans/String Overhaul

Hey its the non-exciting work that sets up the big progress days! Looking good, I feel your pain with grinding out bad layups, had to redo a few sections of stringer earlier this spring. Keep up the good work!

When I was doing little patches like that, I would wet out each layer individually, then set the next piece of glass on and wet it out. A lot easier than pushing resin thru it all.

Lets see how it turns out!
Terry
 

83mulligan

Senior Chief Petty Officer
Joined
Feb 7, 2009
Messages
687
Re: Upon Further Review..#$%@..1973 Slickcraft Trans/String Overhaul

Hey its the non-exciting work that sets up the big progress days! Looking good, I feel your pain with grinding out bad layups, had to redo a few sections of stringer earlier this spring. Keep up the good work!

When I was doing little patches like that, I would wet out each layer individually, then set the next piece of glass on and wet it out. A lot easier than pushing resin thru it all.

Lets see how it turns out!
Terry

Terry, thanks for the encouragement and advice. I'm going to give it another go tonight, trying the one layer at a time approach.
 

83mulligan

Senior Chief Petty Officer
Joined
Feb 7, 2009
Messages
687
Re: Upon Further Review..#$%@..1973 Slickcraft Trans/String Overhaul

AAAAAAAAAAARRRRRRRRRRRRGGGGGGGGGHHHHHHHHH!!!!!!!!!!!!:mad::mad:

This corner repair is not going well. The upper corner of the hull is too wavy and irregular. I can't get eh Biax to lay down in there. Fix one @@!#$#$ arir bubble and two more appear. Roll it one way, it comes out of the corner. I'm struggling. I should probably not have picked the hardest area on the boat to start my fiberglassing career with. Man, it takes a lot of epoxy resin to wet that stuff out too! I wish i had gotten Biax without the mat, if they make that.

So, I mixed up some resin, cabosil and microballoons and started fairing it in all the low spots. I'm not sure what else to do.

I tried repairing the cut in the hull also. We'll see tomorrow how that turns out.
 

jcsercsa

Captain
Joined
May 21, 2007
Messages
3,401
Re: Upon Further Review..#$%@..1973 Slickcraft Trans/String Overhaul

Hay bud , try getting rid of the mat on the 1708 , try just the glass !! John
 

ondarvr

Supreme Mariner
Joined
Apr 6, 2005
Messages
11,527
Re: Upon Further Review..#$%@..1973 Slickcraft Trans/String Overhaul

While epoxy doesn't need the mat on 1708, the mat does make it easier to lay down and conform to the different shapes, so without it it would be even more difficult.

Either fill it or sand it down until the glass will take that shape.
 

83mulligan

Senior Chief Petty Officer
Joined
Feb 7, 2009
Messages
687
Re: Upon Further Review..#$%@..1973 Slickcraft Trans/String Overhaul

While epoxy doesn't need the mat on 1708, the mat does make it easier to lay down and conform to the different shapes, so without it it would be even more difficult.

Either fill it or sand it down until the glass will take that shape.

Ondarvr, is cabosil and microballoons good enough for that area of the boat. Say yes, cause its already done.;)

Also, it was 65 today. I was inside in the garage. Is that causing any problems?
 

ondarvr

Supreme Mariner
Joined
Apr 6, 2005
Messages
11,527
Re: Upon Further Review..#$%@..1973 Slickcraft Trans/String Overhaul

Its better to not use a filler under the glass, but sometimes its the only way to get it done.

You could also use small pieces of glass to fill the low spots, it would be stronger that way.
 

redfury

Commander
Joined
Jul 16, 2006
Messages
2,657
Re: Upon Further Review..#$%@..1973 Slickcraft Trans/String Overhaul

how well does the glass lay in there dry? You might want to try putting the glass in dry with some spray adhesive and conform it by hand into the corner. You can "relax" the glass a bit with a little tugging and pulling until it lays in the way you want. If it just won't conform dry, it won't wet either. You'll either need a different type of glass to use in there, or have to make a cut.
 

83mulligan

Senior Chief Petty Officer
Joined
Feb 7, 2009
Messages
687
Re: Upon Further Review..#$%@..1973 Slickcraft Trans/String Overhaul

how well does the glass lay in there dry? You might want to try putting the glass in dry with some spray adhesive and conform it by hand into the corner. You can "relax" the glass a bit with a little tugging and pulling until it lays in the way you want. If it just won't conform dry, it won't wet either. You'll either need a different type of glass to use in there, or have to make a cut.

Hey red. It's not so much the corner itself. Its the irregularities in it. The hull is kind of wavy there near the top and there are some deep spots. So, its not making the glass go into the corner its making it go into the corner and then adjust to the different planes and angles. I'm just not that good at this yet. I put a fillet of pb in the corner to fill all those voids. I'll see what happens the next go round.
 
Top