1978 River Ox Restoration Project

gatorfan6908

Petty Officer 2nd Class
Joined
May 17, 2010
Messages
149
Re: 1978 River Ox Restoration Project

This was my plan for glassing them in and I give major rep to WoG for giving out useful info like this! My Brother in law was asking me about the drainage yesterday and I think him and I had a disconnect... anyways, I have the weepholes, as shown in the pics above, and they all give ample places for water to run back down the stringer and then down inwards toward the keel stringer. From there, it will be a straight shot back to the bilge. I am assuming this should be adequate and allow for zero water standing throughout the hull underneath. Is there something I am missing though? He really threw me for a loop when he didn't understand what I was telling him and made me question my logic. I will be using cardboard cylinders to shape the foam at all of these points so the water can drain freely and not get stuck laying up on the foam somewhere.
 

jigngrub

Fleet Admiral
Joined
Mar 19, 2011
Messages
8,155
Re: 1978 River Ox Restoration Project

I also applaud Woodonglass' helpful "how to's" and detail sketches, very informative and if everyone paid attention to this stuff they wouldn't have the problems they sometimes from ignoring it.

Your below deck drainage sounds like a good plan.

How do you plan on pouring your foam? Through the decking via pour holes, or before the decking goes down?
 

chriscraft254

Commander
Joined
Jun 4, 2011
Messages
2,445
Re: 1978 River Ox Restoration Project

Ok, well, I will keep you thinking. Don't mind the bad art,lol You do have a room for a custom fuel tank under deck. (red) I would run one pipe under the deck to the side using 45 degree bends, the teleflex will have no problems bending in 45s. (White) You can run your electrical in the same pipe or run seperate conduit, up to you. I would mount batteries, assuming you might have two under the console to keep them dry and close to the electronics etc. (green) Then you can mount a bep cluster and your fuse boxes on the wall of the center console. (yellow)

Yes, The under deck fuel tank would cost some money, but well worth it I think.

4E77BD95-DCFB-430E-A320-069229799444-10375-0000055085AA9AFD-1.jpg
 

chriscraft254

Commander
Joined
Jun 4, 2011
Messages
2,445
Re: 1978 River Ox Restoration Project

Also, if you look at the pictures of the original layout, you had whats called a sump box, I am assuming that it originally dumped all the water from the deck into this sump box. This is a poor design and you have the chance to change it since you are doing a full restore. The sump/bilge should still be located in the stern where you plan to put it but, rain water should be self bailed out the stern through the transom via drains. This is not a self bailing deck if it goes to a sump box to be pumped out.

Simply put, the bilge pump should be there but shouldn't need to be used unless for some odd reason you get water in the bilge from leaks or from an emergency. The deck water should self bail out the back of the boat, not to a hole in the boat that collects it, then pumps it out. Plus it will allow you more deck space all the way to the stern which is important in a 17 ft boat.

You can add side boxes for storage. Exit the teleflex through the one side to keep it clean.(purple) Add a truhull fitting up high for future electronics cables for transducers. (Yellow) Has to be a big one to get the ends through. Access hatch to the bilge pump should be air tight. (Green) They sell them online.

ACAABCFE-C891-4888-AAEB-C91AD10C4195-10375-00000550764F7999-1.jpg
 

gatorfan6908

Petty Officer 2nd Class
Joined
May 17, 2010
Messages
149
Re: 1978 River Ox Restoration Project

I really like your sketch... and in a perfect world, this would be my ideal config. Here are my only concerns:
1. I don't like the idea of cutting through the stringers to run the pipe. At this point I plan on running it straight back to the bilge area and up from there. Also, I would definitely have two separate runs, with electrical in it's own individual pipe. I will tell you this though... when I was tearing down the boat, the PVC runs were identical to your sketch. It just seems crazy to me to build up all of the strength for the stringers only to cut it out for PVC... (Am I crazy?)
2. #1 is not an option with the fuel tank. I would LOVE to relocate the fuel tank under the deck. At this point, I don't feel I have the resources to do this though. I understand that estimates are given as-is and no guarantees, but what would a tank fab cost for a project like this? I would assume 12 gallons to be enough, but I honestly do not feel that given the space I have available that this would work.
3. This would work especially nicely with the relocation of the battery to underneath the console. It would definitely make things easier and a whole lot nicer in terms of deck organization. Please guide me to the sane way of finishing out this project. All ideas are up for grabs, and I am only limited by the thickness of my wallet. Thanks for the ideas and sketch as well!
 

gatorfan6908

Petty Officer 2nd Class
Joined
May 17, 2010
Messages
149
Re: 1978 River Ox Restoration Project

Are you suggesting that I should completely cover the bilge area at the stern? I'm not calling you crazy, I promise! I've just never imagined doing this boat that way. I will have the bilge pump/livewell pump located there and If something were to fail, how would I go about swapping it? I am definitely open to more space, I just want to fully understand what you are saying. More details please!
 

gatorfan6908

Petty Officer 2nd Class
Joined
May 17, 2010
Messages
149
Re: 1978 River Ox Restoration Project

I think I am just unfamiliar with the whole self-bailing deck layout. Wouldn't the drain system just put the water down to the bilge anyways? I have a drain plug at the bottom of the stern to allow the draining. The bilge pump is only for emergencies.
 

chriscraft254

Commander
Joined
Jun 4, 2011
Messages
2,445
Re: 1978 River Ox Restoration Project

I really like your sketch... and in a perfect world, this would be my ideal config. Here are my only concerns:
1. I don't like the idea of cutting through the stringers to run the pipe. At this point I plan on running it straight back to the bilge area and up from there. Also, I would definitely have two separate runs, with electrical in it's own individual pipe. I will tell you this though... when I was tearing down the boat, the PVC runs were identical to your sketch. It just seems crazy to me to build up all of the strength for the stringers only to cut it out for PVC... (Am I crazy?)
2. #1 is not an option with the fuel tank. I would LOVE to relocate the fuel tank under the deck. At this point, I don't feel I have the resources to do this though. I understand that estimates are given as-is and no guarantees, but what would a tank fab cost for a project like this? I would assume 12 gallons to be enough, but I honestly do not feel that given the space I have available that this would work.
3. This would work especially nicely with the relocation of the battery to underneath the console. It would definitely make things easier and a whole lot nicer in terms of deck organization. Please guide me to the sane way of finishing out this project. All ideas are up for grabs, and I am only limited by the thickness of my wallet. Thanks for the ideas and sketch as well!

I get the wallet thing, has taken me three years, slowly but surely I have gotten my boat about 80 percent of the way.

There are all different sized tanks on the market. And yes I think a 12 to 16 gallon tank would do nicely on the 17. If you had one fabricated, I am guessing it would be around the $350.00 for a tank that size. But I think you will find one sold that will fit instead of custom.

As far as cutting the stringers, as long as the pvc is glassed in to the stringers it will make it all one piece, one structure when done properly, so you are not really cutting out strength.

The batteries and electronics up under the console protects them and keeps it all nice and clean. It will cost you more in the length of battery cables to the motor. But I promise you, you will like it much better if you can get in your console. ;)

The drainage will all depend on the height of the deck also. If the drains are run out the stern, the deck has to be above the water line. This is why I mentioned shimming. Some people during restos actually raise the stringers to allow for more drainage height. Smaller boats sometimes are made witht he sump box because they want more freeboard, they accomplish this by lowering the deck not allowing it to self bail. I do not like the design.

At the end of the day, it is really all up to you, I was just giving you some ideas. I understand, time, money and your wants and needs are all factors in how you choose to finish this out.
 

jigngrub

Fleet Admiral
Joined
Mar 19, 2011
Messages
8,155
Re: 1978 River Ox Restoration Project

1. I don't like the idea of cutting through the stringers to run the pipe.

It just seems crazy to me to build up all of the strength for the stringers only to cut it out for PVC... (Am I crazy?)


Fabricating and glassing in nice strong stringers to support your hull and deck only to cut chunks out of them is a poor design to me.

Anything installed below deck in a fiberglass boat needs to have an access hatch for complete removal of the object in case of failure... access hatches are potential future water intrusion points.

I've seen several people on this site have to chop a hole in their fiberglassed deck to remove a failed fuel tank... not something I'd want to do to my restored fiberglass boat.
 

chriscraft254

Commander
Joined
Jun 4, 2011
Messages
2,445
Re: 1978 River Ox Restoration Project

Are you suggesting that I should completely cover the bilge area at the stern? I'm not calling you crazy, I promise! I've just never imagined doing this boat that way. I will have the bilge pump/livewell pump located there and If something were to fail, how would I go about swapping it? I am definitely open to more space, I just want to fully understand what you are saying. More details please!

The bilge area would have an access hole with an access hatch. You can purchase these from many different manufacturers. A self bailing deck is one that from bow to stern will drain all the rain water or splash water out the stern via gravity. (down hill) This boat had a splashwell in it before but looked like it was hacked up by someone. The splash well was there for motor splash basically and nothing else. It looks like it your pics it also just had a hole draining to the bilge.

A self bailing boat provides you with safety, cleanliness and easy cleaning. Thing about what will happen if you have a ton of water that empties into the bilge via a rain storm or whatever and the pump stops working. You can sink the boat. The self bailing decks allow the water to escape out of the stern through the transom. The drain at the lowest part of the boat ,at the hull is nothing more than a drain to pull when the boat is dry docked or on the trailer.
 

chriscraft254

Commander
Joined
Jun 4, 2011
Messages
2,445
Re: 1978 River Ox Restoration Project

Fabricating and glassing in nice strong stringers to support your hull and deck only to cut chunks out of them is a poor design to me.

Anything installed below deck in a fiberglass boat needs to have an access hatch for complete removal of the object in case of failure... access hatches are potential future water intrusion points.

I've seen several people on this site have to chop a hole in their fiberglassed deck to remove a failed fuel tank... not something I'd want to do to my restored fiberglass boat.

Well I have to say, your wrong.:) Its not a poor design. Think of the pipe as being nothing more than another stringer ran on an angle or a bulkhead. Once bedded into the stringers and glassed in, they are then part of the stringer system. Once its all bedded and glassed it is all one piece. The pvc is actually stronger than the wood itself untill it is all bonded together with glass.

Yup, you are right, you have to buy the right hatches and also seal the edges of the deck opening before installing the hatch/access panel so as not to have any issues down the road. A little water getting into the hull is much better than directing all the water to inside the hull.

Fuel tanks that fail are usually 20 to 30 years old and they fail or corrode because they are not properly sealed. The op has the advantage because he is not a manufacturer trying to make profits. He can install a tank below deck and not have to replace it for probably 50 years if done right. By the way, you can get tanks that are not metal.
 

gatorfan6908

Petty Officer 2nd Class
Joined
May 17, 2010
Messages
149
Re: 1978 River Ox Restoration Project

I see where you are coming from for the self bailing deck, but I don't think I will choose that design for this hull. As of now I already have my stringers cut to the deck height and don't want to add some "fix" to get the needed height to satisfy the self-bailing design. I also don't believe the self-bailing design will work since the height will only give a ankle's worth of height for you to stand on without tripping over the sides. I also have a storage compartment in the front portion of the hull which I will be keeping. I truly appreciate your input and trust me, I have taken all of your ideas under consideration. Any other ideas would be greatly appreciated!
 

chriscraft254

Commander
Joined
Jun 4, 2011
Messages
2,445
Re: 1978 River Ox Restoration Project

I see where you are coming from for the self bailing deck, but I don't think I will choose that design for this hull. As of now I already have my stringers cut to the deck height and don't want to add some "fix" to get the needed height to satisfy the self-bailing design. I also don't believe the self-bailing design will work since the height will only give a ankle's worth of height for you to stand on without tripping over the sides. I also have a storage compartment in the front portion of the hull which I will be keeping. I truly appreciate your input and trust me, I have taken all of your ideas under consideration. Any other ideas would be greatly appreciated!

The storage up front would have nothing to do with the self bailing. The drain that ran from the bow to the stern was to evacuate any water that might have gotten in there from the wooden/teak louvered hatch. I have a cabin in half my current boat, but it is still a self bailing boat.

I didn't say you would have to raise your floor. I said some people do. Your boat is already self bailing but it self bails to a sump box instead of out the stern.

Again, relying on a sump box with bilge pump to evacuate water from the entire boat only makes since if it has to be that way. the only way to tell really is when you put it in the water, see where the stern deck elevation is compared to the waterline. If you do this without the motor, add buckets of water in the stern to apply the same amount of weight the motor would add. If the deck is above the waterline at the stern, it can self bail through the transom. If installed, the scupper drains would have a flap to not allow water to reenter the boat. They let water out, but not back in.

If you want to check out many projects similar to yours, I would say classicmako.com is a good place to look. You will find 17 and 20 foot makos that are very similar in design to your center console that have had full restores there. The makos are all set up the way I have described. I have had two makos, and one Grady White, they were all center consoles. The smaller the boat, the more space needed inside of it imo, thats the only reason I was putting my .02 in to begin with.

By the way, I really am just giving you a better plan as I see it, but if you decide not to go that route, its no sweat off my back. I was just trying to help with the knowledge I have of center consoles and offshore boats.
 

gatorfan6908

Petty Officer 2nd Class
Joined
May 17, 2010
Messages
149
Re: 1978 River Ox Restoration Project

Ok. Thanks for the full description. I understand where you are coming from now and can visualize it better. That actually isn’t a very bad idea at all… but as you said, this is something I would have to test w/the water line to determine whether or not it would work. With the original build, I know in reverse, light waves would splash up over the bilge, even more in rougher conditions. With this size of boat though, do you think it is worth the extra holes in the transom? I believe just the bilge in the sump box would be sufficient. But then again, that is all I have ever known, and don’t see the true benefit of the self-bailing deck other than rainwater runoff, etc. Feel free to give me the light-bulb realization if you want… I’m open for suggestions. I hope I didn’t make you feel as though your suggestions were ill-greeted. I didn’t mean to come off that way at all. I appreciate all of the suggestions from everyone, especially ones which are for improvements to the current build. Thanks again, and I will look into the self-bailing design and see if it may be a good fit. How much do those hatches typically run? Just ball-park will suffice. Thanks again!
 

chriscraft254

Commander
Joined
Jun 4, 2011
Messages
2,445
Re: 1978 River Ox Restoration Project

Ok man, I have gone back and looked at your pics closer. This boat originally had a splash well box. The red circle shows where the drain was on the port side of that splah well. There may also have been another one on the starboard side. Don't know because its not shown. But basically that is there to keep water from getting into the boat if a wave or motor splash enters the stern. The water then simply drains back out throught he transom.

Now I said earlier, the only reason there is a bilge box in any boat that the deck drains to is if it has to be there. It depends on the height of the deck itsself in relation to how the stern of the boat sits in the water. This again is why some raise there decks to get rid of the sump box. The gunwales on your boat are already pretty short so that may not be an option so you may have to keep the sump box. It sucks but it is what it is. If thats the case, you will definately want to install another splash well with adrain exit out the stern to help in the case of water over the stern.

Do you have a full shot of the stern before it was worked on?

The other bad thing about the set-up before is the fish well was plumbed into the sump box. This can cause some issues because the bilge pumps are not like macerator pumps, they do not grind up scales and fish guts etc. The fish well should drain to a inline macerator which is plumbed to a thruhull fitting to the outside of the hull. These usually discharge out the side of the boat.

100_2765-1.jpg
 

ahmincha

Lieutenant Commander
Joined
Jul 21, 2012
Messages
1,512
Re: 1978 River Ox Restoration Project

Not sure if this help out at all but my fuel is under deck it sits under the center console with a hatch that is protected by console. And on my well craft v 17 tank sits on deck covered by console
 

gatorfan6908

Petty Officer 2nd Class
Joined
May 17, 2010
Messages
149
Re: 1978 River Ox Restoration Project

Well that actually makes a lot of sense. I have wondered what that was there for the entire time... So I had not planned on putting anything else there, since it seemed more of a hassle than anything. But that was back when I had handfuls of rotted wood washing back into the bilge I had to reach down and pull out. I have really considered your build for the self bailing deck, but I looked at the exterior gel coat today and could somewhat see the regular waterline mark. My best guess is that the deck will be below the waterline, but then again that was back when the foam was fully waterlogged and adding on the extra pounds. I went to test float it today and then remembered that I have a hole in e hull where the livewell pump was located, so that option was a no go. I'm not sure at this time how I will be able to judge the waterline along with the deck height. I'm thinking that I wish I would have known about this option about a month or two ago and I might have done something different. I also measured the space in between stringers tonight. It's looking like a 9"Wx7"H and whatever length I wanted. I couldn't find any prefabbed, so it would be a custom job. I really don't have the money for that kind of job and don't think I have the motivation to hit the drawing boards again... At least for something that in depth.
 

gatorfan6908

Petty Officer 2nd Class
Joined
May 17, 2010
Messages
149
Re: 1978 River Ox Restoration Project

So... any recommendations for a classic steering wheel? Found some nice ones on eBay last night and I am thinking about snatching it up. Stainless spokes with mahogany grip... Looks really sharp!
 

gatorfan6908

Petty Officer 2nd Class
Joined
May 17, 2010
Messages
149
Re: 1978 River Ox Restoration Project

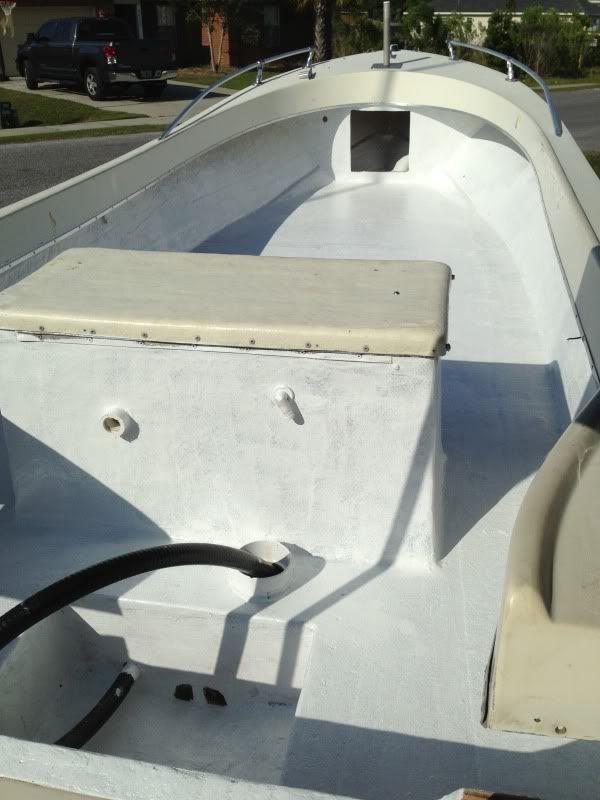
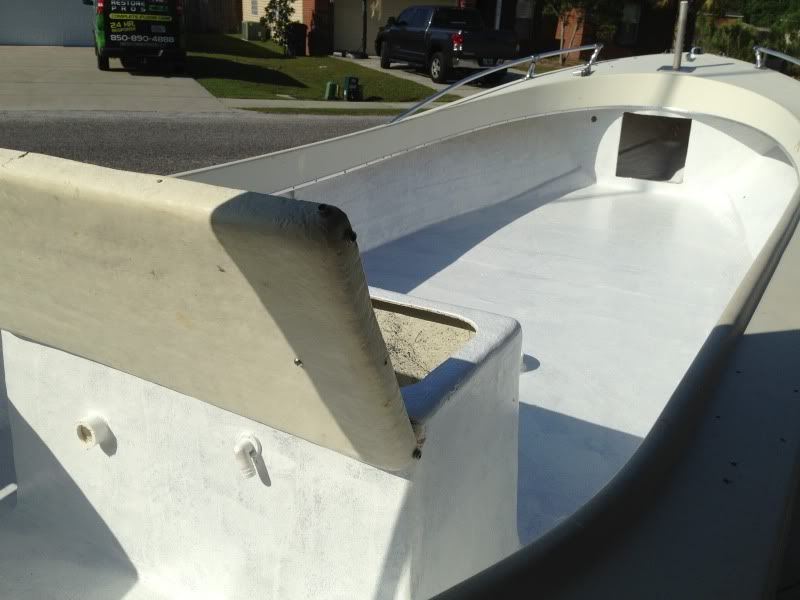
Alright guys... just a quick update with a few pictures.


gatorfan6908

Petty Officer 2nd Class
Joined
May 17, 2010
Messages
149
Re: 1978 River Ox Restoration Project

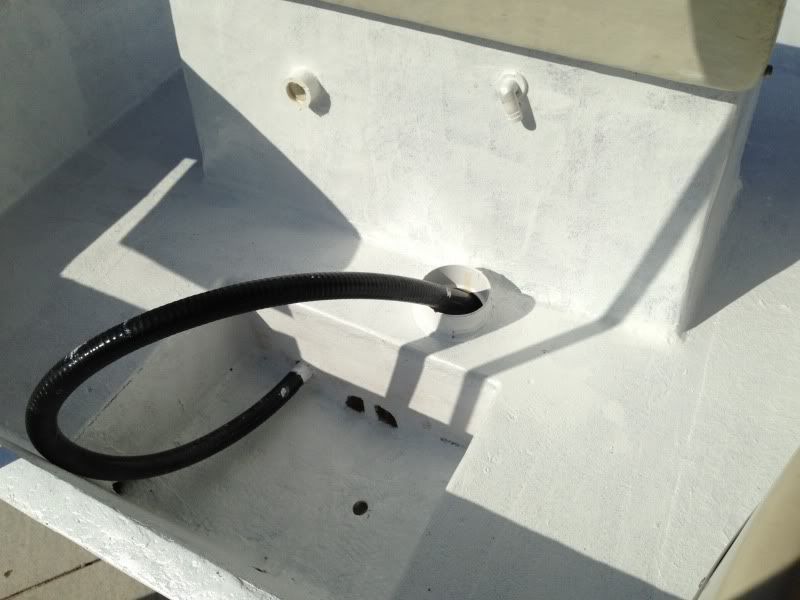
Ok.. first of all, don't mind the hose. It is not cut to length yet and I just had it layed over where it wouldn't get on the gel coat. That is where the live well drains out through the transom. If you are looking at the pipe in the floor, that is where all of my wiring/steering cables will go through to reach the stern. The other end comes up where the console will sit on the deck. I have bought some rubber pieces made for sealing pipes on a roof to seal up all of it after it is done.
As you can tell... it was a bad choice on my part for the coloring of the gel coat. I am quite bad when it comes to colors, and wish it wasn't such a bright-white. I would love to know if there is a way to add some pigment to get it back down a little to a more neutral color... any info is appreciated.
One other thing: I bought a 5-gal bucket of this stuff, so I will have A LOT left over, as it only took 2 quarts to do one coat on the deck. I have been thinking of other uses for it, and one thing I would like to do is to renew the center console. It's color matches the exterior, and it will stick out like a sore thumb when it is put into the deck. Is there a process for repainting the console with the gel coat I have left over? I've looked up a lot in these forums and other places, but haven't yet found a definitive process. There is a learning curve to this that I am trying to stay ahead of... Also, is this gel coat something that I could redo the bottom of the hull with to cover gouges, scrapes, and chips with also? It is quite drastic on the bottom and I would love to give it a new look. (This is all dependent upon the fact that I can change the pigment or not)

Hope you guys enjoy the pics!!!
 
Top