"Master Bait'R" Restore Thread

GT1000000

Rear Admiral
Joined
Jul 13, 2011
Messages
4,916
Re: How would you recommend starting stringer Replacement

Re: How would you recommend starting stringer Replacement

Yep, exactly what JC said...sorry I got called to dinner, you know what they say, you can call me late for a lot of things, but never for dinner...:)

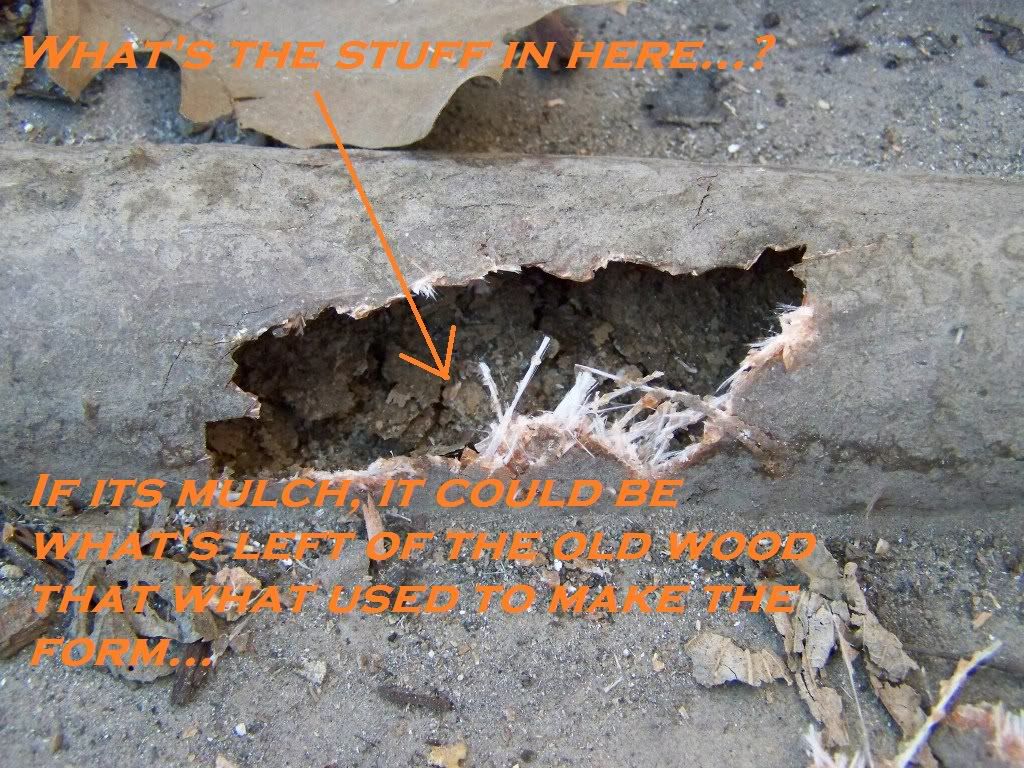
You could also drill a couple of exploratory holes in them and see if they have any wood...mine did, but they were sort of used as stiffeners along the strakes and there were only two...on the outer most strakes...

I think JC is right on the money with them either being made outside the mold, then added...or possibly shaped into the hull out of half-tubes of cardboard...

I am not sure if I will be replacing the ones I took out, since I will be re-designing my cap and adding more of a bulkhead type structure...
 
Joined
Feb 17, 2012
Messages
2,906
Re: How would you recommend starting stringer Replacement

Re: How would you recommend starting stringer Replacement

mine were wood added after the hull was formed i looked at the ones that come pre-made with the foam core but in places the inner 2 stringers go on top of them so i made the replacement out of wood and pb-ed the piece down and added weight to hold it during the time it cured then glassed over it. the ones in the middle im not sure i would be concerned about if the glass is good
 

sevanseriesta

Petty Officer 1st Class
Joined
Jul 12, 2012
Messages
303
Re: How would you recommend starting stringer Replacement

Re: How would you recommend starting stringer Replacement

Ok so I "Explored" the ribs in the floor. There is NOTHING inside them, they are all empty. Does this mean that I can set the stringers then put in these ribs. Also would I be able to use pvc pipe inside to when I redo them? I spent most of my morning taking measurements. It cause a lot of problems. The deck height is all over the place. I mean one spot was 14" from the the side of the hull to 14 3/4". So I am confused How or what height I should make the height cause it is different across the whole area. This weekend starts demo.. Im kinda excited
 

sevanseriesta

Petty Officer 1st Class
Joined
Jul 12, 2012
Messages
303
Re: How would you recommend starting stringer Replacement

Re: How would you recommend starting stringer Replacement

How do I change My thread name.
 
Joined
Feb 17, 2012
Messages
2,906
Re: How would you recommend starting stringer Replacement

Re: How would you recommend starting stringer Replacement

i think you edit the first post then go advanced and change the title. not 100% sure as ive never done it myself
 
Joined
Feb 17, 2012
Messages
2,906
Re: How would you recommend starting stringer Replacement

Re: How would you recommend starting stringer Replacement

the deck height is set by the stringers so the measurement is not as important as the stringer measurement. proberly the easy way is to put a piece of wood or metal thats straight across the boat then mark the sides of the boat about every 4" from back to front then put a letter near each mark then measure down from the straight edge. you may find the floor has a very small dip towards the center for draining water towards the biege area. as the runners are hollow there are lots of options my favorite is the ones that are premade with foam in them but cardboard tubing will work. you are kinda lucky as mine were wood and a real pain to work around yours look like they can be put in last which is alot easier.
 

jbcurt00

Moderator
Staff member
Joined
Oct 25, 2011
Messages
25,109
Re: How would you recommend starting stringer Replacement

Re: How would you recommend starting stringer Replacement

How do I change My thread name.

i think you edit the first post then go advanced and change the title. not 100% sure as ive never done it myself

Go to your initial 1st post in your thread
Click bottom right 'Edit post' button
Click bottom right 'Go Advanced' button
When the advanced post window opens, there should be 2 long txt boxes in the top left corner of the post window.
1 should be: reason for edit
The other should be: title

It should have your current title in that title box. Just change it to whatever you want it to be ;)

BTW: The 'official' title change is only available for a certain # of posts to a thread, once you reach that #, title change only appears as a portion of each person's post. It will still be referenced in the Resto forum list as the current title, if the post count has been reach.

A MOD maybe able to change it for you after that post count is reached.
 

sevanseriesta

Petty Officer 1st Class
Joined
Jul 12, 2012
Messages
303
Re: How would you recommend starting stringer Replacement

Re: How would you recommend starting stringer Replacement

Thanks, I think I got it right. I changed it to the name of the boat, so people can recognize it. I started working on the trailer today so I can get rid of it. I needed to weld on the back support which is done now. I got the bunks off so I can get those replaced. I needed to replace the emergency cable, i finaly figured out how to get that off. That should be interesting to get back into the right place. I think the cylinder is good but needs new fluid, and the lines will need to be bled. Not quite sure how to do that on a trailer so I go some reading to do.
 

jbcurt00

Moderator
Staff member
Joined
Oct 25, 2011
Messages
25,109
Re: How would you recommend starting stringer Replacement

Re: How would you recommend starting stringer Replacement

Yeah, I'd suggest you change it again, else it may get changed for you, to something more appropriate for a public forum.... IMO

Changing it for you maybe the least of the moderators actions
 

sevanseriesta

Petty Officer 1st Class
Joined
Jul 12, 2012
Messages
303
Re: "Master Bait'R" Restore Thread

I thought it was the perfect name for my fishing boat. I'll change it when I get home then
 

sevanseriesta

Petty Officer 1st Class
Joined
Jul 12, 2012
Messages
303
Re: "Master Bait'R" Restore Thread

OK, So this weekend I did not get anything accomplished on the Boat everything was with the trailer. I was able to get the back section welded back on, all of the lights off, repaired the brake system, Straightend the fenders. In two weeks I will be taking the trailer to get it blasted, then paint it so I can sell it. The trailer is way to big for my boat so the funds will go to finishing off the boat and buying a different trailer.

I am also trying to decide when the best time to paint the outside will be. Should I paint it before I start putting it back together so it is lighter to flip over or does it need the structure? And is there any type of specific paint brand I should use?
 

sevanseriesta

Petty Officer 1st Class
Joined
Jul 12, 2012
Messages
303
Re: "Master Bait'R" Restore Thread

Hmmmm, I changed the name of the thread and its back to the old one. I would assume that for what ever reason the site was down they restored from a cached version or something.

Anyways I got some work done yesterday. I got the foam boxes cut out and the 2 pieces from the splashwell off finally. I also braced the sides a little bit to help with flexing let me know if you think this will work. I put 2x4's and across the boat and screwed some blocks to each side.I have 3 of them like this near the transom, in the middle and upfront, I have pics but I'm at work so I will post them tonight.

I am ready to start tearing everything apart, my question is that I would like to see how most of the wood pieces look like underneath the fiberglass what is the best route to take to accomplish this?
 
Joined
Feb 17, 2012
Messages
2,906
Re: "Master Bait'R" Restore Thread

if you are ready to make dust then grind around the seams of the wood just deep enoght to cut the fiberglass as its proberly only glassed on the top side then start to tear it off. if you can not make dust then use a chissel and work around seams angle the chissel towards the floor when cutting so you dont tear into the hull and it takes time but should cut real easy. the floor is proberly screwed to the stringers if the stringers are wet then the screws pull out real easy if the stringers are solid then the floor might have to be cut up and removed in small pieces. pry bar and a claw hammer are good tools to help free the floor off
 

sevanseriesta

Petty Officer 1st Class
Joined
Jul 12, 2012
Messages
303
Re: "Master Bait'R" Restore Thread

Dust is not a problem, for me I live in a neigborhood where rednecks are trying to be urban dwellers and they feel right at home with tearing apart a boat in the culdesack. LOL

I will try to cut the edges and see if I can peel it off. Also in some of the pictures that I'm going to post the FG looks black, is this just painted or is it a different type of Glass. It appears to be really thick. I will start tearing out fiberglass today and all weekend. Also The current floor ply looks pretty thin like 1/4 inch. Should I use the same thickness or should I use a thicker board?

Here are the corners that I was fighting with to get off, took 2 hours just to get these 2 pieces off
102_1636.jpg


102_1661.jpg

The White stuff that is in the corner, can I expect that to be PL or is this resin that is injected? Cause this is the stuff that was causing all the problems getting everything off. And how crutial is this stuff going to be when putting the boat back together, does it need to be replaced?
102_1660.jpg

This is where the foam blocks were removed from. They were also fiberglassed over and around the bottom, however the bottoms are wet, barely. They were not very heavy so I dont think they are completly soaked. But the only way that water would have been able to get to them was for the boat to go under, dont thing that happened, or water was coming in from where the cap connects to the hull and seeped down the side. Hoever that is still pretty deep in the water.
102_1662.jpg


Here is where I have started tearing up the floor, as you can see it looks like the ply is pretty thin.
102_1650.jpg


And how is the floor put together, is it mat, woven, mat?
102_1669.jpg
 

sevanseriesta

Petty Officer 1st Class
Joined
Jul 12, 2012
Messages
303
Re: "Master Bait'R" Restore Thread

Here are the ribs in the middle I put some holes in them to see what was in there foam, or wood. Came up to nothing in there.

102_1637.jpg


I was thinking about cutting PVC pipe in half to redo these ribs, will that work better or should I try to do it the same way they did?

The transom, Is this 2 pieces of 3/4 ply? It looks like a 2X12 but I cant tell till I get some of the glass off.
102_1665.jpg

102_1664.jpg

102_1660.jpg

Also in this you can see the black that I was talking about. Is this just a paid or something that was used to cover the glass work.
102_1661.jpg
 
Joined
Feb 17, 2012
Messages
2,906
Re: "Master Bait'R" Restore Thread

the black oil based paint is paint to protect the fiberglass and it helps to cover any sins. fiberglass is transparent when applied as you will find out.
the floor should be 1/2 ply
the material that looks woven is woven roven and is cheaper than bi-axle but is a pain to wet out and you will proberly find you can rip it off the hull if it was anything like mine.
the floor was proberly coated in csm then when assembled then woven was just resined in over all the joints and up onto the sides
look for premade ribs with foam center that might be the easiest way to replace them depending on cost

the transom is proberly 2 pieces of 3/4 with a piece of fiberglass inbetween you can go this route or use a premium adhesive to glue the 2 pieces together.
the white stuff is a type of pb. mine was missing the 1/4 inch chop so it broke like glass when i broke it out


looking good so far :)
 
Joined
Feb 17, 2012
Messages
2,906
Re: "Master Bait'R" Restore Thread

alot of people wonder why they glued the top to the bottom and the simple ans is they had to fill any gaps because the motor bolts go throught both parts and if there was a gap then the bolts would break the glass. its nothing to worry about as in you dont need to measure how thick it is etc you will use it when needed to close gaps or to act as a glue/filler.

side note: on some boats there can be places (on the floor) where theres a odd build up of pb that is used to direct water or to level a area close to the hull for the cap to rest on these may have to be re-installed either during the build or when the cap is applied. the reason i mention this is so you can take pictures and remeber not to paint the area before you apply the cap or you will have to grind the paint back off that area to add the pb
 

GT1000000

Rear Admiral
Joined
Jul 13, 2011
Messages
4,916
Re: How would you recommend starting stringer Replacement

Re: How would you recommend starting stringer Replacement

SS1.jpg


You could use almost any thing you want to make a form for the glass to take that shape...cardboard [cut in half length-wise], foam [covered with aluminum foil to keep it from disintegrating, or PVC tubing cut in half length-wise...

It is the glass that will give you the strength, not the form...

SS2.jpg


If it looks like PB, then it probably is...if it looks like cement, it is probably Sea-Cast...it could also just be floatation foam...

SS3.jpg


Same as above...


SS4.jpg


SS5.jpg


Painting over raw fiberglass is just another layer of protection from water intrusion, but it is the least effective...a much better method is to gel coat it...

Your deck may have been 1/2" OR 3/4" thick...either will work, but obviously, over building, to a point is a good thing...you can go back with what was originally there or take it to the next size up, just don't go thinner...

Hope this helps...
 
Joined
Feb 17, 2012
Messages
2,906
Re: How would you recommend starting stringer Replacement

Re: How would you recommend starting stringer Replacement

+1 to gel coat. i must admit i like gel coat alot and if i could go back and redo mine then i would have gel coated the rear battery compartment it would have looked so much better than black paint.
my other regret is that i didnt get any sea-cast or nida-pour as with most bass boats with a fancy transom/back the area where trim tabs would be screwed in is normally a void that they filled with foam i wish i had noticed the free trial (1 gallon) that 3m was offering as that could have been poured in the wing area behind the transom filling the gap between the transom and the skin. i know your design is diffrent but trim tab mounting points are something to think about when rebuilding just in case you ever decied you want them later
 

sevanseriesta

Petty Officer 1st Class
Joined
Jul 12, 2012
Messages
303
Re: How would you recommend starting stringer Replacement

Re: How would you recommend starting stringer Replacement

GT1M the first picture, inside I believe is just the material that I knocked in, I think I remember looking in there and that was the only spot there was any material. But I will double check, not that it will matter much as they will be redone anyways.

second pic-I will wipe it down this weekend and see what it turns out to be. I am not really sure which one it is.

Third Pic- that stuff is fiberglass and wood dust that has not been cleaned up yet

Fourth pic- same stuff that is in pic 2, what ever it is is very tough.

5th pic- is why every car I own is black, nothing looks better then a clean polished black car, my wife drives white though. LOL

I think I will go with 3/4 just for the protection.Since my gunwales come all the way down to the floor can I leave the stringers the same height they are now or should I lower them. I was just going to glass the gunwhales to the floor like it was previously was so does it matter. And my theory here is that the sides just slip down beside the floor if that makes sense.

Glenn- what do you mean about Trim tabs, where exactly are you talking about? I can tell you 2 things that I want to do is, The back tie down loops or what ever there called I would like to reinforce that area because I am not sure how someone has not already pulled these straight through the fiberglass, the are only nuts right before the fiberglass. The second is all the way around the top of the hull the wood piece that the screws go through it looks crappy and just not very strong. I think I know where your talking about, when you say pouring the foam, is it in pic 3 post 94. There is currently foam poured in there.
 
Top